
How Users Experience Account Linking
Account linking connects a user's Amazon identity with their identity in your system. This topic describes the account linking experience from the user's perspective, including the common flow that applies to all account linking methods and the variations based on how users start the process.
For an explanation of account linking concepts, see Account Linking Concepts.
How users know that account linking is available
Users discover account linking in different ways depending on the Alexa experience.
- Smart home add-ons and video skills – The add-on detail page in the Alexa app displays an Enable to Use button with an Account linking required label. The user can't use the add-on without completing account linking.
- Custom skills – If account linking is optional, the skill detail page displays a separate Link Account button. The user can enable and use the skill without linking, but some functionality might be unavailable.
- Cards and push notifications – If a user interacts with a add-on or skill that requires account linking and hasn't linked their account, the Alexa app displays a card or push notification prompting the user to link their account.
Factors that influence the account linking experience
The account linking experience varies based on the following factors:
- Where the user starts the account linking process – The starting point can be the Alexa app, your service's app, the screen of an Alexa-enabled device with a screen, or by voice.
- The account linking method you chose – Whether you use standard, app-to-app, or Login with Amazon (LWA) account linking. For a description of each method, see Add Account Linking for Alexa.
- Your implementation – Whether account linking is required or optional affects the flow.
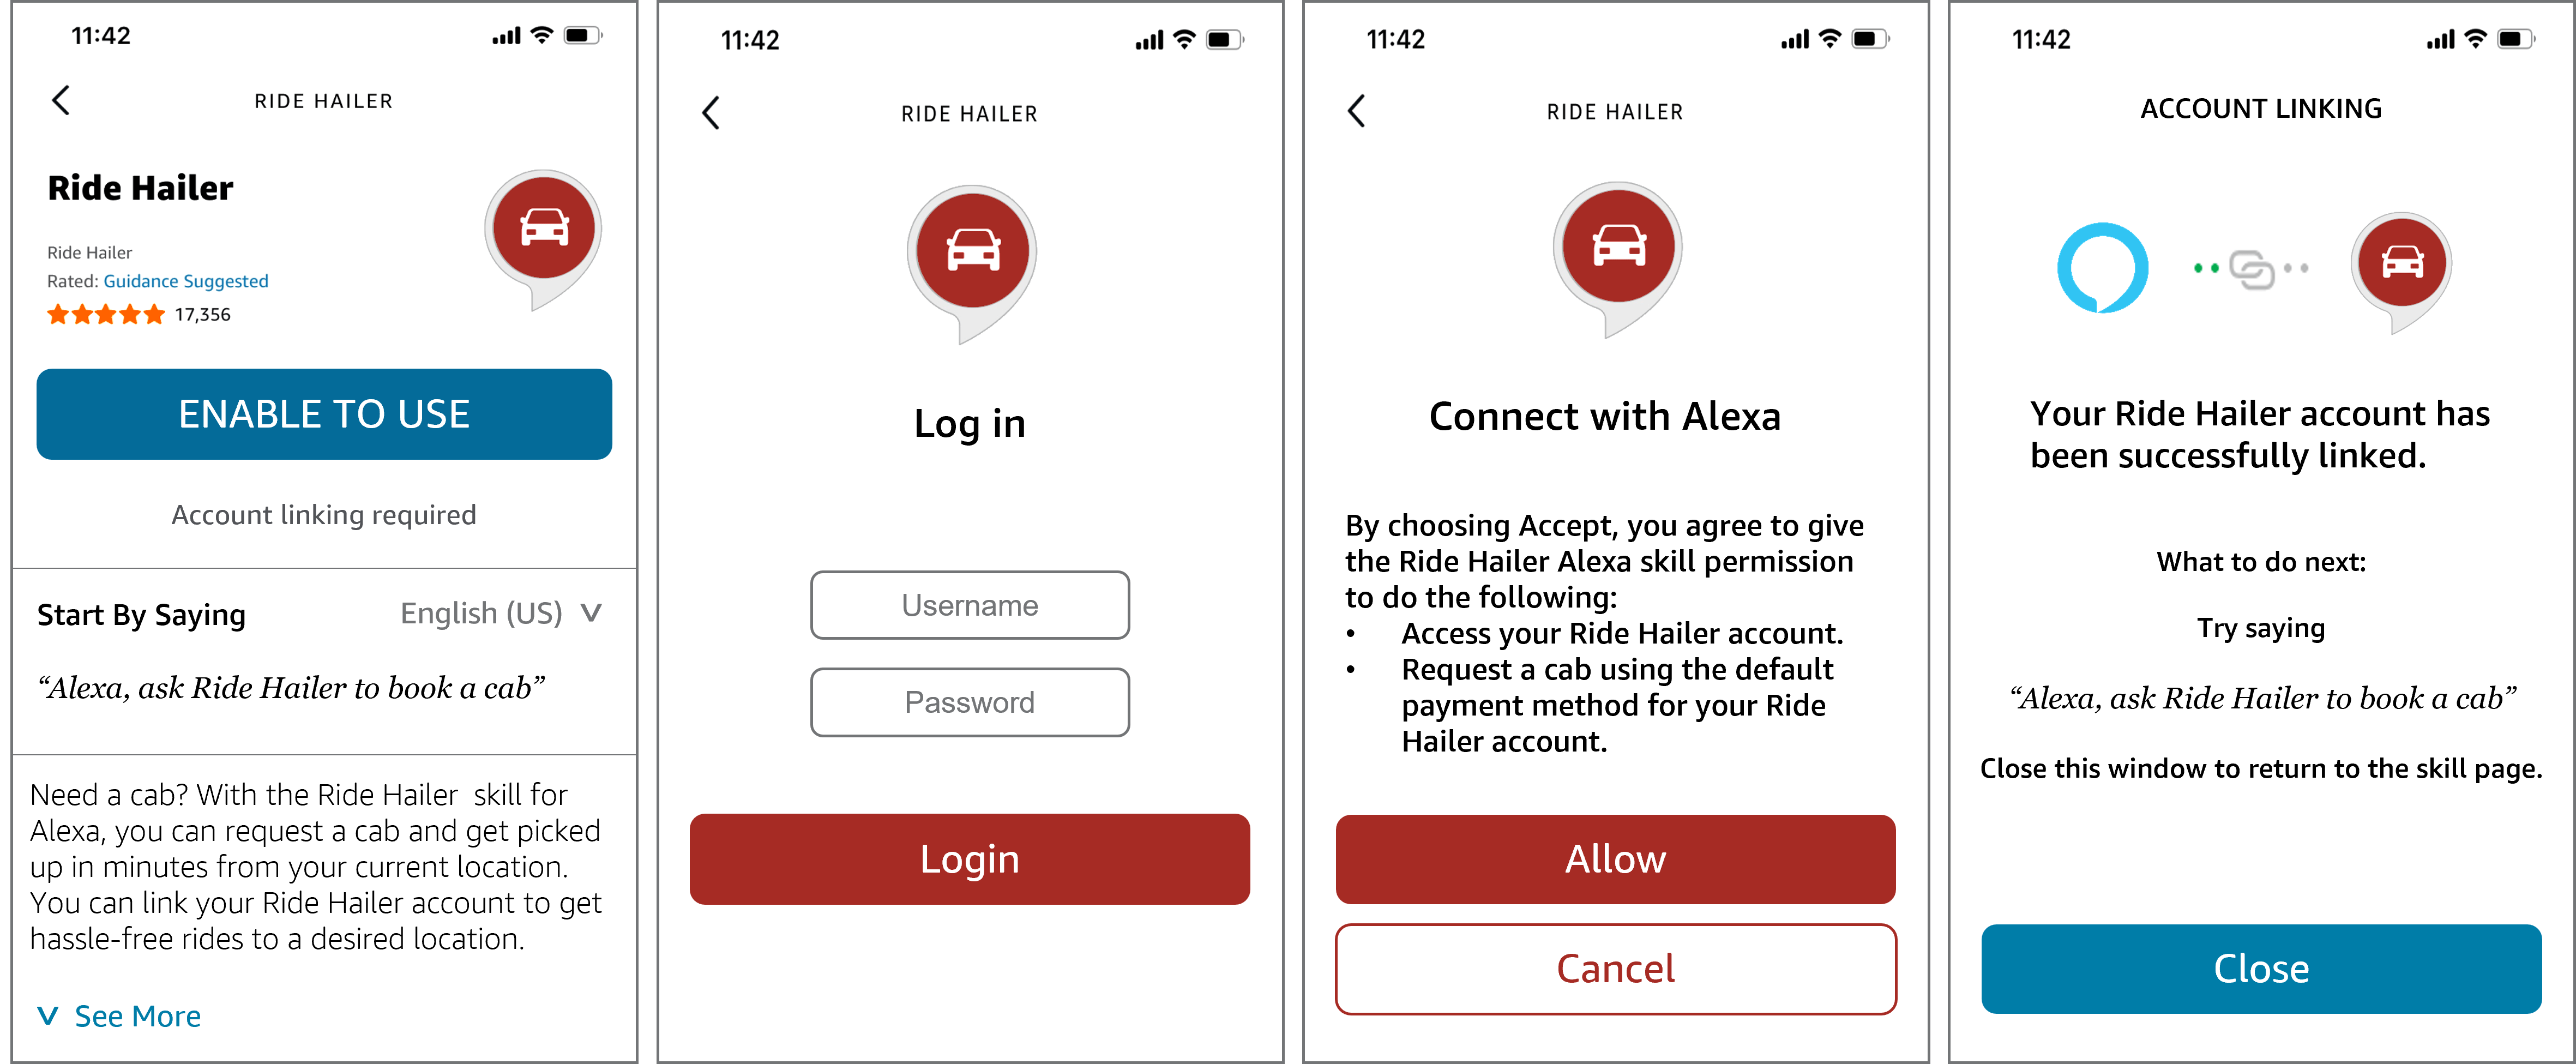
Standard account linking flow
Regardless of the starting point or method, every account linking flow follows the same general pattern. The following steps describe the standard account linking flow. Variations for app-to-app and LWA are described in later sections.
- The user takes an action that starts the account linking process, such as tapping Enable to Use on the add-on or skill detail page, or tapping a link in a card or push notification in the Alexa app.
- The Alexa app opens your authorization URI in a web view. Your login page displays, and the user enters their credentials to sign in to your system.
- Your authorization server validates the user's credentials and generates an authorization code.
After successful authentication, your authorization server displays a consent page asking the user to grant Alexa permission to access their account. The user taps Allow or Agree. - After the user consents to link their accounts, your authorization server redirects the user back to the Alexa app using the Alexa redirect URI, passing the authorization code in the query string. The Alexa service sends the authorization code and the PKCE code verifier to your access token URI to request an access token and a refresh token. The Alexa app displays a success message confirming that the account is linked.
- The user can now make requests that require data from their account in your system. For each request, the Alexa service includes the access token so that your add-on or skill can identify the user and access their data.
Note: When the access token expires, the Alexa service automatically uses the refresh token to obtain a new access token without requiring the user to re-authenticate.
The following images show example screens displayed to the user during the standard account linking flow to connect the user's Amazon account to their Ride Hailer account. The screens correspond to steps 1–4: the Alexa app page to enable Ride Hailer, the Ride Hailer login page, the Ride Hailer consent page, and the Alexa app success confirmation.
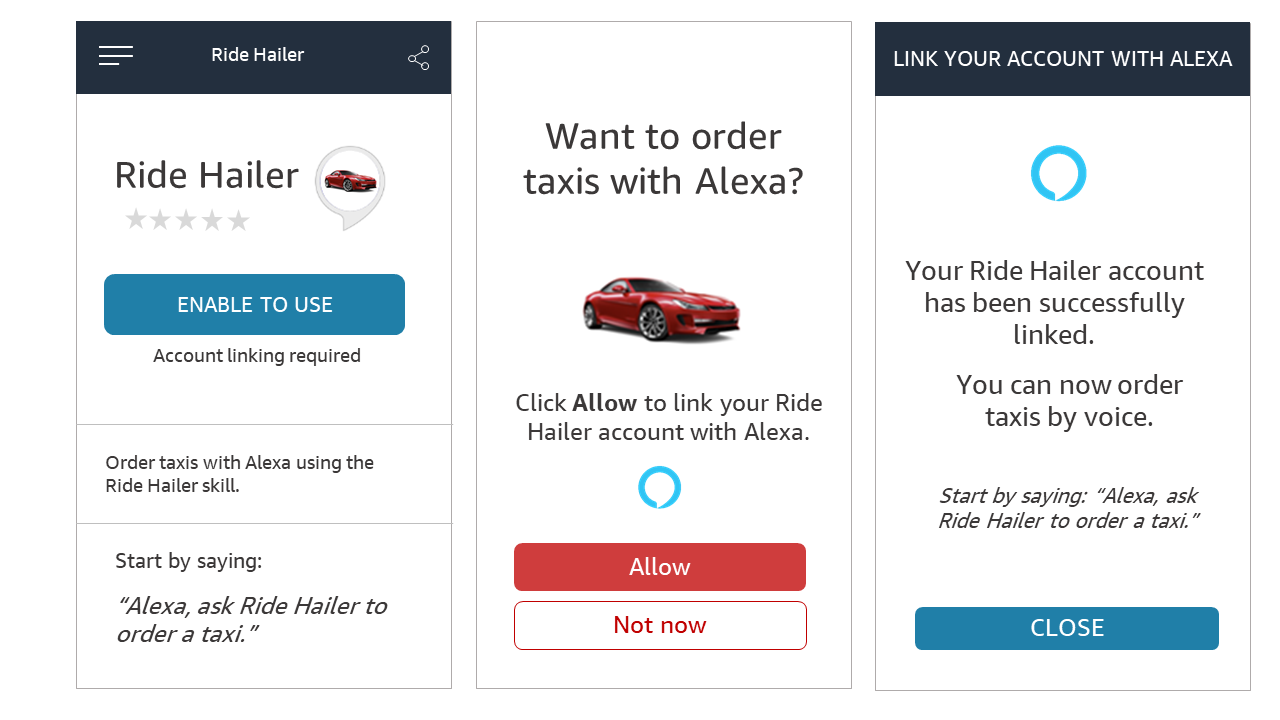
App-to-app account linking
App-to-app account linking follows the common account linking flow with one key difference. Instead of signing in through a web view in the Alexa app, Alexa redirects the user to your native mobile app to authenticate. Linking accounts in this manner can provide a smoother experience because the user might already be signed in to your app.
The app-to-app flow varies depending on where the user starts.
Starting from your app
Your app gives the user the option to enable your skill and link their account with Alexa. When the user starts account linking from your mobile app or website, your app redirects the user to the Alexa app to complete the linking process. If the user has the Alexa app installed on their device, the Alexa app launches and asks the user to acknowledge the account linking request. After acknowledging the request, the Alexa app returns the user to your app.
The following images show the app-to-app account linking flow starting from the example Ride Hailer app, redirect to the Alexa app, and confirmation and redirect back to the Ride Hailer app.

If the user doesn't have the Alexa app installed on their device, an in-app browser window with Login with Amazon (LWA) opens, and the user can enter their Amazon credentials or create an Amazon account. The user is then asked to give permission to link the accounts. After acknowledging the request, the LWA returns the user to your app.
The following images show the app-to-app account linking flow starting from the example Ride Hailer app when the Alexa app isn't installed on the user's device.

Starting from the Alexa app
When the user starts account linking in the Alexa app, Alexa gives the user the option to link their account in your system with Alexa. If the user has your app installed on their device, the device launches your app and asks the user to acknowledge the account linking request. After the user acknowledges the request, your app returns the user to the Alexa app.
The following images show the app-to-app account linking flow starting from the Alexa app, redirect to the third-party app consent page, and redirect back to the Alexa app.
If the user doesn't have your app installed on their device, the user's browser opens your authorization page at the configured URI, asking the user to login and acknowledge the account linking request. After the user signs in and acknowledges the request, the authorization website returns the user to the Alexa app.
The following images show the app-to-app account linking flow when your app isn't installed on the user's device.
Related topics
Last updated: Jul 14, 2026