
Object Orchestration
Written in December 2017 by Nathan Ranney, the founder of game development studio Gutter Arcade.
Object orchestration is the act of controlling objects from inside another object. This is very useful for something like a "controller" object, which manages many things in your game. Let's say you wanted to spawn a bunch of enemies to attack your player. You could manage the enemy behavior from inside each enemy object, or you could set the behavior of all enemies at once via the controller object. This is helpful when you need to address multiple objects at once, and inform those objects of the current state of the game.
In the example below, we will create a bunch of objects and control them all from a controller object.
Basic Setup
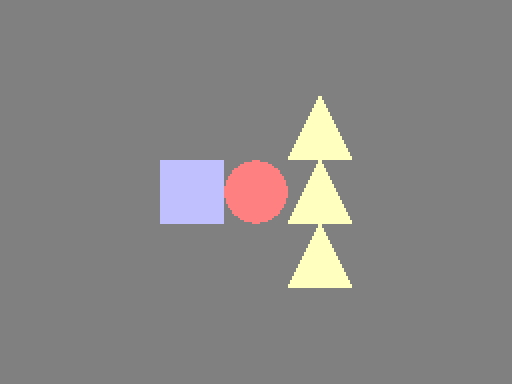
The first thing we need to do is create a couple of objects. I've created three sprites, a circle, a square, and a triangle, and I have named them accordingly. If you are following along with this example, it doesn't necessarily matter what your sprites look like as long as they are all different.
Now create an object for each sprite. You do not need to add any events to the objects.

Create a new room, name it whatever you want, and make it whatever size you want (I'm using 512x512).
Controller Object Setup
Now we are going to create our Controller Object. This will be the overseer of our game, and will be used to address the objects we will be creating. When creating your controller object, choose a name that is short. You will often reference this object, and it is easier to type a shorter name. For this example, I am using oGame as the name of this object. Add the Create Event and let's initialize some variables.
oGame Create Event
left = false;
right = false;
up = false;
down = false;
spawn = false;
rotate = false;

circle = -1;
square = -1;
triangle = -1;

triList = ds_list_create();
The first set of booleans are going to be used as shortcuts for keyboard inputs. Since a button press is either pressed or not, storing that input in a boolean will save you a lot of trouble in the long run. The second set of variables will be used to store the ID of the objects we are going to create and control. These are set to a negative value when initialized to ensure that no asset, or object ID is stored. All asset indexes and object IDs have to be positive numbers. The last variable is used to store the index of a list we are creating. We will be adding object IDs to this list, and using the list of IDs to control those objects.
Add the Step Event to the oGame object and add the following code.
oGame Step Event
//keyboard inputs
left = keyboard_check(vk_left);
right = keyboard_check(vk_right);
up = keyboard_check(vk_up);
down = keyboard_check(vk_down);

spawn = keyboard_check_pressed(vk_space);
rotate = keyboard_check(vk_rshift);
Here we have assigned keyboard inputs to variables. By doing this we can simply call the variable name when we need to check for keyboard input. Now let's spawn some objects. Add this under the code we just typed up.
oGame Step Event
//spawn some objects
if(spawn){
    circle = instance_create(room_width * 0.5, room_height * 0.5, oCircle);
    square = instance_create(room_width * 0.5 - 32, room_height * 0.5, oSquare);

    for(i = 0; i < 3; i ++){
        triangle = instance_create(room_width * 0.5 + 32, room_height * 0.5 - 32 + (i * 32), oTriangle);
        ds_list_add(triList,triangle);
    }
}
This code will check to see if we pressed our spawn button, which is set to the spacebar, and will create some objects for us to noodle around with. It also stores the ID of these objects in the circle, square, and triangle variables. For the oTriangle objects, this code will create three of them, and add their IDs to the ds_list we've created. If you are unfamiliar with for loops, click here to read some documentation. Essentially a for loop runs x number of times, running the code inside of it as many times as it loops.
In this case it runs for three loops, creates an oTriangle object, and adds it to the triList with each loop. When adding data (in this case an object ID) to a list, the data is added sequentially. The first piece of data is stored in position zero (the start) of the list, and each subsequent piece of data is stored to the end of the list in position one, two, three, etc. This isn't super important for this example, but it is good to know.
Add your oGame object to the room if you haven't already, and run the game. Push the spacebar and, if everything was set up correctly, some objects should spawn in the center of the room! Now that we have some objects, we can work on controlling them.

Object Orchestration
There are two main ways to address objects from inside of other objects. First, we can address the object directly by using the ID of the object. Since the ID of our newly created objects are stored in a variable (square, circle, triangle) this is very easy. Add this chunk of code to the end of your oGame Step Event.
oGame Step Event
//address object directly
if(instance_exists(square)){
    if(left){
        square.x -= 2;
    }else if(right){
        square.x += 2;
    }
}
Let's see how we can address every instance of an object. The easiest way to do this is to use the with construction. If our last method of control is like telling an object what to do, then using with is like controlling the object from the inside. Add this code to the end of your oGame Step Event.
oGame Step Event
//address objects using with
with(oCircle){
    if(other.up){
        y -= 2;
    }else if(other.down){
        y += 2;
    }
}
This time we are telling the oCircle object what to do. By using with(oCircle) we are addressing every single instance of the oCricle object in the game at the time. For us, this is only a single object. The important part about using with is that if you need to refer back to the object that is calling the function, you must use other. So when we say other.up and other.down we are referring back to the oGame object variables up and down. If you were to just use up and down without other, the game would crash since your oCircle object doesn't have an up and down variable. With can be used to address single instances of an object as well. You can do this by using the ID of a particular object instance just like we did when we moved the square around.
Finally, let's look at how to control a bunch of different instances of an object, but not necessarily every instance of an object. Above we created three oTriangle objects and added them to the triList. Now we can loop through the list of objects, and address them all individually at the same time. Or in this case, address two of the three triangles at the same time. Add some more code to the end of your oGame Step Event.
oGame Step Event
//address objects in a list
for(i = 0; i < ds_list_size(triList) - 1; i ++){
    tri = triList[|i];
    with(tri){
        if(other.rotate){
            image_angle += 2;
        }
    }
}
Just like when we created our oTriangle objects, we are using a for loop. This time the loop is used to loop through the list of object IDs we have stored in the triList. We assign an object ID from the list to the tri variable, and using with we address those objects.
Resources
Object orchestration is a very powerful concept and can be used in many different ways. Having a primary control object is vital to a successful, and efficient game. Check out the links below for more information on some of the concepts we discussed above.
- GameMaker: With Constructor
- GameMaker: ds_lists
- GameMaker: For Loops
- Download the example project file here