
Debugging
Written in January 2018 by Alejandro Hitti, a video game programmer and designer from Venezuela.
In this post, I will explain my process when debugging my games, and some tips to find bugs quickly and identify bottlenecks in your game. I will try to cover as much as possible on these tools, but I will most likely miss a few points, given it is such an extensive topic. It's a good idea for you to experiment with all these tools yourself and figure out ways to make your debugging experience easier and better. Reading the official documentation is also a great way to learn more about it after you've read this article.
- What Is Debugging and Profiling?
- Entering Debug Mode
- The Debug Toolbar
- Breakpoints
- The Game Is Paused in the Section I Want. Now What?
- Navigating Your Code While Paused
- Real-Time Debugging
- More Resources
What Is Debugging and Profiling?
We've all been in that situation where we write code, run the game, and nothing works like expected. Then we go back to the code and look at it for 20 minutes thinking it should work. The first solution that comes to mind is to check the values of variables, or the results of conditional statements, by using debug messages or drawing text to the screen.
This is fine for quickly debugging a small feature, but when you have many moving parts working together, generating these messages can quickly get out of hand. This is when a debugger becomes useful. GameMaker's debugger allows you to run your code line by line, checking the values of every variable and their changes along the way. It can also show you more advanced information, such as the state of your textures and surfaces, current graphics options, values of buffers, etc.
Profiling is often more useful in the second half of the project when you experience slowdowns in your game due to the amount of objects interacting with each other. Programmers are decent at spotting obvious bottlenecks, but on any application that isn't trivial, it's hard to find them. This is where the profiler comes in handy, giving you detailed information about what functions are being called at every stage of the game run-time and compiling the data in a way easy to analyze. Once you pinpoint the function/section that is running slowly, then you can optimize it.
Entering Debug Mode
Let's start with the basics. You may be used to launching your game by pressing the Play symbol at the top bar, or by pressing F5. However, to launch the game with the debugger attached, you will need to press the Bug icon instead, or you can also use F6.

Once the game launches, you will see a new tab show up at the top of your code editor, and a multitude of other windows opening. You can customize the layout of every one of these windows, but here's what mine looks like

If a window isn't showing up, or you closed it by accident, go to Debugger > Windows and there will be a full list of available windows that can be displayed.

The Debug Toolbar
Once you are in the Debugger tab, you will see a set of buttons at the top. Let's go over each one of these, and we will go into more detail as we go along in the article. This is what the toolbar looks like:

From left to right, we have these sections:
- Continue, Break, and Restart Game: These buttons let us pause (break) the program, continue to the next breakpoint (or continue execution if no other breakpoints are set), and restart the program.
- Close the Game: This one acts similarly to the one above to stop the execution of the game.
- Step Into, Step Over, and Step Out: These buttons advance our code line by line when the application is paused. You will use these a lot.
- Real-Time Debugging: This is a toggle to control whether we want variables to be updated in the debugger while the application is running, or only when it is paused.
- Discard Collected Data: While debugging, the debugger will keep the data it collected on its last run, so you can reference it after you've closed the application. This button will discard all that data.
- Memory, FPS and Colored Circle: Displays the current memory usage, current frames-per-second (FPS), and the circle will be green when the debugger is attached and the application is running, or red otherwise.
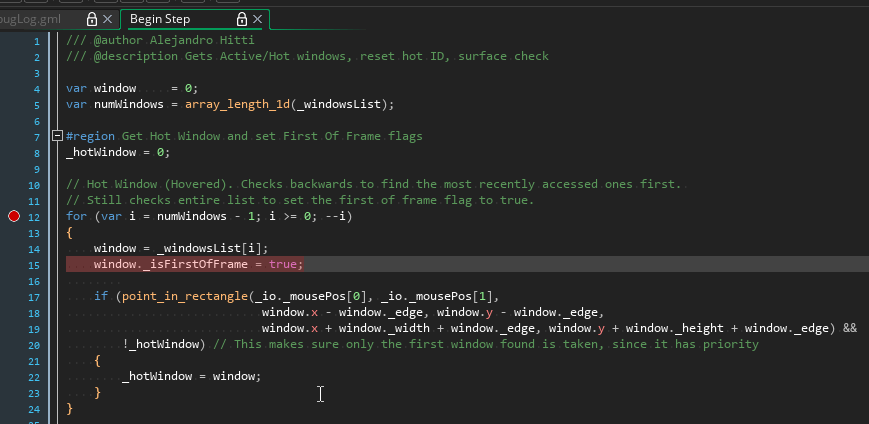
Breakpoints
Now that you have run your game with the debugger attached, you may have noticed that not much has changed. You still can't see the values of variables and the only thing that seems to be working is the graph. The reason is that debuggers need to pause your application to inspect the values of variables and buffers (there is a way to do this in real time, but we'll get to that later). One way to pause your game is through the debug toolbar, by pressing the Break (Pause) icon. However, this will pause the game at whichever point it was at when you clicked the button, so it is essentially pausing at a random location you can't control. A better way to stop the application is by using breakpoints.
There are three ways to set a breakpoint on a specific line:
-
Left-click on the line number gutter, on the line you want the breakpoint on.
-
Right-click on a line, then click Toggle Breakpoint.
-
Select a line, then press F9.

Remember that if you set a breakpoint on an empty line, or a line with a comment, the game will pause at the next valid line.
Now that we have a breakpoint set up, if we run the game using the debugger, the application will automatically stop right before that line of code is run. So, for example, if you stop at a line where we assign a value to a variable, the variable itself won't have that value yet, but it will change as soon as we step into the next line. Breakpoints can be set or removed at any point, even while the game is running.
The Game Is Paused in the Section I Want. Now What?
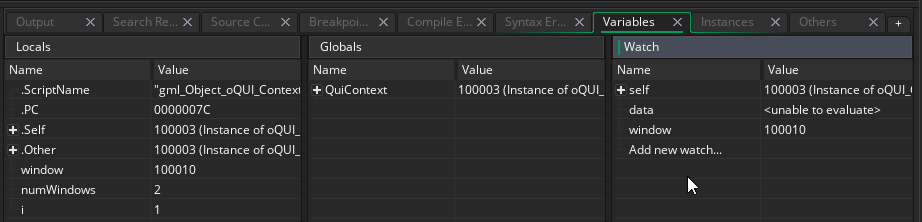
While the game is paused, you can inspect the values of variables in a few different ways. The easiest one is to hover over the variable name in code. Know that the values of variables above the current line have already been updated for this frame while the ones below haven't. This also means that if you have a local variable, they won't be initialized yet.
Checking values this way is useful for variable types such as integers or strings, but the information you get from data structures or objects isn't too useful. In those cases, it's better to use the Variables and Instances debug windows to get more information.

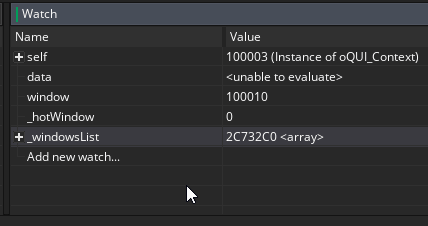
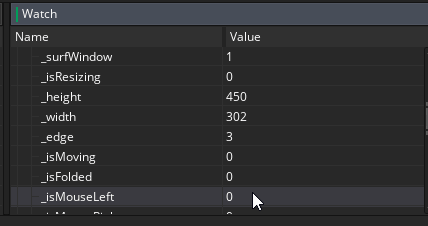
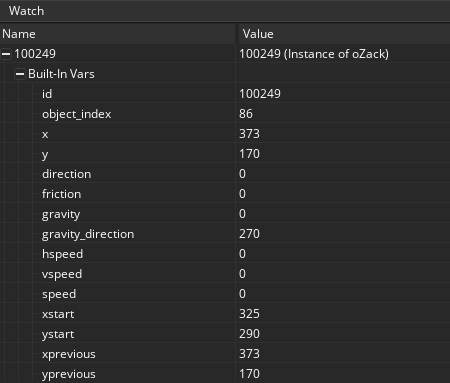
By default, there are three sections in the Variables tab. In the Locals window, you will see the values of all local variables, which includes self. If you click the plus sign on the self object, you will see all instance variables associated with the object you are inspecting. Then we have the Globals section, showing us all the defined global variables and their values. Last, we have the Watch window, where we can specify variables to keep track of at all times. To add variables in the Watch window, we can either click on "Add new Watch" and then type the name of the variable, or we can right-click any variable in other windows (Locals, Globals, Instance, All Instances) and then select "Add Watch." Note that if you try to watch a variable that is currently out of scope, the debugger won't be able to reference it (it will show
Sometimes you will notice that a variable is not displaying the information you want, such as the instance or data structure ID, when you really want to see its value. In those situations, all you have to do is right-click the variable, hover on "View As," and select the way you want the variable to be displayed as.
Here is where things get interesting though since you can do more than just look at the value in variables. In fact, you can change any value you want by double-clicking on the value cell and then typing in a new value. This change will affect the variable instantly, letting you test stuff on the fly without having to re-compile the game. If you change a value this way, it won't happen again the next time you run the game, so you will need to remember the value you set the variable to that worked, and then replace it in code so it happens every time.
Now we can take a look at the Instances tab, which includes three sections as well by default. The first one, labeled Instance, contains all the variables and information about the instance that is running the code. You will see the values of variables you created, and all the built-in variables objects in GameMaker are created with, such as ID, position, physics variables, alarms, etc.

You can also search through every instance created in the All Instances tab. Last, if you click on an instance in your game window, it will show up in the Selected Instance section, but only if the object in question has a collision mask that GameMaker can reference. This is a very useful feature in case you have multiple instances of the same object in your room and need to select a specific one, which would be difficult using the All Instances section, seeing as they all have the same name.
Navigating Your Code While Paused
I have mentioned that you can run through your code line by line after the game is paused, either manually or by a breakpoint, but haven't explained how to do it yet. If you look at the debug bar, you will notice these icons:
These are your helpers while navigating code. From left to right, these buttons are: Step Into, Step Over, and Step Out.
Step Into
When you press this button, the code will perform the next logical step. If your line has a variable assignment, it will perform it and then move to the next line. However, if the line you are hovering has a script call, then it will jump into that script and stop at the first line. You can the keep stepping through the code of the script until you reach the end which will then return you back to the initial call. Remember that this will only happen for user defined scripts, not GameMaker functions, as their implementation is hidden from the user.

Step Over
This one works similarly to the previous one where we step through the code line by line, but this time if you are on a line with a function call, you will not be taken to it. Instead, it will perform all the operations inside that script, come out, and then step to the next line. Unless I'm doing some deep debugging section, where I need to check what happens every step of the way, this is the button I use the most.

Step Out
Lastly, this button will bring you one step above in the call stack. If you are not sure what the call stack, it is the list of function calls that were performed to reach the part of the code you are in. So, for example, if you are inside of your object create event, and then you call a script that calls another script inside of itself, then you will be three functions deep. If you press the Step Out button now, you will be taken to the previous step in the stack (the first script call). If you press it once more, you will end up back at the object create event. Useful when you are inside of a script that you know is working as expected and want to get back to debugging the section you started on.

Another good way to navigate your code if you want to skip large sections of it, is to place another breakpoint where you want to reach and then press the Play button. This will make the game continue executing until it reaches the next breakpoint which should be the one you just placed.

As explained before, you can also press the Pause button to stop the execution of the game, but this will stop wherever the game was currently executing, so it may be a random location. You can also restart the game by pressing the circular arrow next to the Play/Pause buttons.
Real-Time Debugging
Most debuggers only let you inspect variables while the application is paused. In the newest iteration of the tool provided by GameMaker, it is possible to watch the state of variables while the game is running. If you press the button next to the code step icons, you will activate it. The variables will update as fast as they can while running the game, which isn't always once per frame, but it is often enough to be usable. Not all windows will work with this feature, and its use is mostly to watch instances being created/destroyed and variable values real time.
Congrats! You now have all the tools to debug your game efficiently in 90% of situations.
More Resources
In the meantime, I can't stress enough how useful and well-written the official GameMaker documentation is. I definitely recommend that you open it (F1 while in GameMaker), or by going here.