Alexa Blogs

スマートホームスキルの作り方、シリーズ第3回目です。1回目、2回目はそれぞれ以下をご確認ください。
第1回 「スマートホームスキルを作る (1) サンプルコードからスキルの基本要素を作る」
第2回 「スマートホームスキルを作る (2) 各ディレクテイブを処理する」
イベントを処理する
スマートホームスキルAPI にはスマートホームデバイスの状態の変化をイベントとして Alexa に通知する仕組みがあります。この仕組みは今後の Alexa 進化の中で色々な形で利用されることになります。イベントの通知機能を正しく実装することは、スキルがAlexaの今後の進化の恩恵を受け、正しく振る舞うことができるようにするために非常に重要です。今回はこのイベント通知の仕組みと、その実装方法を中心に見ていきます。
イベントの通知を実現するアクセストークン
デバイスクラウドからAlexaにイベントを通知するためには、どの Alexaユーザー宛てのイベントか識別できる仕組みが必要です。スマートホームスキルAPI ではこれを実現するために Login with Amazon から発行されるアクセストークンを利用しています。
イベント通知機能が有効化されたスキルでは、ユーザーがスキルを有効にし、アカウントリンクを終了させると、スキルのエンドポイント Lambda関数に、AcceptGrant というディレクティブが送られてきます。 AcceptGrant ではデバイスクラウドから Alexa にイベントを送る際に必要なアクセストークンを得るための認可コードが送られます。認可コードからアクセストークンを得るには Login with Amazon にアクセスします。
イベント通知のためのアクセストークンを得るまでのおおまかな流れは次の通りです。
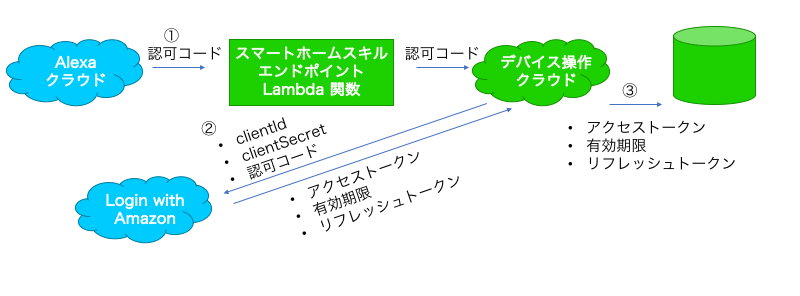
- ユーザーがスキルを有効にし、アカウントリンクを済ませると、AcceptGrant ディレクティブが呼ばれ、認可コードがスキルに渡されます
- 受け取った認可コードと開発者コンソールからあらかじめ発行された クライアントID、クライアントシークレットをLogin with Amazon に渡し、アクセストークン、アクセストークンの有効期限、リフレッシュトークンを得ます
- 取得したアクセストークン、アクセストークンの有効期限、リフレッシュトークンはユーザーごと取り出せる形で、セキュアな場所に保存します(AcceptGrant ディレクティブではあなたのOAuth2.0サーバーが発行したアクセストークンも送られてきます。これによって AcceptGrant がどのユーザーのために呼ばれたものかを識別することができます)
スマートホームデバイスの状態変化をイベントとして Alexa に送る際のおおまかな流れは次の通りです。

1. 対象スマートホームデバイスを所有しているユーザーのアクセストークンを取り出します
1'. アクセストークンの期限が切れていた場合、Login with Amazon にアクセスし、アクセストークンを更新します
2. イベントゲートウェイにスマートホームデバイスの状態変化イベントを送ります
ここからは、サンプルプログラムを用いて具体的な実装方法を確認していきます。
事前準備
ここでは「スマートホームスキルを作る (1) サンプルコードからスキルの基本要素を作る」で作成した、サンプルコードを使って説明を進めていきます。事前にこのサンプルコードが確認できる環境を用意しておいてください。
スキルの Send Alexa Events オプションを有効にする
スキルがデバイスクラウドからのイベントを受け入れられるようにするにはスキルの設定で Alexaイベントを送る(Send Alexa Events) を有効にする必要があります。有効にすると クライアントID(Client Id)、クライアントシークレット(Client Secret) が表示されます。これらは Login with Amazon からアクセストークンを取得するときに必要です。
Send Alexa Events を有効にしたスキルでは、ユーザーがスキルを有効にするボタンを押し、アカウントリンクを終了させると、AcceptGrant ディレクティブが呼ばれるようになります。 スキルはこれを適切に処理する必要があります。

Discover への応答で proaciveReport を返す
スマートホームデバイスをイベント通知機能に対応させるためには Discover 要求の際、 デバイスがイベント通知をサポートすることを伝える必要があります。これは capability オブジェクトのフィールド proactivelyReported を True で返すことによって実現します。
「スマートホームスキルを作る (1) サンプルコードからスキルの基本要素を作る」で作成したサンプルプログラムでは、次の箇所で proactivelyReported を True に設定しています。
def get_capabilities_from_v2_appliance(appliance):
    model_name = appliance["modelName"]
    if model_name == 'Smart Switch':
        capabilities = [
            {
                "type": "AlexaInterface",
                "interface": "Alexa.PowerController",
                "version": "3",
                "properties": {
                    "supported": [
                        { "name": "powerState" }
                    ],
                    "proactivelyReported": True,
                    "retrievable": True
                }
            }
        ]
    elif model_name == "Smart Light":

   :        :
capabilities オブジェクトの詳細は次を確認してください
https://developer.amazon.com/ja/docs/device-apis/alexa-discovery.html#capability-object
AcceptGrant ディレクティブを処理する
「イベントの通知を実現するアクセストークン」で示したように、イベント通知機能を有効にしたスキルでは、ユーザーがスキルを有効にし、アカウントリンクを完了させた後、スキルのエンドポイント Lambda 関数の AcceptGrant ディレクティブが呼ばれます。サンプルプログラムでは handle_non_discovery_v3 関数の中でこれを処理していますが、リクエストが成功したと応答しているだけで、実際は何もしていません。本来ここではデバイスクラウドが発行した、アクセストークンと、イベントを送る際に必要なアクセストークンを得るために与えられた認可コードを取り出し、デバイスクラウドでこれらを処理すべきですが、まずは取得した認可コードをログに出力するようにしてみましょう。
def handle_non_discovery_v3(request):
    request_namespace = request["directive"]["header"]["namespace"]
    request_name = request["directive"]["header"]["name"]


    :         :


    elif request_namespace == "Alexa.Authorization":
        if request_name == "AcceptGrant":
            print("====== AcceptGrant directive is called. Your authorization code is :" + request["directive"]["payload"]["grant"]["code"]);
            response = {
                "event": {
                    "header": {
                        "namespace": "Alexa.Authorization",
                        "name": "AcceptGrant.Response",
                        "payloadVersion": "3",
                        "messageId": get_uuid()
                    },
                    "payload": {}
                }
            }
            return response

    :         :
Alexaアプリで、スキルを有効にし、アカウントリンクを完了させると、Lambda関数の CloudWatch ログに次のような形で認可コードが表示されるようになります。本来は AcceptGrant の処理の中でアクセストークンを得る一連の処理を行うべきですが、今回は全体の流れを確認することに重点を置き、ログに表示された認可コードを使ってこの後に紹介する処理につなげます。

状態変化をイベントとして送る
イベントを送るまでの一連の処理をサンプルプログラムを参考に見ていきましょう。
以下は、https://github.com/alexa/alexa-smarthome/tree/master/sample_async/python で公開されているサンプルコードをベースに日本語環境で動くように少し変更したものです。
# -*- coding: utf-8 -*-

# Copyright 2017 Amazon.com, Inc. or its affiliates. All Rights Reserved.
#
# Licensed under the Amazon Software License (the "License"). You may not use this file except in
# compliance with the License. A copy of the License is located at
#
#    http://aws.amazon.com/asl/
#
# or in the "license" file accompanying this file. This file is distributed on an "AS IS" BASIS,
# WITHOUT WARRANTIES OR CONDITIONS OF ANY KIND, express or implied. See the License for the specific
# language governing permissions and limitations under the License.

"""Alexa Smart Home Asynchronous Messaging Sample Code.
This file demonstrates some key concepts when working with the Alexa Smart Home, as well as
Login with Amazon (LWA) in order to establish authentication and authorization, so your skill
can send proactive state updates and change reports to Alexa on behalf of the customer.
This sample stores access and refresh tokens in a file, and shows the flow for requesting a new
access token and refreshing existing and/or expired access tokens. It also shows how to use a valid
access token to send a proactive change or state report. You would ideally store access and
refresh tokens in a more appropriate persistence like DynamoDB.
Basic usage of this file is as follows:
1. fill in the CLIENT_ID and CLIENT_SECRET constants
2. with a user in the Alexa App, enable your skill, and receive an AcceptGrant directive
3. get the auth code from that AcceptGrant directive, and fill in the CODE constant
4. update main() with a change or state report that is appropriate for your user and skill
5. run this file and see how it works for the first time
6. change PREEMPTIVE_REFRESH_TTL_IN_SECONDS to a large number to force token refresh as needed
"""

import logging
import sys
import time
import datetime
import json
import uuid
import os
import requests

# constants
UTC_FORMAT = "%Y-%m-%dT%H:%M:%S.00Z"
LWA_TOKEN_URI = "https://api.amazon.com/auth/o2/token"
LWA_HEADERS = {
    "Content-Type": "application/x-www-form-urlencoded;charset=UTF-8"
}
ALEXA_URI = "https://api.fe.amazonalexa.com/v3/events" # update to appropriate URI for your region
ALEXA_HEADERS = {
    "Content-Type": "application/json;charset=UTF-8"
}

# setup logger
logging.basicConfig(stream=sys.stdout)
LOGGER = logging.getLogger()
LOGGER.setLevel(logging.DEBUG)

# LWA constants
CODE = "<code>" # auth code from AcceptGrant directive, update whenever you disable/enable the skill
CLIENT_ID = "<client id>" # copy from Developer Console
CLIENT_SECRET = "<client secret>" # copy from Developer Console
PREEMPTIVE_REFRESH_TTL_IN_SECONDS = 300 # used to preemptively refresh access token if 5 mins from expiry

TOKEN_FILENAME = CODE + ".txt" # everytime a new auth code is used, we store tokens in a new file

# utility functions
def get_utc_timestamp(seconds=None):
    return time.strftime(UTC_FORMAT, time.gmtime(seconds))

def get_utc_timestamp_from_string(string):
    return datetime.datetime.strptime(string, UTC_FORMAT)

def get_uuid():
    return str(uuid.uuid4())

# authentication functions
def get_need_new_token():
    """Checks whether the access token is missing or needed to be refreshed"""
    need_new_token_response = {
        "need_new_token": False,
        "access_token": "",
        "refresh_token": ""
    }

    if os.path.isfile(TOKEN_FILENAME):
        # if token file exists, then we've already gotten the first access token for this user skill enablement
        with open(TOKEN_FILENAME, 'r') as infile:
            last_line = infile.readlines()[-1] # THIS IS TOTALLY INEFFICIENT

        token = last_line.split("***")
        token_received_datetime = get_utc_timestamp_from_string(token[0])
        token_json = json.loads(token[1])
        token_expires_in = token_json["expires_in"] - PREEMPTIVE_REFRESH_TTL_IN_SECONDS
        token_expires_datetime = token_received_datetime + datetime.timedelta(seconds=token_expires_in)
        current_datetime = datetime.datetime.utcnow()

        need_new_token_response["need_new_token"] = current_datetime > token_expires_datetime
        need_new_token_response["access_token"] = token_json["access_token"]
        need_new_token_response["refresh_token"] = token_json["refresh_token"]
    else:
        # else, we've never gotten an access token for this user skill enablement
        need_new_token_response["need_new_token"] = True

    return need_new_token_response

def get_access_token():
    """Performs access token or token refresh request as needed and returns valid access token"""

    need_new_token_response = get_need_new_token()
    access_token = ""

    if need_new_token_response["need_new_token"]:
        if os.path.isfile(TOKEN_FILENAME):
            # access token already retrieved the first time, so this should be a token refresh request
            with open(TOKEN_FILENAME, 'a') as outfile:
                outfile.write("\n")

            lwa_params = {
                "grant_type" : "refresh_token",
                "refresh_token": need_new_token_response["refresh_token"],
                "client_id": CLIENT_ID,
                "client_secret": CLIENT_SECRET
            }
            LOGGER.debug("Calling LWA to refresh the access token...")
        else:
            # access token not retrieved yet for the first time, so this should be an access token request
            lwa_params = {
                "grant_type" : "authorization_code",
                "code": CODE,
                "client_id": CLIENT_ID,
                "client_secret": CLIENT_SECRET
            }
            LOGGER.debug("Calling LWA to get the access token for the first time...")
            LOGGER.debug("Params: " + json.dumps(lwa_params))

        response = requests.post(LWA_TOKEN_URI, headers=LWA_HEADERS, data=lwa_params, allow_redirects=True)
        LOGGER.debug("LWA response header: " + format(response.headers))
        LOGGER.debug("LWA response status: " + format(response.status_code))
        LOGGER.debug("LWA response body  : " + format(response.text))

        if response.status_code != 200:
            LOGGER.debug("Error calling LWA!")
            return None

        # store token in file
        token = get_utc_timestamp() + "***" + response.text
        with open(TOKEN_FILENAME, 'a') as outfile:
            outfile.write(token)

        access_token = json.loads(response.text)["access_token"]
    else:
        LOGGER.debug("Latest access token has not expired, so using it and won't call LWA...")
        access_token = need_new_token_response["access_token"]

    return access_token

def main():
    """Main function that sends a proactive state or change report to Alexa"""

    token = get_access_token()

    if token:
        message_id = get_uuid()
        time_of_sample = get_utc_timestamp()

        # ensure that this change or state report is appropriate for your user and skill
        alexa_params = {
            "context": {
                "properties": [{
                    "namespace": "Alexa.EndpointHealth",
                    "name": "connectivity",
                    "value": {
                        "value": "OK"
                    },
                    "timeOfSample": time_of_sample,
                    "uncertaintyInMilliseconds": 500
                }]
            },
            "event": {
                "header": {
                    "namespace": "Alexa",
                    "name": "ChangeReport",
                    "payloadVersion": "3",
                    "messageId": message_id
                },
                "endpoint": {
                    "scope": {
                        "type": "BearerToken",
                        "token": token
                    },
                    "endpointId": "endpoint-001"
                },
                "payload": {
                    "change": {
                        "cause": {
                            "type": "PHYSICAL_INTERACTION"
                        },
                        "properties": [{
                            "namespace": "Alexa.PowerController",
                            "name": "powerState",
                            "value": "ON",
                            "timeOfSample": time_of_sample,
                            "uncertaintyInMilliseconds": 500
                        }]
                    }
                }
            }
        }

        response = requests.post(ALEXA_URI, headers=ALEXA_HEADERS, data=json.dumps(alexa_params), allow_redirects=True)
        LOGGER.debug("Request data: " + json.dumps(alexa_params))
        LOGGER.debug("Alexa response header: " + format(response.headers))
        LOGGER.debug("Alexa response status: " + format(response.status_code))
        LOGGER.debug("Alexa response body  : " + format(response.text))

if __name__ == "__main__":
    main()
これはスタンドアローンで動く Python プログラムです。
実際に動かすには先頭の次の部分を書き換える必要があります。
# LWA constants
CODE = "<code>" # auth code from AcceptGrant directive, update whenever you disable/enable the skill
CLIENT_ID = "<client id>" # copy from Developer Console
CLIENT_SECRET = "<client secret>" # copy from Developer Console
- <code> には AcceptGrant で与えられた認可コードを与えるようにします
- <client id> には開発者ポータルでアクセス権限(permission)を設定した際に表示されたクライアントID(client id)を与えるようにします
- <client secret> には開発者ポータルでアクセス権限(permission)を設定した際に表示されたクライアントシークレット(client secret)を与えるようにします
このプログラムでは認可コードをファイル名(認可コード.txt)として、ファイルを作成し、ここに Login with Amazon から取得したアクセストークン、有効期限、リフレッシュトークンを保存しています。大まかに処理の流れを確認すると、次のようになります。
認可コード.txt ファイルからアクセストークンを取得。ファイルが存在しない場合、Login with Amazon にアクセスし、アクセストークンを取得、認可コード.txt に取得した情報を保存
↓
アクセストークンの期限が切れている場合、Login with Amazon にアクセスしアクセストークンを更新、認可コード.txt の内容も更新
↓
アクセストークン、状態情報をパラメータとしてイベントゲートウェイにイベントを送る
イベントゲートウェイのアクセス先は Alexa が稼働している地域ごとに異なり、日本語環境の場合は https://api.fe.amazonalexa.com/v3/events になります。地域ごとイベントゲートウェイのアクセス先は次に説明されています。
https://developer.amazon.com/ja/docs/smarthome/send-events-to-the-alexa-event-gateway.html#endpoints
イベントゲートウェイに送る内容は次で生成しています。
        message_id = get_uuid()
        time_of_sample = get_utc_timestamp()

        # ensure that this change or state report is appropriate for your user and skill
        alexa_params = {
            "context": {
                "properties": [{
                    "namespace": "Alexa.EndpointHealth",
                    "name": "connectivity",
                    "value": {
                        "value": "OK"
                    },
                    "timeOfSample": time_of_sample,
                    "uncertaintyInMilliseconds": 500
                }]
            },
            "event": {
                "header": {
                    "namespace": "Alexa",
                    "name": "ChangeReport",
                    "payloadVersion": "3",
                    "messageId": message_id
                },
                "endpoint": {
                    "scope": {
                        "type": "BearerToken",
                        "token": token
                    },
                    "endpointId": "endpoint-001"
                },
                "payload": {
                    "change": {
                        "cause": {
                            "type": "PHYSICAL_INTERACTION"
                        },
                        "properties": [{
                            "namespace": "Alexa.PowerController",
                            "name": "powerState",
                            "value": "ON",
                            "timeOfSample": time_of_sample,
                            "uncertaintyInMilliseconds": 500
                        }]
                    }
                }
            }
        }
payload オブジェクトがデバイスの状態変化の内容を伝える箇所です。 ここでは endpointId が endpoint-001 の powerState が ON になったことを通知しています。 cause で変更の理由が示されており、ユーザーが直接デバイスを操作したこと (PHYSICAL_INTERACTION) を返しています。
context オブジェクトの中には付加的な情報を送ることができます。イベント発信の直接の理由ではないが、関連した情報を送る際に context オブジェクトを使います。ここではデバイスとの接続状況を示す connectivity でデバイスがオンライン状態であることを伝えています。 payload オブジェクト、context オブジェクト、いずれでもデバイスの各属性情報を通知することができますが、同じ属性を両方に含めて与えることはできません。
詳しくは次を確認してください
実行すると最後にイベントゲートウェイからのレスポンスの結果が表示されます。
DEBUG:root:Alexa response status: 202
DEBUG:root:Alexa response body  :
処理が成功した時のステータスコードは 202 です。
ステータスコードとその意味については次を確認してください。
実装が正しく行われているか確認するデバッグツールがあります。次を確認してください。
https://developer.amazon.com/ja/docs/smarthome/how-to-use-state-reporting-test-tool.html
異常系を正しく処理し、スキルを完全なものにする
スキルを完全なものにするためには操作対象のデバイスが異常状態にあるときにも適切に振る舞う必要があります。実際のスキルでは次を参考に適切な実装を行ってください。
- スマートホームデバイスがクラウドから操作できる状態にあるかどうかを EndopintHealth インターフェースで報告
https://developer.amazon.com/ja/docs/device-apis/alexa-endpointhealth.html
- ディレクティブを正しく処理できなかった場合は適切なエラー応答を返す
https://developer.amazon.com/ja/docs/device-apis/alexa-errorresponse.html
スキルを公開する
全3回でスマートホームスキルの作りたを見てきました。必要な要素は一通り確認しています。
スキルの公開に向けては次を確認してください。
https://developer.amazon.com/ja/docs/smarthome/smart-home-skill-publishing-guide.html
スマートホームスキルで動くスマートホームデバイスについて Alexa 対応であることを認定する Work with Alexa というプログラムがあります。Work with Alexa については次を確認してください。
https://developer.amazon.com/ja/docs/smarthome/certify-your-device-with-works-with-alexa.html
スキルのアラーム、タイムアウト設定、そのほかスキルを安定運用するためのベストプラクティスについては次を参考にしてください。
以上、3回にわたってスマートホームスキルの作り方を見ていきました。是非スマートホームスキルの開発に、チャレンジしてみてください!