
Login with Amazon Component
The Login with Amazon Component allows you to prompt users to log in to your Amazon Fire TV app using their Amazon account credentials before they perform a specific action, such as watching media. To learn more, see Login with Amazon.
Since Amazon Fire TV already requires users to log in with their Amazon accounts when they set up and register their Fire TV, the real benefit of the component isn't that it allows users to log in with their Amazon account. The component's benefit is that it prompts users to consent to share their Amazon name and email address with your app. This allows you to get a better sense of your audience.
- The User Experience with Login with Amazon Component
- Configuration Overview
- Step 1. Configure Your App
- Step 2. Create a Security Profile on the Developer Console
- Step 3. Get the Login with Amazon API Key
- Mix Free Content with Login-Required Content
- Related topics
The User Experience with Login with Amazon Component
When users click the Watch Now button to view media, they see a Login with Amazon button that starts the login process:

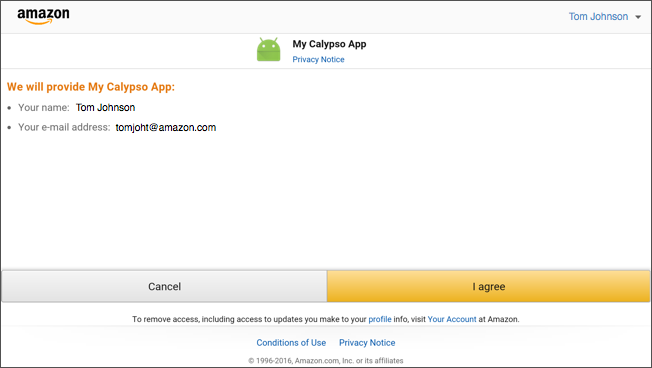
After clicking the button, the user is presented with a secure login screen (hosted by Amazon) that shows the user's name and email address (associated with their Fire TV account). They are asked to consent to share this data (name + email address) with the app. The consent screen shows the app name, logo, and privacy notice.
If users click I agree, they are redirected back to the app with a token that grants them access to watch the media.

Once back in the app, the user clicks Return. The media the user selected begins to play.
If users do not consent to share their info with the app, they are redirected back to the app and see the same Login with Amazon screen (Figure 1) as before.
Once logged in, users can log out using the Logout button at the bottom of your app. The next time users try to view media, they will be prompted to log in again (Figure 1). Since users have already consented to share their details with the app, the privacy screen (Figure 2) will be bypassed.
If users want to revoke your app's access to their data, they do the following:
- Log in to amazon.com and go to Your Account > Your Account. (Or go directly here.)
- Under Settings, click Manage Login with Amazon.
- Click Remove next to your app.
Configuration Overview
To configure the Login with Amazon Component, follow these steps:
- Step 1. Configure Your App
- Step 2. Create a Security Profile on the Developer Console
- Step 3. Get the Login with Amazon API Key
Step 1. Configure Your App
To configure the Login with Amazon Component:
-
As with other components, follow the general instructions to Add or Remove a Component.
Be sure to remove any other authentication components that are loaded in your app (such as AdobepassAuthComponent, PassThroughLoginComponent, or FacebookAuthComponent).
Note: You can load only one component per interface. For example, you cannot load both the Adobe Pass Auth component and the Pass Through Login component, because both components use the sameIAuthenticationinterface. For a list of the components by interface, see Components Overview. - In your app, open the Navigator.json file (located in app > assets).
-
Set the
verifyScreenAccessvalue totruefor the screen where you want users to log in. For example, if you want users to log in before playing media, you would verify screen access at thePlaybackActivity:"com.amazon.android.uamp.ui.PlaybackActivity": { "verifyScreenAccess": true, "verifyNetworkConnection": true, "onAction": "CONTENT_RENDERER_SCREEN" } - To change the text that appears in the Login with Amazon screen (Figure 1), go to LoginWithAmazonComponent > res > values > strings.xml. Copy the strings into your app's custom.xml file (inside res > values) and customize the string values.
To fully configure the component, you will need to insert the API key from the Login with Amazon service. The next sections explain how to get this API key.
Step 2. Create a Security Profile on the Developer Console
You must create a security profile for your app on the Developer Console. This security profile is used by the Login with Amazon service and is required to get an API key.
Your security profile contains information about your app and is displayed to users on the privacy consent screen (Figure 2). On the privacy consent screen, users see the name of your application, your logo, and a link to your privacy policy.
To set up your security profile, follow the instructions in the "Register Your Security Profile" section on the Register your Android app with Login with Amazon page.
Step 3. Get the Login with Amazon API Key
After creating a security profile on the Developer Console, you must add settings for the app that will use Login with Amazon with that profile. You can then get an API key and finish configuring the Login with Amazon Component in your app.
-
Complete the steps in the "Adding an Android App to a Security Profile" section on the Register your Android app with Login with Amazon page. Note the following:
- For the package name, open the AndroidManifest.xml file (located in your app > manifests) in Android Studio. The package name is listed at the top. By default, the package name is com.amazon.android.calypso. However, you most likely changed the package name when you customized your app.
- To get the MD5 and SHA-256 values for the signature fields, see the following section, Getting Your App's Signature.
-
Get your API key by following the steps in the "Retrieving an Android API Key" section on the Register your Android app with Login with Amazon page.
-
After you get the API key, go into the LoginWithAmazonComponent > assets folder in Android Studio and open the api_key.txt file. Delete all the default text that appears in that file, and then paste your API key.
Getting Your App's Signature
Your apps must be signed in order to interact with the Login with Amazon service. Before you release your app, your signature is stored in a debug keystore. After you release your app, your signature is stored in a release keystore. The Login with Amazon service will use your app's signature to construct the API key that is necessary to configure the Login with Amazon Component.
If you're testing out your app (that is, you haven't yet released it to the Amazon Appstore), Android Studio automatically generates a signature for your APK file. While you're in the coding/testing phase, you can use this signature to test the Login with Amazon functionality. When you officially release your app, you will need to generate a new API key based on the signature from the release keystore.
For more information about signatures, see Android App Signatures and API Keys. See also Sign Your App in the Android documentation.
To get the MD5 and SHA-256 values from your signature, you use a Java utility called keytool. To use keytool to get these values:
-
Add keytool to your PATH:
- Locate the path to keytool. keytool is in the Home/bin directory of your JDK location. For example, on a Mac, the path is /Library/Java/JavaVirtualMachines/jdk1.8.0_91.jdk/Contents/Home/bin. (The exact path depends on your version of the JDK. Update this path based on your version.)
-
Add this location to your PATH. On a Mac, you can use a command such as the following:
echo 'export PATH=$PATH:/Library/Java/JavaVirtualMachines/jdk1.8.0_91.jdk/Contents/Home/bin' >> ~/.bash_profileFor Windows users, use Windows methods for adding tools to your PATH.
-
With keytool in your PATH, browse to the folder where the
debug.keystoreresides. This path is as follows:/Users/<your username>/.android/debug.keystoreReplace
<your username>with your username. -
Run the following keytool command, replacing
<alias>with androiddebugkey and<keystore.filename>with debug.keystore:keytool -list -v -alias <alias> -keystore <keystore.filename>The password is android.
This alias and password correspond with the debug keystore file Android Studio automatically produces.
The Certificate fingerprint appears and looks something like this:
Alias name: androiddebugkey
Creation date: Jun 13, 2016
Entry type: PrivateKeyEntry
Certificate chain length: 1
Certificate[1]:
Owner: C=US, O=Android, CN=Android Debug
Issuer: C=US, O=Android, CN=Android Debug
Serial number: 1
Valid from: Mon Jun 13 22:56:54 PDT 2016 until: Wed Jun 06 22:56:54 PDT 2046
Certificate fingerprints:
     MD5:  20:91:A5:45:ED:F7:D5:9A:03:65:33:66:AD:02:27:E8
     SHA1: B7:73:5F:AF:28:68:40:AB:31:59:03:A2:46:AB:D6:44:85:2A:C1:0E
     SHA256: 05:E3:7C:82:42:04:4A:0A:DC:98:6A:1C:B3:21:64:9F:AC:CD:3E:CD:B1:57:3F:EA:C0:35:0E:32:8D:39:D5:A6
     Signature algorithm name: SHA1withRSA
     Version: 1
The MD5 and SHA256 values are highlighted in red.
-
Copy the values for MD5 and SHA256. Enter these values into the corresponding fields in the Developer Console, as explained in the previous Get the Login with Amazon API Key section.
Mix Free Content with Login-Required Content
If your content requires login but you want to provide some free content too (that doesn't require login), you can do so by mapping certain "free" tags in your feed. See Mix Free Content with Login-Required Content.
Related topics
Last updated: Apr 06, 2017