Alexa Smart Properties (ASP) recently announced support for WebRTC (Web Real-Time Communication) based audio and video calling on all ASP-compatible Echo devices. With this launch, staff and guests have access to seamless peer-to-peer communication to conduct audio and video calls between Echo devices and non-Echo devices such as tablets and laptops.
Building on our initial blog announcing support for WebRTC Calling on ASP, we will now share how properties can prepare to enable WebRTC with their ASP deployments.
Before we get into the pre-requisites for enabling WebRTC to work with ASP, we’d like to share two diagrams to illustrate the signaling events for outbound and inbound calls.


Pre-requisites
1) Onboard your property to ASP (if not already done).
2) Enable the WebRTC Add-on from the ASP console: WebRTC add-on subscription activation is self-service for Solution Providers (SPs) and supported via ASP Janus console for all ASP customers.
To enable the free WebRTC add-on, the SP or ASP administrator need to complete the below steps:
1. Login to the ASP console.
2. Go to Billing and subscriptions page.
3. If you onboarded or activated the base subscription using Janus console earlier, it will be visible under the subscriptions tab.

Now that you have the WebRTC added to your ASP organization, let’s look at the requirements to set this up for use.
Requirements
To enable WebRTC at your property, you need to:
1) Have the infrastructure to support Inbound and Outbound calling via WebRTC
2) Create a Service Provider
3) Create an Alexa Skill with Account linking and calling permissions
Req #1: Infrastructure to support calling via WebRTC
WebRTC support caters primarily to peer-to-peer video and audio calling. In this setup, one peer is the Alexa device, while the other is defined by the property, which could be a web or a mobile application running on a tablet or phone.
Two key capabilities your infrastructure needs to support WebRTC are:
1. Receiving the Session Description Protocol (SDP) offer and metadata from an outbound call made from Alexa to your device endpoint.
2. Facilitating an inbound call originating from your infrastructure.
Outlined below are the APIs necessary for the infrastructure to support these functionalities. You can find them in this technical document.
Outbound calling
1. InitateOutboundCall
2. CallRingAck
3. CallInProgressAck
4. CallEnded
5. CallRinging
6. CallInProgress
7. CallAccepted
8. CallUpdated
9. CallUpdateAck
10. CallUpdateResponse
11. CallAcceptedAck
Inbound Calling
1. CallRinging
2. CallInProgress
3. CallAccepted
4. CallEnded
5. IntiateInboundCall
6. CallRingingAck
7. CallInProgressAck
8. CallUpdate
9. CallUpdateAck
10. CallAcceptedAck
Req #2: Create a Service Provider
After you enable the WebRTC subscription, create a Service Provider link via API. This will connect your ASP account with the Alexa Communication system to place and receive WebRTC traffic. Please see sample API call below. On a successful request, it will return the ServiceProviderID.
POST /v1/communications/serviceProviders HTTP/1.1
Host: api.amazonalexa.com
Content-type: application/json
Authorization: Bearer {access token}
{ "serviceProviderLogicalId" : "example_service_provider",
    "displayName": [
        {
            "locale": "en-US",
            "value": "Example service provider"
        }
    ]
}
Req #3: Create an Alexa skill with Account Linking
With the infrastructure ready to send and receive calls, you need to develop a custom Alexa skill that will serve as the conduit for calls to be transmitted and received via Alexa. This skill will act as a middleware between your ASP devices and your web services to pass the calling information. It will employ pre-existing Alexa intents for calling, thus eliminating the need to develop a separate interaction model.
You will need to setup the necessary permissions and account linking via the Alexa Developer Console for your skill:
1. Enable Account Linking setup
2. Enable the Persistent Unit ID Permission
3. Enable Calling Communication Permission within your Alexa skill.
4. Creating the Service Provider Network Mapping for your Alexa Skill.
Enabling Account Linking
Account linking enables your skill to connect the skill user's Amazon identity with their identity in a different system. To ensure secure communication through the Alexa Cloud, properties and SPs need to undergo authentication and authorization before performing any communication action. ASP leverages this authentication process to verify inbound requests from these providers. This safeguard ensures that the external endpoint is indeed authorized to interact with the Amazon endpoint.
SPs must link the master account and subsequently use the credentials of this primary account to enable the skill in other units. To get started with configuring Alexa skills with account linking and Login with Amazon (LWA), please follow the below steps.
Step 1: Create an LWA security profile
· Go to https://developer.amazon.com.
· Click on the “Developer Console” at the top right of the navigation bar and sign-up or sign-in.
· Click on “Login with Amazon” and then go to “Security Profiles”
· Click on “Create a New Security Profile”


Step 2: Configure Account Linking in the Alexa Developer Console
With LWA now configured, it's time to set up Account Linking for your Alexa skill. Within the Alexa Developer Console, select the skill you wish to modify (or create a new one if needed).
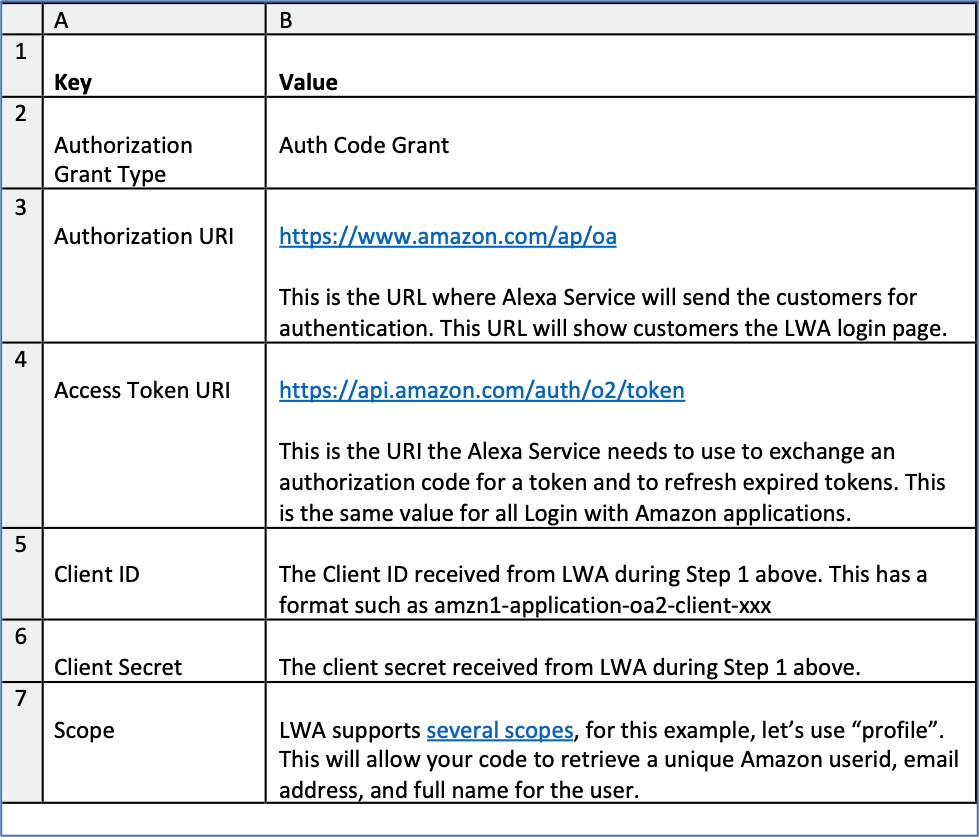
Navigate to the "Build" tab of your skill and click on "Account Linking" located on the left side. To activate account linking, switch on the toggle next to "Do you allow users to create an account or link to an existing account with you?".


The values you need to enter into these fields are in the below table.


Copy this URL and paste it into the text editor we recommended earlier and then return to the LWA in the Alexa Developer Console. Locate the Security Profile you created in Step 1, click the gear icon button next to it, and select "Web Settings" from the dropdown menu. This will allow you to finalize the linking process with LWA.
Enabling Persistent Unit ID (PUID)
For WebRTC to know which ASP device is calling or receiving a call, we need to setup and enable PUID for your skill. The PUID will be the identifier that will map your ASP Room ID through your skill to your WebRTC infrastructure. Please follow the below steps to enable PUID permissions:
· Log into the ASP Console
· Click on the Administration Tab on the left navigation bar
· Scroll down to the PUID Vendors section.
· There you can add your Vendor ID thus bestowing this permission for your account
o To find your Alexa Developer Console Vendor ID please click HERE.
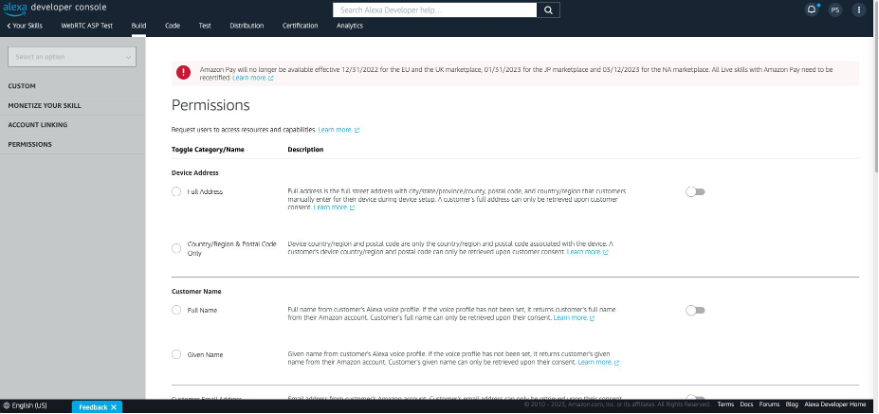
Once you have confirmed that your account has access to the PUID permission, you will need to enable the PUID for your WebRTC skill. To do this, navigate to your skill permission tab, scroll down to the PUID toggle, and turn on the permission.


Granting the Calling Communication permission within your Alexa skill
After enabling the PUID for your WebRTC skill, you will need to enable the Commutation - Calling permission to enable the skill to use ASP WebRTC APIs. This is the permission that enables your skill to use the new WebRTC APIs for inbound and outbound calling.
Service Provider Network Mapping for your Alexa Skill
As referenced above, this is a networking Alexa skill which acts a middleware for the WebRTC traffic to pass through and receive. For this step we will need to use the self-service Network Mapping APIs call to map your new WebRTC networking skill with the ASP infrastructure. To do this, use the API call listed below. For this API call, you will have to use the ServiceProviderID which you created in ‘Req #2: Create a Service Provider’.
POST /v1/communications/serviceProviders/{ServiceProviderID}/network
HTTP/1.1 Host: api.amazonalexa.com
Content-type: application/json
Authorization: Bearer {access token}

{"networkType": "SKILL",
"skillConfiguration":
{
"skillId": "amzn1.ask.skill.49d658da-cee8-4634-b64a-5a4d03c01755"
}
}
Your WebRTC Alexa skill now has the necessary permission and configuration.
Contact the Alexa Smart Properties team to learn more about offering voice-enabled experiences powered by ASP. Learn how to enable WebRTC at your property by reviewing the technical documents and accessing the GitHub Repo.


