Set Up Your Development Environment
The Alexa Connect Kit (ACK) SDK for Matter includes tools, libraries, and documentation for developers to build Matter-compatible device apps that connect to Alexa. The libraries include the Connectivity Standards Alliance (CSA) Matter SDK and software that connects your device to Alexa and ACK managed services, hosted on the Amazon Web Services (AWS) IoT cloud. Amazon distributes the SDK as source code with example apps and additional development and manufacturing tools.
Follow these steps to set up your development environment to build device apps with the ACK SDK for Matter.
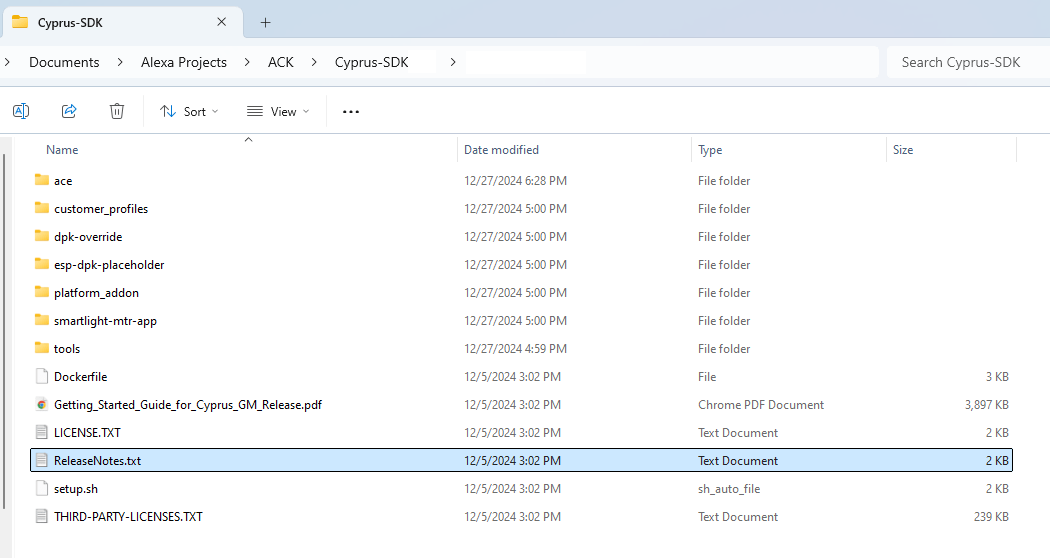
ACK-SDK package
The ACK SDK for Matter includes the following components:
- Smart-light sample app, found in the
Cyprus-SDK/smartlight-mtr-appdirectory. - Middleware components, found in the
Cyprus-SDK/acedirectory. - Matter SDK, found in the
Cyprus-SDK/ace/sdk/external/matter/repodirectory. You can find the Matter version in theReleaseNotes.txtfile.
Prerequisites
Before you start, make sure that you have the following items:
- A Windows, MacOS, or Ubuntu 22.04 LTS host machine with a USB port.
- ACK development kit for ACK SDK for Matter.
- USB cable to connect the development board to the host machine.
- Access to the ACK SDK for Matter provided by your ACK support engineer. For more details, see Contact Amazon about your project.
Note: The ACK SDK for Matter contains symbolic links and case-sensitive files and directories. You must unpack the SDK in the Ubuntu environment.
- If you have an Espressif development board, sign up for a GitLab account and request access to the Espressif repo. For access to the repo, send email to ack-access@espressif.com.
- If you have a Beken development board, send email to ack-support@bekencorp.com.
- Ubuntu 22.04 LTS Operating System installed on your computer or in a virtual machine (VM). You need at least 20 GB for the ACK packages. Ubuntu 22.04 comes with Python 3.10. These instructions require python 3.10.
- A Git repository available in your Ubuntu development environment. You can add the ACK SDK for Matter to an existing Git repository or initialize a new repository in the SDK directory.
Steps to set up your development environment
Complete the following steps to download and install required packages to build device apps with the ACK SDK for Matter.
- Download required packages.
- Build Matter tools.
- Install ACK SDK tools.
- Download the ZAP tool.
- Connect your host machine to the development kit.
Step 1: Download required packages
In this step, you download the required ACK SDK and vendor packages from your VM terminal window.
To download ACK SDK and vendor packages
- To download the GN build tools, in your browser, open GN, and then download and unpack the latest version of the GN binary for Linux.
- In an Ubuntu VM terminal, navigate to your home directory, and then edit
.profileto add the GN directory path to yourPATHvariable. Save the file.PATH="$PATH:<path to GN binary>"
- To update your
PATHvariable, log out of the VM, and then log back in. - To install Linux dependencies, at the command prompt, enter the following command.
Tip: If you're already root user, you don't need
sudo.
sudo apt-get install git gcc g++ pkg-config libssl-dev libdbus-1-dev \
libglib2.0-dev libavahi-client-dev ninja-build python3-venv python3-dev \
python3-pip unzip libgirepository1.0-dev libcairo2-dev libreadline-dev cmake
- If you already downloaded the SDK and extracted the files, go to Step 9.
- To download the ACK SDK for Matter, navigate to the AWS S3 bucket provided by the ACK support engineer, and then download the
Cyprus-SDKzip file.Tip: Download the SDK to an Ubuntu directory that's not shared with Window or MacOS. - To extract the files into a destination directory, such as
Cyprus-SDK, enter the following command.
unzip Cyprus-SDK_<version>.zip -d <destination directory, such as Cyprus-SDK>
- Verify the
Cyprus-SDKdirectory was created successfully. - If you have a Beken development kit, contact the ACK team for steps to download the required packages.
- If you have an Espressif development kit, complete the following steps to download the required packages.
To download the packages, you need a GitLab account and access to the Espressif repo.
- If you downloaded the SDK to an existing Git repository, go to step 13.
- In your VM terminal window, navigate to the
Cyprus-SDKdirectory. - To add a Git repository to the SDK, at the command prompt, enter the following command.
git init
- To commit the SDK files, at the command prompt, enter the following commands.
    git add .
    git commit -m "Initial commit of Cyprus SDK"
Step 2: Build Matter tools
In this step, you clone and build the Matter SDK from the Matter Git repo. For more details, see Building Matter.
To build Matter tools
- To check out the Matter repo, follow the instructions in Checking out All Platforms.
- To set up the environment, follow the instructions in Prepare for building.
- To build the Matter SDK, follow the instructions in Build for the host OS (Linux or macOS).
- To build the
chip-tool, follow the instructions in Building from source.
Thechip-toolacts as a Matter controller that allows you to commission your device to the Matter network and use Matter commands to communicate with your device. - To build the
chip-certtool, follow the instructions in Building.
You use thechip-certtool to generate and verify Matter certificates. - In a convenient place, such as Notepad on Windows or TextEdit on Mac, paste the directory where you placed the
chip-toolandchip-certtools.
Step 3: Install ACK SDK tools
In this step, you install the ACK SDK tools package on your host machine. Before you start, make sure that you have Python 3.10 and the Python package manager installed.
For prototype devices, you use the ACK SDK tools to provision the device with test certificates. For production devices, you use these tools to run a Matter server, provision the ACK production module, lock the module, and more.
To install the ACK SDK tools
- To download the ACK SDK tools package, navigate to the tools folder in the AWS S3 bucket, and then download the
ACK_SDK_Tools-matterzip file. - To extract the files into a destination folder at the same level as the
Cyprus-SDK, enter the following command in a Windows terminal.
unzip ACK_SDK_Tools-matter.zip -d <destination folder>
- To install the
acksdktoolspackage, navigate to the destination folder, and then, enter the following command.
pip install .
- To verify the ACK SDK tools installed correctly, enter the following command.
pip list
- Verify that you see the
acksdktoolspackage in the list.
Step 4: Download the ZAP tool
The ZCL Advanced Platform (ZAP) tool is a user interface developed by the CSA to customize Matter clusters, attributes, and commands. In this step, you download and unpack the ZAP package on your host machine.
To download the ZAP tool
- Navigate to the ZAP repository in GitHub.
- On the right side, under Releases, choose Latest.
- Download the ZIP file for your host machine type.
- To extract the files into a destination directory of your choice, in your VM terminal, enter the following command.
unzip zap.<OS type>.zip
Step 5: Connect your host machine to the development kit
Before you can run commands on the development kit, you connect your host machine over a serial port.
If your host machine is an Ubuntu VM or a Mac, use the screen command in a terminal window. For Windows, use PuTTY.
Complete the following instructions to connect your host machine to the serial console on the development kit. Select the tab for Ubuntu, Windows, or Mac based on your host machine type.
To connect your Ubuntu VM to the development kit
- Navigate to VM settings, and then enable USB support.
- Depending on your virtualization software, add a USB filter to select the USB device.
- Connect a USB cable from your host machine to the debug port on the development kit.
- Select the USB device to connect it to the VM.
- In an Ubuntu terminal window, at the command prompt, enter the following command to add the user to the dialout group for access to the serial port.
sudo usermod -a -G dialout $USER
- To identify the serial port, enter the following command.
dmesg | grep tty
- In a convenient place, such as Notepad on Windows or TextEdit on Mac, paste the port number.
- To connect to the development kit with a baud rate of 115200, enter the following command in an Ubuntu VM terminal window. Use the port number that you saved in the previous step.
This command opens a new terminal window on the development kit.
screen /dev/tty<port number> 115200
- To verify your Ubuntu VM connects to the development kit, enter
?in the terminal window.
The command displays the list of available commands on the development kit.
To connect your Windows host machine to the development kit
- Connect a USB cable from your host machine to the debug port on the development kit.
Tip: In the steps that follow, if you aren't sure which port is the development kit, disconnect and then reconnect the USB cable to see the entry that disappears and then reappears.
- To identify the port on your host machine to which the development kit connects, from the Start menu, search for and open Device Manager.
- In Device Manager, expand Ports (COM & LPT), and then find the USB serial connection. For example, the connection might be Silicon Labs CP210x USB to UART Bridge.
- In a convenient place, such as Notepad, paste the port number.
- Install PuTTY on your Windows machine.
- From the Windows start menu, open PuTTY, and then under Category, select Session.
- Under Connection type, select Serial, and then for Serial line, enter the port number you saved in Step 4. For Speed, enter 115200.
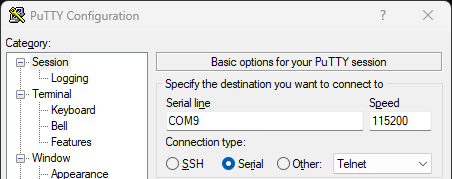
- To save the configuration, in Saved Sessions, enter Development Kit, and then choose Save.
Next time, to select the saved configuration, next to Development Kit, choose Load. (Or, double-click Development Kit.) - To connect to the development kit with a baud rate of 115200, select Open.
A PuTTY terminal window opens. To see the command prompt, press the Enter key. - To verify your host machine connects to the development kit, enter
?in the terminal window.
The command displays the list of available commands on the development kit.
To connect your Mac host machine to the development kit
- Connect a USB cable from your host machine to the debug port on the development kit.
Tip: In the steps that follow, if you aren't sure which port is the development kit, disconnect and then reconnect the USB cable to see the entry that disappears and then reappears.
- To identify the port on your host machine to which the development kit connects, open the Finder icon in your Dock.
- In Finder, choose Applications > Utilities, open System Information, and then in the sidebar, choose USB.
- In a convenient place, such as TextEdit, paste the port number. For example,
/dev/tty.usbserial-1420. - To connect to the development kit with a baud rate of 115200, enter the following command in a terminal window. Use the port number that you saved in the previous step.
This command opens a new terminal window on the development kit.
screen /dev/tty.usbserial-<port number> 115200
- To verify your host machine connects to the development kit, enter
?in the terminal window.
The command displays the list of available commands on the development kit.
Related topics
- Building Matter
- CHIP Certificate Tool
- Working with the CHIP Tool
- Build Apps for ACK-based Matter Devices
- Provision ACK-based Matter Prototype Devices
- Commission ACK-based Matter Devices
- Certify ACK-based Matter Devices
- Manufacture ACK-based Matter Devices
Last updated: frontmatter-missing