
Take Screenshots on Fire Tablets
When you submit your app to the Developer Console, you must include at least three screenshots of your app. This guide describes the process of taking screenshots on Fire tablets and desktop computers.
- Take screenshots on Fire tablets (3rd Gen and later)
- Screenshots on 2011-2012 Fire tablets
- Screenshots on Windows desktop
- Screenshots on Mac OS X
Take screenshots on Fire tablets (3rd Gen and later)
To take screenshots on Fire tablets 3rd Generation and later (after 2012), you can use the physical buttons on the device.
Before taking a screenshot, locate the Volume Down button and the Power button.
- With the device powered on, press and hold down the Volume Down button and Power button together for one second. The screen will flash briefly and a smaller image of the screen will appear in the center of the screen to indicate a successful screenshot. If the volume is turned up, you'll hear a shutter sound just before the screen flashes.
- Release the buttons.
- Use a USB cable to connect the tablet to your computer.
- Do one of the following:
- On Windows: Navigate to
Internal Storage > Pictures > Screenshotson the device. The screenshots are saved with filenames that include the year, month, day, hour, minute, and second in the format:Screenshot_yyyy-mm-dd-hh-mm-ss.png - On MacOS: Install a free app, Android File Transfer (AFT), to complete a USB transfer. After installation, the AFT application starts automatically when you plug in your Fire device. In the AFT window, navigate to
Pictures > Screenshots. The screenshots are saved with filenames that include the year, month, day, hour, minute, and second in the format:Screenshot_yyyy-mm-dd-hh-mm-ss.pngas shown:
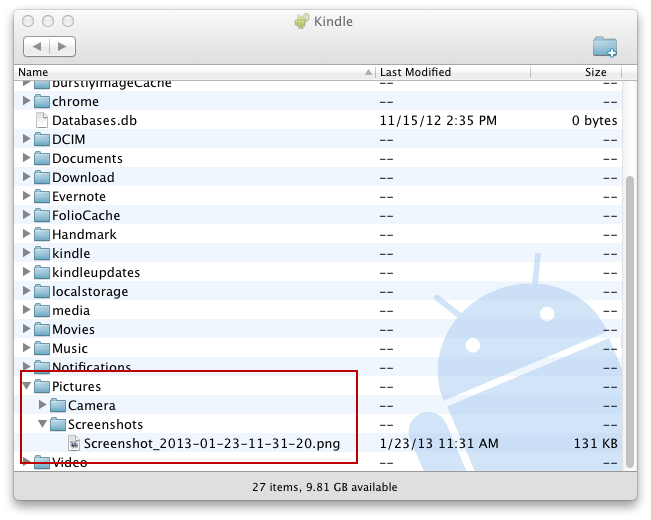
Android File Transfer window - On Windows: Navigate to
Screenshots on 2011-2012 Fire tablets
You can take screenshots from 1st and 2nd generation Fire tablets using Eclipse, a popular desktop developer tool for Android.
- Connect the tablet to your computer as described in Connect to Fire Tablet through ADB.
- In Eclipse, from the Window menu, select Open Perspective > Other… > DDMS.
-
Select the tablet, and click the camera icon. (If the tablet isn't shown, from the Window menu, select Navigation > Show View Menu > Reset adb) The Device Screen Capture window displays the current screen as shown on the tablet. If the device screen saver is on, the window shows what would be on the screen if the screen saver was not running.

Device Screen Capture Window - Save the screen by clicking Save.
- When you are finished taking screenshots, click Done.
Screenshots on Windows desktop
To take a screenshot of your entire desktop, press the Print Screen key.
To take a screenshot of an active window:
- Click the window you want to capture.
- Press Alt+Print Screen
- Press the Print Screen key.
Use image editing software such as Microsoft Paint to crop or resize this image. To resize a picture with Microsoft Paint:
- Open Paint by clicking the Start button. Click All Programs>Accessories>Paint.
- Click the Paint button, click Open, click the picture you want to resize, and then click Open.
- On the Home tab, in the Image group, click Resize.
-
In the Resize and Skew dialog box, select the Maintain aspect ratio checkbox so that the resized picture will have the same aspect ratio as the original picture.
If the Maintain aspect ratio checkbox is selected, you only need to enter the horizontal value (width) or vertical value (height). The other box in the Resize area is updated automatically.
- Do one of the following in the Resize area, and then click OK:
- To resize your picture by a certain percentage, click Percentage, and then enter a percentage to reduce the width by in the Horizontal box or a percentage to reduce the height by in the Vertical box.
- To resize the picture so it's a specific size, click Pixels, and then enter a new width in the Horizontal box or new height in the Vertical box.
- Click the Paint button, point to Save as, and then click the picture file type for the resized image.
- Type a new file name in the File name box, and then click Save.
To crop a picture using Paint
- Open Paint by clicking the Start button. Click All Programs>Accessories>Paint.
- Click the Paint button, click Open, click the picture you want to crop, and then click Open.
- On the Home tab, in the Image group, click Select.
- Click and drag to select the element you want to keep in the picture, and then click Crop.
- Click the Paint button, point to Save as, and then click the picture file type for the cropped picture.
- Type a new file name in the File name box, and then click Save.
Screenshots on Mac OS X
To take a screenshot of the entire screen:
- Simultaneously press the keys: Command (⌘)-Shift-3.
- The screenshot is automatically saved on your desktop.
To take a picture of part of the screen
- Simultaneously press the keys: Command (⌘)-Shift-4
- Drag the crosshair pointer to select the area.
- Continue to press the mouse button, release the keys.
- Press Shift, Option, or the Space bar while you drag to resize the selection area.
- When you are ready to take a picture, release the mouse button.
To cancel, press Escape before you release the mouse button.
You can resize the image using an image editor program such as Preview. To Resize an image using Preview
- Launch Preview.
- Choose Tools > Adjust Size.
- Enter the size you want to change the image to.
- Click ok.
To crop an image using Preview
- Launch Preview.
- Click and drag to select the area of the image that you want to retain.
- Choose Tools > Crop (or press command-K).
Last updated: Oct 29, 2020