
Computer Vision Guidelines for Ring Appstore Apps
Audience: developers building Ring Appstore apps that analyze camera video and images.
Computer vision is one of the most exciting things you can build on a Ring camera. Turning a raw motion clip into "that's a delivery" or "that's your dog" feels like magic, and modern models make the demo almost trivial: point a vision LLM at a frame and it answers.
The interesting part isn't getting an answer. It's getting the right outcome, repeatedly, at a cost and latency your app can sustain. A pipeline that looks great on a few test clips can quietly fall apart in production for reasons that have little to do with model accuracy:
- Volume economics. Cameras fire on motion all day. If every event hits an expensive model, your bill scales with motion, not with the moments your users care about.
- Real-world imagery. Production frames are distant, blurry, backlit, and off-angle. Models that ace clean benchmark images struggle here.
- The cost of being wrong. A missed event and a false alarm are not equally bad, and which one hurts depends entirely on your app. That decision should shape your architecture, not be an afterthought.
- Change over time. Models, prices, and regions move. The pipeline you ship should let you swap pieces without a rewrite.
This guide lays out one pattern that handles all four: decide your accuracy bar, prepare the right input frames, then run a tiered funnel that spends cheap compute on everything and expensive compute only on the slice that earns it. The result is an app whose cost tracks relevant events instead of raw motion, usually with better domain accuracy, because the workhorse is a small model you tuned on your own data.
How to use this guide. This is a pattern, not the pattern, and not a universal "best practice." Computer vision has many valid approaches, and the right one depends entirely on your use case: your accuracy bar, event volume, latency needs, team size, and budget. For some apps a single managed vision API call per event is the correct, simplest choice; for others, parts of this funnel are overkill or missing a piece. Treat the sections here as a menu of techniques with their trade-offs spelled out. Take the parts that fit your app, skip the ones that don't, and let your own requirements, not this document, make the final call. Where a choice has a meaningful trade-off, the text tries to say so, so you can decide deliberately.
The machine learning vocabulary this guide uses is defined in Terminology at the end of the page.
On this page
- The core problem: motion volume is not value
- Decide your accuracy bar first: it dictates your cost
- Ring media constraints to design around
- Turning video into the right image: frame selection
- The core pattern: a tiered CV funnel
- Stage 0: Filter on the webhook subtype before you process anything
- Stage 1: The cheap object gate
- Stage 2: A small, domain-tuned model you train
- Stage 3: The heavy model, used sparingly
- Close the loop with user feedback
- Cross-cutting guidance
- Why this works: cost shape
- Terminology
- Related topics
The core problem: motion volume is not value
Ring cameras are motion-triggered, and most motion events are not the thing your app cares about. A package app only wants deliveries; a pet app only wants pets; a wildlife app only wants animals. Yet every motion event arrives as a full video to process.
If you send every event to a heavyweight model (a large vision LLM, a managed vision API, or a GPU endpoint), two things happen:
- Cost scales with motion, not with value. You pay the premium price for the 95% of events that contain nothing relevant.
- Latency and rate limits become a tax on uninteresting events.
The single most important CV design decision for a Ring Appstore app is therefore not which model is most accurate. It's how you avoid running the expensive model most of the time.
Guiding principle: Spend compute in proportion to the probability that an event matters. Filter aggressively and cheaply first; reserve expensive inference for the small fraction that survives the filter.
Decide your accuracy bar first: it dictates your cost
Before designing the pipeline, answer one question honestly: how accurate does your CV actually need to be, and what is the cost of being wrong? This single decision drives how many expensive layers you need and therefore your entire cost structure. Accuracy and cost are a direct trade-off; more correctness almost always means more (and more expensive) inference.
Sort your app into one of two broad categories, as the following diagram shows.
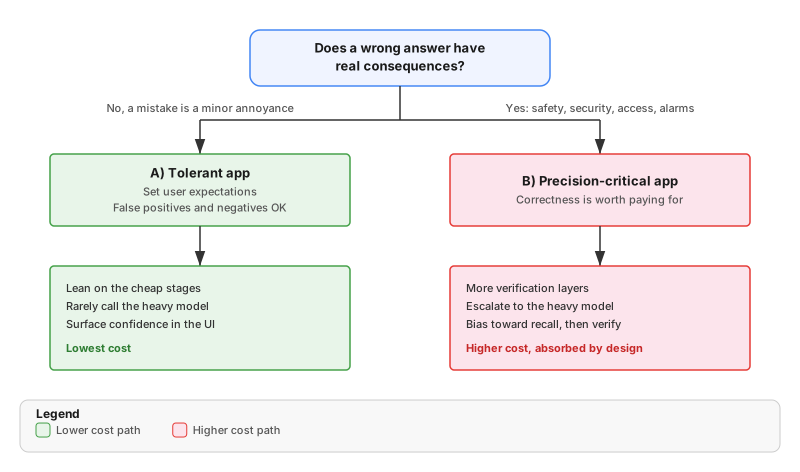
A) Tolerant apps, where false positives and false negatives are acceptable if you set expectations. Many consumer and engagement apps fall here. A missed sighting or an occasional wrong label is a minor annoyance, not a failure. If you can set the right expectation with the user by framing results as "best effort," showing confidence, and letting users correct or dismiss results, then you do not need near-perfect CV, and you should not pay for it.
- Lean hard on the cheap stages. Let the small model (Stage 2) answer most cases; invoke the expensive model (Stage 3) rarely or not at all.
- Accept a lower confidence threshold and surface uncertainty in the UI ("looks like…", a confidence badge, a thumbs up or thumbs down control).
- This is dramatically cheaper and scales comfortably with motion volume.
B) Precision-critical apps, where a wrong answer has real consequences. Security, safety, access-control, or anything where a false negative means a missed intrusion or a false positive triggers an alarm. Here correctness is worth paying for.
- Run more verification layers and escalate more events to the heavy model.
- Bias thresholds toward recall (don't miss the important event) and add a verification pass to control false positives.
- Expect higher per-event cost, and make sure your pricing and architecture can absorb it.
Practical guidance for setting expectations (Category A):
- Show confidence, and don't present low-confidence guesses as fact.
- Give users a correction mechanism (confirm, reject, or relabel). This both manages expectations and feeds your training data. See Close the loop with user feedback.
- Decide which error is worse for your UX and tune accordingly: a wildlife-spotting feed can tolerate false positives (an extra event) more than false negatives (a missed rare visitor); a "quiet hours" notifier is the opposite.
Takeaway: Don't buy accuracy you don't need. The cheapest viable pipeline is the one matched to your real tolerance for error, and most engagement apps can set expectations with users and live happily in Category A.
Ring media constraints to design around
Three properties of Ring media affect every CV pipeline. Account for them before you train anything.
All delivered media carries a watermark. Live video, media clips, and image snapshots delivered through the Ring API include a mandatory visible overlay with the Ring logo (top-left) and the device ID, app name, and timestamp (top-right). The watermark is applied server-side and cannot be removed. Train and evaluate your models on watermarked imagery, because a model trained on clean images meets a systematic artifact in production that it has never seen. The watermark renders at a fixed pixel size, so requesting a lower resolution increases its relative footprint and covers more of your subject. Request full resolution when the corners of the frame matter to your model. See Watermark Behavior.
Some devices return encrypted video. Ring is rolling out two video-encryption modes, Throw Away the Key (TAKE) and End-to-End Encryption (E2EE). A TAKE device stays visible and callable through the Ring API, but video requests return encrypted content, so your app cannot read recordings or snapshots, or open a live stream for that device. E2EE devices are not returned by any Ring API. Your pipeline must treat unreadable media as an expected outcome for a subset of devices and degrade gracefully rather than retrying or surfacing an error to the user. See Video encryption (TAKE and E2EE).
Webhook handlers must respond within 5 seconds. CV is far too slow to run inline with the webhook response. Acknowledge the webhook immediately, enqueue the event, and process it in the background. See Webhook Response Handling.
Turning video into the right image: frame selection
Your models run on still images, not video. Ring events arrive as video, but the object detector and the vision foundation models are all image-in. That matters for two reasons: video input is expensive (video-capable models cost far more and bill by duration), and one good frame beats many mediocre ones. So the first thing you do after a clip is downloaded is pick the best frames on cheap CPU, and send only those to a paid model. Don't just grab the first frame; it's often the worst (exposure still adjusting, subject half-in-frame, empty pre-roll).
Techniques for picking the best frames:
- Sample, don't scan. Decode a few evenly spaced frames per second, not all 20 to 30.
- Drop blurry frames with a cheap sharpness metric (variance of the Laplacian).
- Reject unusable frames that are near-black, blown-out, or night-vision grayscale when color matters.
- Let the object detector pick the winner. Keep the frame with the highest-confidence, largest, most-centered detection, which is the clearest shot. You're running the detector as your Stage 1 gate anyway, so reuse its output for free.
- Produce two crops from that frame: a tight crop for Stage 2 classification, and the full frame with the box annotated for Stage 3 verification.
- Keep two to three frames for the hard cases you escalate, still far cheaper than sending video.
The following diagram shows the frame-selection sequence.
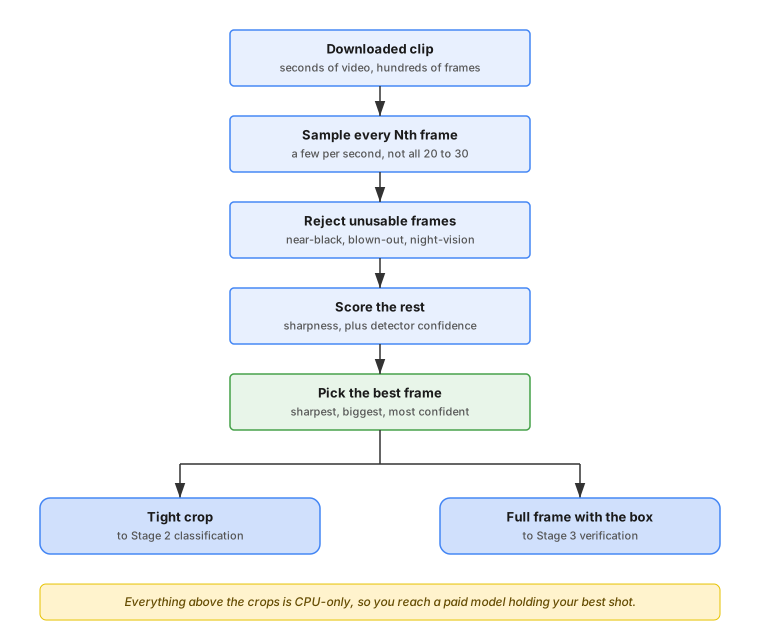
Everything upstream of the two crops is CPU-only, so you reach a paid model holding your best shot, on image pricing rather than video pricing.
AWS building blocks:
- FFmpeg (in your detection Lambda container) for decode and frame extraction; give it enough memory and
/tmpfor a clip. - OpenCV or Pillow in the same function for the blur and brightness checks and cropping. All CPU, no GPU.
- Amazon S3 to store the chosen key frames so later stages and the training flywheel reuse them instead of re-decoding.
The core pattern: a tiered CV funnel
Structure processing as a funnel where each stage is cheaper and higher-volume than the next. An event only advances if the prior stage says it's worth it. Not every app needs every stage: a simple app might use only Stage 0 plus one model, while a demanding one uses all four. Treat the stages as building blocks to combine as your use case requires.
The following diagram shows the funnel, and how traffic and cost per event narrow at each gate.
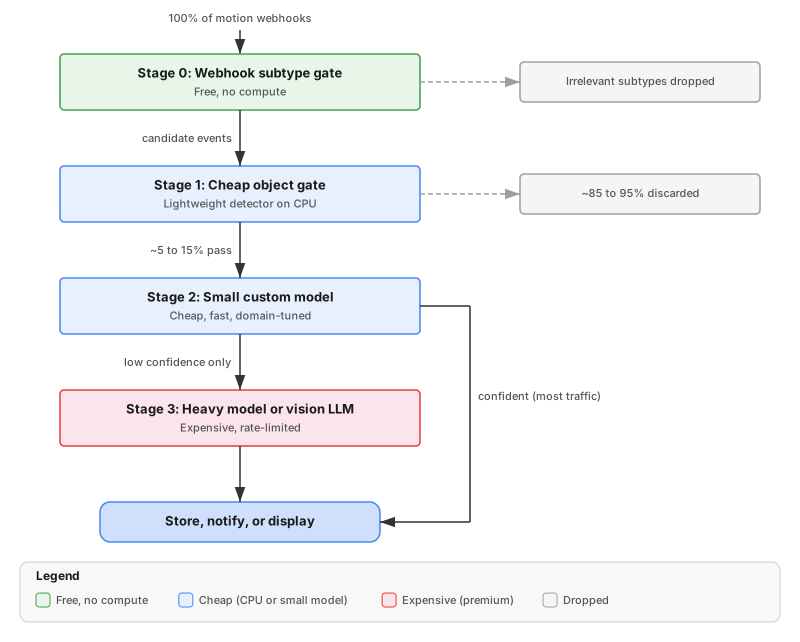
Each stage answers a progressively harder question, and each stage is allowed to reject or short-circuit so downstream stages run rarely. Note that Stage 0 runs before you even download the video. It's the cheapest filter of all because Ring has already done the work for you.
The key visual to internalize: the box that costs the most per event (Stage 3) is the one that should see the fewest events. Every gate upstream exists to keep it that way.
Stage 0: Filter on the webhook subtype before you process anything
Goal: Drop irrelevant events using signal Ring already computed, before you download a single frame or run any model. This is free filtering, so use it first.
Ring motion webhooks carry a subtype that classifies what triggered the event. When the camera owner has Smart Alerts enabled on their device, Ring's own detection populates this field, for example distinguishing a person from a vehicle from a package delivery. Your webhook handler can read it and decide, instantly and for zero compute cost, whether the event is even a candidate for your app.
How it arrives: the subtype shows up on the motion detection webhook payload as sub_type, inside the attributes object. Read it defensively and default to "unknown" when it's absent:
sub_type is returned inside attributes. Read it as data.attributes.sub_type, not data.subType.const subtype =
webhookEvent.data.attributes?.sub_type ||
'unknown';
How to use it, mapping subtypes to your app's intent:
- A package / delivery app cares about
package_deliveryandhuman-adjacent events, and can skip purevehicledrive-bys. - A pet app can skip
vehicleand deprioritizehuman. - A wildlife / animal app can skip
humanandvehicleevents outright, because those videos will not contain the target.
For example, an app whose target never appears in person- or vehicle-triggered clips can drop those the moment the webhook arrives:
// The subtypes you're confident can't contain your target.
// Everything else (including values you've never seen) falls through to the CV stages.
const SKIP_SUBTYPES = new Set(['human', 'vehicle']);

if (SKIP_SUBTYPES.has(subtype)) {
  // acknowledge the webhook and stop: no download, no CV, no cost
} else {
  // process: motion, other_motion, package_delivery, unknown, anything new...
}
You can also use the subtype deeper in the pipeline to suppress the expensive fallback for categories that are structurally unlikely to contain your target, so even events that aren't fully dropped still skip wasted inference.
Important caveats. Treat it as an optimization, not a guarantee:
- Expect the set of subtype values to grow. Which values you see depends on whether the customer has Smart Alerts enabled on the device. With Smart Alerts off, Ring performs no classification and every motion event carries
motion. With it on, the event carrieshuman,vehicle,package_delivery, orother_motion. The generic ones,motionandother_motion, are often the majority of traffic, and the set can change over time as Ring adds detections. Build for an open-ended vocabulary: maintain an explicit skip list of the subtypes you drop, and treat every other value, known or not, as "process." Never hard-code an exhaustive list of expected subtypes, because a value you didn't anticipate should fall through to the CV stages, not get dropped or crash your handler. - It depends on the user's settings, and you can't check them. Classification only happens when the device has Smart Alerts enabled, and no API reports whether it is. So a
motionevent is ambiguous: it may mean the device classifies nothing, or that Ring classified this particular trigger as generic motion. Your pipeline must work either way (fall through to Stage 1), and must never assume the field carries a classification. See Motion Detection. - Default to "process," not "drop," when unsure. Only skip on subtypes you're confident are irrelevant. An unknown or unrecognized subtype should pass through to the CV stages so you don't silently miss real events.
- It's a coarse signal. Subtypes describe the trigger, not your specific object. A generic
motionorother_motionevent can still contain your target (many objects register as generic motion rather than a dedicated subtype), so Stage 0 removes the obvious non-candidates and leaves the real discrimination to Stages 1 through 3.
Why it's the best filter you have: it costs nothing, runs before any video download or model invocation, and removes a meaningful slice of traffic (people, cars) that would otherwise consume Stage 1 through 3 budget. For a camera pointed at a driveway or front door, person and vehicle events can be the majority of motion, so dropping them at the webhook is a large, free win.
AWS building blocks:
- Do this check inline in the webhook handler (API Gateway to Lambda), before enqueuing. Acknowledge the webhook fast and simply don't enqueue the events you're dropping.
- Keep a structured log line of
typeandsub_typeper webhook so you can measure your subtype mix and tune which ones you skip.
Stage 1: The cheap object gate (the highest-leverage CV stage)
Goal: On every event, answer one coarse question as cheaply as possible, "Is my target object plausibly present, and roughly where?" Discard everything else immediately.
This is a lightweight, general object detector that runs on CPU inside your compute (for example, bundled into a Lambda container or a small container service). It does not need to be clever; it only needs to be fast, cheap, and have decent recall for your object category so you don't throw away real events.
Why this matters so much: this stage decides the cost of your entire pipeline. If 90% of events have no relevant object and this gate removes them for near-zero cost, you've cut your expensive-inference bill by roughly 10 times before it's incurred.
Design guidance:
- Favor recall over precision here. A false positive is cheap (a later stage catches it); a false negative means a missed, unrecoverable event. Tune the confidence threshold low and let later stages reject.
- Run it on cheap, scalable compute. CPU inference in a container-based function is usually sufficient for frame-sampled detection. You don't need a GPU to filter.
- Sample frames, don't process every frame. Motion clips are seconds long at 20 to 30 fps. Running detection on a handful of sampled frames per clip is typically enough to decide "present / not present" and cuts compute dramatically.
- Keep the bounding box. Even a rough region is valuable: it lets you crop for Stage 2 and gives you a location to annotate.
Model selection note: evaluate commercial licensing as a first-class criterion alongside accuracy and latency; licenses in this space vary widely and some popular detectors require a paid license. The architectural value is in having a cheap gate, not in any specific detector.
Models that fit this stage: a small, fast, general-purpose object detector, not a classifier or an LLM:
- A lightweight open-source object detector (a compact few-million-parameter model) running on CPU, the cheapest per-event option. Confirm its weights' license allows commercial use before shipping.
- Amazon Rekognition (
DetectLabels) for a fully managed, commercially-licensed API that returns labels with bounding boxes, when per-call cost suits your volume.
Avoid vision LLMs here; they're far too expensive and slow for a gate that runs on 100% of events.
AWS building blocks:
- AWS Lambda (container image) for bundling a detector plus its native dependencies, scaling to zero between events.
- Amazon SQS in front of the detector so bursts of motion events queue up and process with retries and a dead-letter queue, rather than overwhelming downstream stages.
- Amazon S3 event notifications to SQS to Lambda as the ingestion path for stored clips.
Stage 2: A small, domain-tuned model you train
Goal: For events that pass the gate, do the real work (classify or identify the object) using a small model fine-tuned on your own data, not a general-purpose model.
A compact classifier fine-tuned on your own production imagery typically beats both off-the-shelf classifiers and general vision LLMs on your domain, at a fraction of the cost. Three reasons:
- Domain fit beats generality. Off-the-shelf models are trained on clean, centered images; security-camera frames are distant, blurry, oddly lit, and off-angle. A model trained on your distribution handles that far better.
- Cost and latency. A small classifier is cents-scale per thousand inferences and low-latency, right for the volume that survives Stage 1.
- You control the label space. You train on exactly your categories, not thousands of irrelevant ones.
You don't need a labeled dataset on day one, and you shouldn't pay a human to build one. Use an expensive, high-accuracy model as a teacher to generate clean labels for a cheap model you own (a teacher/student pattern): you run the costly model only to manufacture data, not to serve production volume.
The data flywheel runs in two phases.
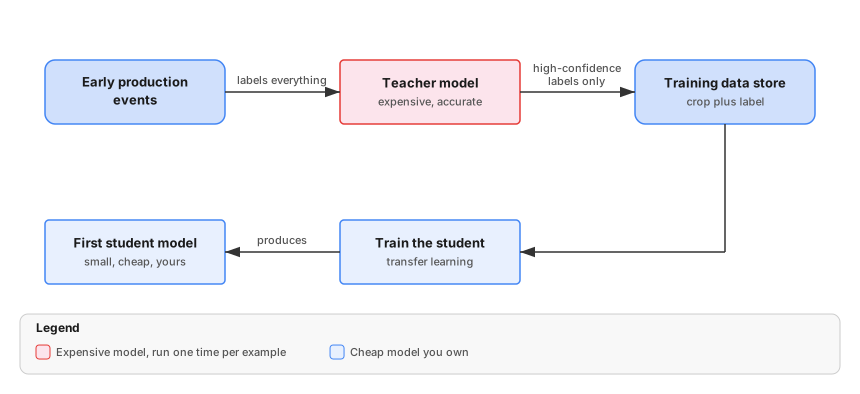
Bootstrap (before you have a student):
- Teacher labels the data. With no model of your own yet, route events to a higher-cost, higher-accuracy model (Stage 3). Its job here isn't to serve users cheaply; it's to produce trustworthy labels.
- Keep only high-confidence labels. Save the teacher's confident results as training examples (crop plus label), organized by category in S3. Discard or quarantine the uncertain ones so you don't poison the dataset.
- Train your first small model. Fine-tune a compact classifier on this dataset. This is the student: cheap and fast to run.
The following diagram shows the bootstrap phase.
Steady state (after the student is live):
- The student runs first on every event. It serves the vast majority of traffic cheaply. Only when its confidence is low does the event escalate to the teacher. This is the key cost lever: the expensive model sees only the hard slice, not the whole stream.
- The teacher corrects the hard cases, and that correction becomes training data. When the teacher resolves a low-confidence event, save its answer as a new labeled example and feed it back into S3. Those are exactly the examples the student most needs to learn from, so the next retrain closes the gap. The loop tightens over time: the student's confident share grows, and the teacher is called less and less.
The following diagram shows the steady-state loop.
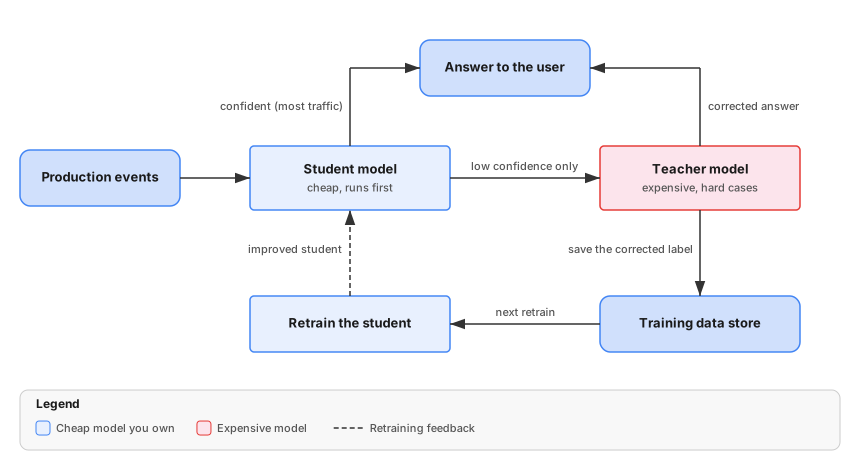
This hinges on a confidence gate: accept the student's answer when it's confident, escalate only the uncertain cases to the teacher. That threshold is the dial that trades cost against accuracy, so set it where your accuracy bar from Decide your accuracy bar first demands.
Why this wins in the long term: the expensive teacher runs one time per example to build a durable asset (a labeled dataset and a model you own) instead of every time in production. Accuracy climbs as the dataset grows, and your blended cost falls at the same time, because more traffic shifts to the cheap student. Early on you lean on the teacher; over months, less and less.
Models that fit this stage: a small image classifier fine-tuned on your own crops. A compact backbone adapted with transfer learning is the sweet spot of accuracy, speed, and cost:
- A pretrained CNN backbone, for example a ResNet (ResNet-18 or ResNet-50) or a small EfficientNet (B0 to B3). Well understood, quick to train on modest data, cheap to run. Start small and move up a size only if accuracy demands it.
- Amazon Rekognition Custom Labels if you'd rather not manage training code: bring labeled crops, and it trains and hosts the classifier for you, fully managed and commercially licensed.
AWS building blocks:
- Amazon SageMaker is a great starting point. No research team or GPU cluster needed: start from a pretrained backbone and use transfer learning so training stays cheap, fast, and approachable. It handles training jobs, model registry, and hosting.
- SageMaker Serverless Inference scales to zero when idle, so you pay only for inferences. Ideal for spiky, motion-driven traffic.
- Amazon S3 as the training-data lake, folder-per-category, written by the teacher and read by your training jobs.
Stage 3: The heavy model, used sparingly
Goal: Handle the genuinely hard cases, verify suspicious results, and produce rich natural-language output (descriptions, summaries), but only for the small slice that reaches it.
General vision models and vision-capable LLMs are powerful and flexible, but they are the most expensive and rate-limited option. Treat them as a backstop and a reasoning layer, not the workhorse.
Where they earn their cost:
- Low-confidence fallback when your small model is unsure.
- Verification and false-positive rejection. A full-frame "is this really what we think it is?" check catches the characteristic failure of cheap detectors: confidently detecting the wrong category (for example, a pet mistaken for the target). Sending the full frame with the candidate region marked lets the model use scale and context the cropped detector never saw.
- Rich description and summarization for user-facing text.
Design guidance:
- Gate the call. Only invoke when confidence is low or when a known-ambiguous signal is present (for example, another object class was also detected).
- Pass context, not just a crop. For verification, the full frame with an annotation beats a tight crop, because scale and surroundings are often what disambiguate.
- Make it a swappable component you can turn off. Model availability, pricing, and regions change. Put the heavy model behind an internal interface and an environment flag so you can switch providers and models (or disable the path) without touching the pipeline. Done well, you can swap the underlying model more than once with no pipeline changes.
Models that fit this stage: a vision-capable foundation model on Amazon Bedrock, all commercially licensed and reachable through one API. This stage sees little traffic, so you can afford a capable model; just match the tier to the job:
- Amazon Nova Lite as a low-cost default for high-volume escalations.
- Amazon Nova Pro when hard cases need stronger reasoning or richer descriptions.
- Anthropic Claude (a Sonnet-class vision model) for strong visual reasoning and high-quality user-facing text.
- OpenAI GPT models on Bedrock (vision-capable): a fast tier for high-volume checks, a larger one for the hardest cases.
A good pattern is tiered escalation even within Stage 3: try a cheaper vision model first and fall through to the most capable only when it's still unsure. Your flywheel teacher is typically whichever of these you trust most for labeling.
AWS building blocks:
- Amazon Bedrock for managed access to foundation vision models without managing infrastructure, with the option to keep inference in-account and in-region for data governance.
- A thin adapter layer in your code so the rest of the pipeline is model-agnostic.
Close the loop with user feedback
No CV pipeline is right every time. What turns a wrong result from a frustration into a strength is letting the user correct it and then learning from the correction so the mistake gets rarer. An app that keeps serving the same wrong answer feels broken; one that lets you fix it and improves feels smart. It's also your best data source: corrections are the cleanest, most relevant labels you'll ever get, real frames labeled by the person who knows what was there. Feed them straight into the Stage 2 flywheel.
Give the user a correction mechanism:
- Make every result correctable with a lightweight confirm, reject, or relabel action, one tap, in context. The easier it is, the more corrections you get.
- Show confidence; never present a guess as fact. Phrasing low-confidence results as tentative ("looks like…") makes a wrong answer read as a correctable guess, which dramatically lowers frustration.
- Let users suppress or tune what they don't want (mute a category, raise the threshold) instead of dismissing the same thing repeatedly.
Turn corrections into training data:
- Capture the correction with its frame, tagged
source: user_feedback, into the same S3 lake the flywheel uses. - Weight user labels highly. A human correction on a real frame beats a model-generated label; relabels of confident-but-wrong predictions are especially valuable, because they target exactly where the model is overconfident.
- Close the loop. Each retrain folds corrections back in, so this week's flagged mistake shows up less next week, improving the system at the things users actually care about.
The following diagram shows the feedback loop.
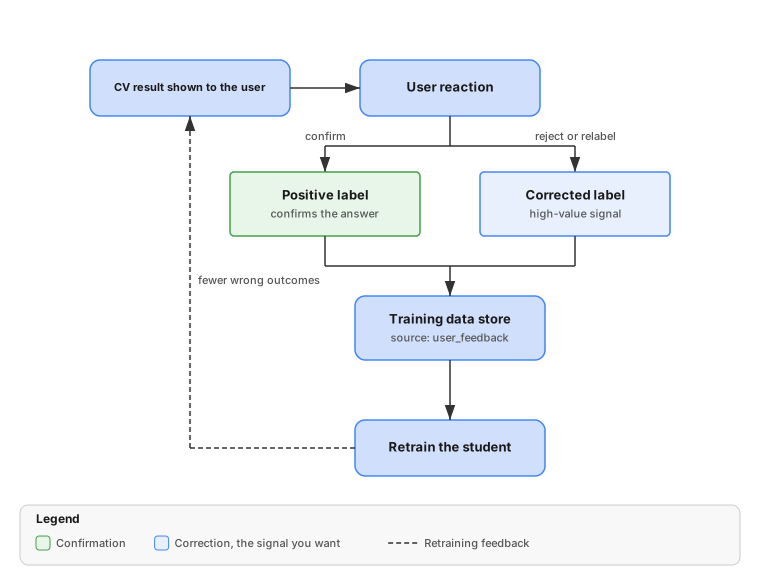
A note on expectations: this feedback loop is what makes a tolerant app (Category A in Decide your accuracy bar first) genuinely pleasant to use. You don't need near-perfect CV if the user can correct the misses in one tap and watch the system learn. For precision-critical apps (Category B), feedback is still valuable, but pair it with the heavier verification path rather than relying on users to catch errors.
AWS building blocks:
- An API endpoint (API Gateway to Lambda) that records a feedback event: the event or result ID, the user's correction, and a pointer to the stored frame.
- Amazon DynamoDB for the per-result feedback record, and Amazon S3 for the corrected training examples (same lake as the flywheel, tagged by source).
- A periodic job (for example, scheduled via EventBridge) that folds accumulated corrections into the next SageMaker retrain.
Cross-cutting guidance
Process asynchronously, off the webhook path. Acknowledge the Ring webhook immediately, enqueue the event, and process in the background. CV is too slow to run inline with the webhook response.
Ring webhook -> API Gateway -> Lambda (ack fast) -> SQS -> CV pipeline (async)
Let confidence decide escalation, at every tier. The whole funnel is held together by one rule: a cheaper model answers when it's sure, and only low-confidence results get escalated to a more capable, more expensive model to decide. This applies at every boundary, not just teacher/student:
- Stage 1 to Stage 2: if the cheap object gate is unsure whether the target is present, pass the event up rather than dropping it (favor recall at the gate).
- Stage 2 to Stage 3: if the small model's top score is below your confidence threshold, or two classes are close together (an ambiguous result), escalate to the heavy model to make the call.
- Within Stage 3: reserve the most capable (and most expensive) model for the genuinely ambiguous cases; a mid-tier model can often resolve the rest.
Treat the confidence threshold as a tunable dial: higher sends more events up the chain (more accuracy, more cost), lower keeps more on the cheap path. Set it to the accuracy bar from Decide your accuracy bar first. Watch for overconfident-but-wrong results, so on precision-critical paths pair the score with a verification pass rather than trusting it alone. And every time a higher model overrides a lower one, capture it as training data (see Stage 2) so escalations get rarer.
Right-size per stage. Give the CPU detector modest memory; give the video-processing step enough memory and ephemeral storage for frame extraction; keep the LLM-calling function lean. Don't provision the whole pipeline for the heaviest stage.
Instrument the funnel. Emit a metric at each stage boundary: events in, events passed, which model answered, confidence distribution, fallback rate. You want to see what fraction reaches Stage 3, because that fraction is your cost. Alert if it drifts up (it usually means a model regressed or a threshold is wrong).
Mind data residency and privacy. Camera imagery is sensitive. Prefer processing and storage in-region, keep retention short, and if you use managed foundation models, choose options that keep inference within your account and region. Your handling of Ring media must also comply with the Ring Appstore Permitted Content Policy and the Ring Appstore Program Requirements.
Handle video, not just stills. Events are clips, but your models take images, so extract the best frames before any paid inference and cap work on very long clips to avoid timeouts. See Turning video into the right image: frame selection for the full frame-selection playbook.
Design every stage to fail safe. If a stage errors (model unavailable, rate-limited, bad frame), decide the default: skip, retry via the queue, or degrade to a lower stage. Never let a single model outage drop the whole event silently.
Why this works: cost shape
The funnel changes the shape of your cost from "price times all events" to "price times only the events that survive each gate."
The following diagram compares the two approaches.
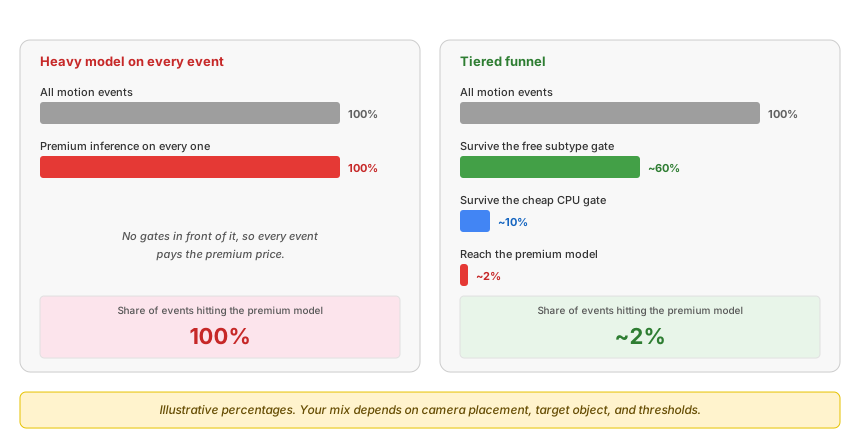
The following table summarizes what you pay for under each approach.
| Approach | What you pay for |
|---|---|
| Heavy model on every event | Premium inference on 100% of motion, most of it noise |
| Tiered funnel | A free webhook-subtype gate drops irrelevant events first, a near-free CPU gate handles the rest, a cheap custom model takes the ~10% that pass, and a premium model sees only the small low-confidence remainder |
In practice this is the difference between an app whose inference bill scales dangerously with install base and motion volume, and one whose bill scales with actual relevant events. That is often an order-of-magnitude reduction, with better domain accuracy because the workhorse is a model you tuned on your own data.
Terminology
This guide uses a small amount of machine learning vocabulary. The following table defines each term, in alphabetical order.
| Term | Definition |
|---|---|
| Backbone | A pretrained neural network that already recognizes general visual features such as edges, textures, and shapes. You adapt a backbone to your own categories instead of training a network from scratch. ResNet and EfficientNet are common backbones. |
| Bounding box | The rectangle an object detector returns around something it found, expressed as pixel coordinates in the frame. You use it to crop the subject out of the full image. |
| Computer vision (CV) | Automated analysis of images or video that produces a machine-readable result, such as "a dog is present" or "the package is at these coordinates." |
| Confidence score | A number between 0 and 1 that a model returns alongside its answer, indicating how strongly the model supports that answer. A confidence score is not a probability of being correct. Models can be confidently wrong. |
| Confidence threshold | The confidence score below which you stop trusting a model's answer and pass the event to a more capable model. This threshold is the main dial that trades cost against accuracy in this pattern. |
| Data flywheel | A loop in which production events generate labeled training examples, those examples improve your model, and the improved model needs less help from expensive models, which lowers your cost per event over time. |
| False negative | A relevant event your pipeline misses, such as a real delivery that never produces a notification. A false negative is usually unrecoverable, because the moment has passed. |
| False positive | An irrelevant event your pipeline reports as relevant, such as a notification about a delivery that never happened. |
| Fine-tuning | Continuing to train an existing model on your own labeled examples so that it specializes in your categories and your imagery. See also transfer learning. |
| Frame | A single still image taken from a video clip. Ring motion events arrive as video, but the models in this pattern take images, so you extract frames before any paid inference. |
| Image classification | Assigning one label from a fixed set to a whole image, for example "cat" or "dog." A classifier answers "what is this," not "where is it." Compare object detection. |
| Inference | One run of a trained model on one input, producing one answer. Inference is what you pay for per event, so the number of inferences and the price of each is the cost you manage. |
| Object detection | Finding instances of object categories in an image and returning a bounding box and a confidence score for each. A detector answers "is it there, and where," not "exactly which kind is it." |
| Precision | Of the events your pipeline reports as relevant, the fraction that really are. Low precision means many false positives. |
| Recall | Of the relevant events that actually occurred, the fraction your pipeline reports. Low recall means many false negatives. |
| Student model | The small, inexpensive model you own and run on most of your traffic. A student is trained on labels produced by a teacher model and by user corrections. |
| Teacher model | A large, accurate, expensive model you run rarely, both to label training data and to resolve the cases your student model is unsure about. |
| Transfer learning | Starting from a backbone trained on a large general dataset and retraining only part of it on your much smaller dataset. Transfer learning is what makes a custom model practical with hundreds of examples rather than millions. |
| Vision foundation model | A large, general-purpose model that accepts an image and a text prompt and answers in natural language. Also called a vision LLM. It is the most capable and the most expensive option in this pattern. |
| Webhook subtype | The sub_type field on a Ring motion webhook, which classifies what triggered the event. See Motion Detection. |
