
Vega网页应用概述
Vega WebView组件可显示Vega应用中基于网页的内容,包括HTML、JavaScript和CSS。使用此组件,可以在应用中重复使用现有网页内容。示例包括静态页面(帮助页面、条款和条件)、登录屏幕或应用的表示层。WebView组件利用Chromium引擎,该引擎可以自定义(例如自定义标头、DOM存储等),并支持通过消息传递桥在WebView源和包含的Vega应用之间进行数据通信。
确保网页内容针对电视设备进行了优化,其中包含了remote-control/directional-pad(方向键)输入的焦点导航。单击/触摸/拖动用户体验实现很少与电视用户体验兼容,而且电视设备的耗电量往往低于台式机和移动设备。例如,通过减少电视动画来优化网页内容。有关性能和流畅度的更多指导说明,请参阅网页应用开发最佳实践。
WebView堆栈的各层
下图展示了WebView代码堆栈的各层。
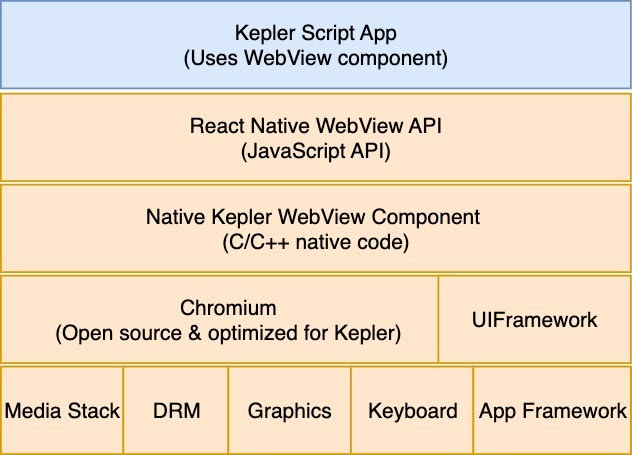
以下列表描述了上图中的WebView代码堆栈的各层,从底层到顶层依次为:
- WebView核心组件: 以下一组核心组件提供了一系列API,其可在WebView窗口中解析和渲染网页内容。
- 媒体堆栈: 提供硬件加速访问权限的操作系统API。它还可以包含平台的片上系统 (SoC) 和板级支持程序包 (BSP) 支持的软件音频和视频解码器,用于对帧进行解码。
- DRM: 处理数字版权管理 (DRM) 许可证和密钥的API。该API使用解码器组件对ARM Trust Zone或可信执行环境 (TEE) 中的帧解密。
- 图形: 为网页内容和媒体渲染提供表面和次表面的API。
- 键盘: 为WebView提供屏上键盘的服务。
- 应用框架: 提供生命周期管理器、程序包管理器、事件管理器等的框架。
- Chromium: Chromium网页引擎,针对Vega进行了优化。该引擎负责解析和渲染网页,包括HTML、CSS和JavaScript网页。
- 用户界面框架 支持反应式编程风格的跨平台工具包,这种编程为声明式编程风格,类似于React。该框架允许组件开发者通过公开跨平台API抽象来与操作系统 (OS) 级API表面进行交互。
- 原生Vega WebView组件: 一个用C++编写的组件,可为开发者启用WebView。
- React Native WebView API: 亚马逊和您的适用于Vega的React Native应用之间的软件接口。
- 适用于Vega应用的React Native: 开发者创建的应用。
快速设置您的网页应用
步骤1: 添加应用模板
npm install @amazon-devices/webview@~3.3.0
有关更多详细信息,请参阅使用模板创建应用。
步骤2: 将所需的服务添加到manifest.toml文件中
[wants]

# 如果网页应用需要键盘支持
[[wants.service]]
id = "com.amazon.inputmethod.service"

# 如果网页应用需要视频播放
[[wants.service]]
id = "com.amazon.media.server"

# 从视频播放中发出指标的必需项
[[wants.service]]
id = "com.amazon.mediametrics.service"

# 在稳定API上播放视频的必需项
[[wants.service]]
id = "com.amazon.mediabuffer.service"
[[wants.service]]
id = "com.amazon.mediatransform.service"

# 如果网页应用需要音频播放
[[wants.service]]
id = "com.amazon.audio.stream"

# 音频管理功能在WebView中正常工作的必需项,例如音频焦点、音量控制等功能
[[wants.service]]
id = "com.amazon.audio.control"

# 要实现应用对无障碍功能支持,建议使用服务注册器添加UCC服务
[[wants.service]]
id = "com.amazon.kepler.ucc.publisher"

# 取消注释以下部分以启用加密媒体播放(DRM内容)
# [[wants.service]]
# id = "com.amazon.drm.key"
# [[wants.service]]
# id = "com.amazon.drm.crypto"
# [[needs.privilege]]
# id = "com.amazon.privilege.security.file-sharing"

# 启用Group-IPC以访问媒体服务
[[wants.service]]
id = "com.amazon.gipc.uuid.*"
[offers]
[[offers.service]]
id = "com.amazon.gipc.uuid.*"

# 您可以根据需要添加其他服务
步骤3: 在App.tsx文件中导入并使用WebView组件
import { WebView } from "@amazon-devices/webview";
import * as React from "react";
import { useRef } from "react";
import { View, StyleSheet } from "react-native";

export const App = () => {
  const webRef = useRef(null);
  return (
    <View style={styles.container}>
      <WebView
        // 标题:{},
        ref={webRef}
        hasTVPreferredFocus={true}
        source={{
          // 替换为您的URL。
          uri: "https://www.example.com",
          // 或者引用位于<根目录>/assets/index.html的文件
          // uri:"file:///pkg/assets/index.html"
        }}
        javaScriptEnabled={true}
        onLoadStart={(event) => {
          console.log("onLoadStart url: ", event.nativeEvent.url)
        }}
        onLoad={(event) => {
          console.log("onLoad url: ", event.nativeEvent.url)
        }}
        onError={(event) => {
          console.log("onError url: ", event.nativeEvent.url)
        }}
      />
    </View>
  );
};

// 布局样式,是正确焦点行为的必需项
const styles = StyleSheet.create({
  container: { flex: 1 }
});
WebView属性
有关WebView组件属性的完整列表,请参阅Vega WebView组件参考。
hasTVPreferredFocus={true},才能在电视设备上实现正确的焦点行为。支持的媒体格式
Vega网页应用支持以下音频和视频格式:
支持的音频格式
- FLAC
- MP3
- Opus
- Vorbis
- AAC
- PCM 8位无符号整数
- PCM 16位有符号整数小端
- PCM 24位有符号整数小端
- PCM 32位浮点数小端
- PCM 16位有符号整数大端
- PCM 24位有符号整数大端
- PCM μ-law
- PCM A-law
- AAC-LC
- AAC-SBR
- AAC-PS
- AAC Scalable (MPEG-2)
支持的视频软件格式
- Theora
- MPEG4 Part 2
支持的视频硬件格式
- VP8
- VP9
- H.264
- H.265
对数字版权管理 (DRM) 的支持
WebView目前支持Widevine和PlayReady。Widevine对视频支持HW_SECURE_ALL,对音频支持SW_SECURE_CRYPTO。PlayReady对视频支持SL3000,对音频支持SL2000。
检查设备是否支持DRM内容
WebView支持硬件DRM(Widevine L1和PlayReady SL2000/3000)和软件DRM (Widevine L3)(只要设备支持)。要检查DRM的可用性,网页应用可以使用requestMediaKeySystemAccess方法。
const system = 'com.widevine.alpha';
const config = [
  {
    audioCapabilities: [
      {
        contentType: 'audio/mp4;codecs="mp4a.40.2"',
        encryptionScheme: 'cenc',
        robustness: 'SW_SECURE_CRYPTO'
      }
    ],
    videoCapabilities: [
      {
        contentType: 'video/mp4;codecs="avc1.42E01E"',
        encryptionScheme: 'cenc',
        robustness: 'HW_SECURE_ALL'
      }
    ]
  }
];

navigator.requestMediaKeySystemAccess(system, config)
  .then(() => console.log('DRM supported'))
  .catch(() => console.log('DRM not supported'));
使用注意事项
- 配置中的robustness字段决定了所查询的DRM级别。对硬件支持的DRM使用
HW_SECURE_ALL,对软件DRM使用SW_SECURE_CRYPTO。硬件不支持音频,因此对音频内容使用SW_SECURE_CRYPTO。 - 如果设备不支持请求的DRM配置,则promise会拒绝。
- 检查硬件和软件DRM级别,然后根据可用性优雅回退。
相关主题
Last updated: 2026年4月28日