

Packages and versioning in Vega OS
If you have an Android or iOS app development background, versioning your Vega OS package file has a few key differences:- Package format: Instead of an APK (Android) or IPA (iOS), Vega OS uses a VPKG file as the app binary. When your submitted VPKG goes live in the Amazon Appstore, the mini-wrapper VPKG file used for cloud streaming is replaced automatically.
- Versioning configuration: Android and iOS define versions in configuration files (build.gradle, Info.plist). On Vega OS, versions are set as build command flags or in package.json scripts, not in the manifest file.
- Version number: On Android, you set
versionNamein the build.gradle file. On Vega OS, you pass the--build-versionflag at build time as a freeform string (for example,1.2.3). - Build number: On Android, you set
versionCodeas an integer in the build.gradle file. On Vega OS, you pass the--build-numberflag at build time. Like Android’sversionCode, this must be an increasing integer.
- Version number: On Android, you set
Migration overview
During this process, you follow these high-level steps:- Find the build number of your live app in the Developer Console.
- Build your VPKG, making sure to properly set the versioning in that file.
- Add an upcoming version of your app and upload your VPKG. When you upload your VPKG file to the Developer Console, you change the supported devices for the Fire OS APK file and Vega OS VPKG file so that your new VPKG can target Vega OS devices.
Prerequisites
Before you start, you must have:- Vega developer tools installed. For details, see Install the Vega Developer Tools.
- Your Android-based Fire OS project ported to a React Native for Vega project. To get started developing for Vega OS, see Develop with Vega. For help porting your Fire OS app to Vega OS, see Port Your Fire OS App to Vega.
Step 1: Find the build number of your live app
The VPKG file you build must have a greater version and build number than your live cloud-streamed Fire OS app. You can find your current app’s version name and build number in the Developer Console. To find the version name and build number of your live cloud-streamed app- Sign in to the Developer Console.
- From the navigation bar, choose My Apps.
- Find and open the Fire OS app that’s enrolled in the Amazon Cloud App Program.
-
On the Upload Your App File screen, find your uploaded APK that is being cloud-streamed.

- Select Manifest on the uploaded APK. Make a note of the Version Name and Build Number.
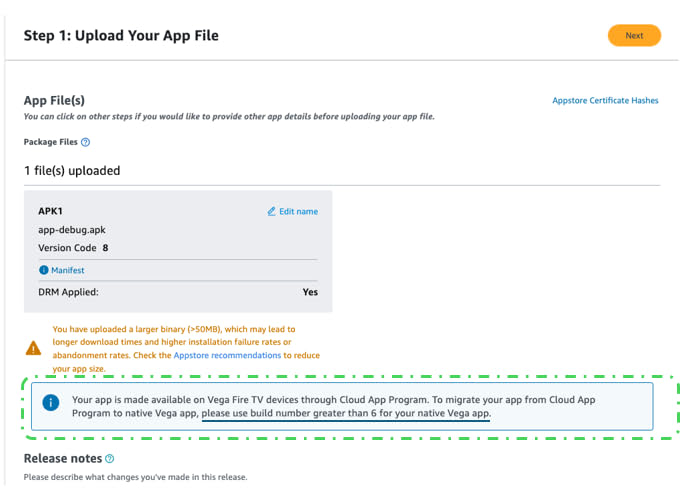
Step 2: Build your VPKG
Build a release VPKG with a version and build number greater than those of your live cloud-streamed Fire OS APK. Select the appropriate tab based on the tool you use to build your app.- Vega Studio
- Vega CLI
To build your release VPKG file
-
In your package.json file, set the
--build-versionand--build-numberflags to values greater than those noted in Step 1: Find the build number of your live app. Set--build-typetoRelease:For more details on versioning, see Version Your App. - In VS Code, select the Vega extension icon from the activity bar to open the Vega Studio panel.
- Select your project from Vega Studio > Projects.
- Choose Release from the Build Mode section.
-
Select the build icon (wrench) next to your project name to start the build.
The build creates VPKG files in the build folder. For app submission, use the VPKG file in the build/armv7-release folder:
-
At the command prompt, you can verify the version and build number in your VPKG:
Confirm that the
versionandbuild_numbervalues in the output are greater than those of your live mini-VPKG. - Make sure your VPKG package name matches the Fire OS APK package name.
Before you submit
Before you submit your app, you can test it using Live App Testing (LAT). With LAT, you can distribute your app to a pre-defined set of testers before going live. To learn more, see Understanding Live App Testing for Vega.Step 3: Add an upcoming version of your app and upload your VPKG
In this step, you add an upcoming version to your existing app listing, upload your VPKG file, and reassign device targeting so that Vega OS devices receive the VPKG instead of the cloud-streamed APK. Amazon must approve your updates before your Vega OS app goes live.- Sign in to the Developer Console.
- From the navigation bar, choose My Apps.
- Find and open the Fire OS app that’s enrolled in the Amazon Cloud App Program.
- In the sidebar, choose Add Upcoming Version.
- Select Confirm on the confirmation message that appears. You can use the upcoming version feature both for updating existing binary files and for adding new binary files. In the sidebar, under Current Version, an Upcoming Version section opens. The Upcoming Version section has app submission screens that mirror your current version. Green check marks in the sidebar indicate that the required fields have been pre-filled with information copied from the live version of your app.
- In the Upcoming Version section, on the Upload Your App File screen, upload your VPKG file.
-
Edit which binary supports Vega OS devices:
- On the Target Your App screen, in the Supported devices section, choose Edit supported devices on your original APK file.
- Select the Amazon Fire TV tab, and then deselect all devices under Amazon Vega TV. Select Save.
- Now choose Edit supported devices on your VPKG file.
- Select the Amazon Fire TV tab, and then select all devices that you want to support under Amazon Vega TV.
- Before saving your device selections, make sure to review the statement next to the checkbox about your app’s removal from the Cloud App Program. Click the box to acknowledge you understand, and then select Save.
- Edit the information on the remaining app submission screens as needed. For details with the remaining screens, see Submit Your App to the Amazon Appstore.
- On the Review & Submit screen, verify the updates and select Submit App.
