
ランディング画面のナビゲーション
ランディング画面のナビゲーション
オープンベータ版ドキュメント:本テクニカルドキュメントは、リリース前のオープンベータ版の一部としてAmazonから提供されるものです。ここで説明されている機能は、Amazonがフィードバックを受け取り、機能の開発を繰り返す過程で変更される可能性があります。最新の機能の情報については、最新のリリースノートを参照してください。
ナビゲーションの追加
LandingScreenにナビゲーションを追加して、VideoCardをクリックしたときにVideoDetailsScreenを読み込めるようにしましょう。
LandingScreen.tsxで、LandingScreenのパラメーターとしてnavigationを分割し、any型として宣言します。
const LandingScreen = ({ navigation }: any) => {
  // LandingScreenのコード
}
- VideoCardを更新して新しい
pressFunctionプロパティを取り込んで、VideoDetailScreenに移動するように設定します。 navigate呼び出しのパラメーターとして{video:item}を追加します。
    <VideoCard
        key={item.id}
        title={item.title}
        description={item.description}
        imgURL={item.imgURL}
        pressFunction={() => navigation.navigate("VideoDetailScreen", { video: item })}
    />
LandingScreen.tsxのコードは次のようになります。
import React, {useState, useEffect} from 'react';
import {FlatList, StyleSheet, View, Text} from 'react-native';
import {Header, VideoCard} from '../components';
import {TVFocusGuideView} from '@amazon-devices/react-native-kepler';

interface IVideo {
  id: string;
  title: string;
  description: string;
  duration: number;
  thumbURL: string;
  imgURL: string;
  videoURL: string;
  categories: Array<string>;
  channel_id: number;
}

const LandingScreen = ({navigation}: any) => {
  const [islandVideos, setIslandVideos] = useState<IVideo[]>([]);
  const [underwaterVideos, setUnderwaterVideos] = useState<IVideo[]>([]);

  const url = 'https://d2ob7xfxpe6plv.cloudfront.net/TestData.json';

  const getAllVideos = () => {
    fetch(url)
      .then((response) => response.json())
      .then((data) => {
        // 各カテゴリの動画をフィルタリングします
        const islands = data.testData.filter(
          (video: IVideo) =>
            video.categories && video.categories.includes('コスタリカの島々'),
        );

        const underwater = data.testData.filter(
          (video: IVideo) =>
            video.categories &&
            video.categories.includes('コスタリカの水中'),
        );

        setIslandVideos(islands);
        setUnderwaterVideos(underwater);
      })
      .catch((error) => {
        console.log(error);
      });
  };

  useEffect(() => {
    getAllVideos();
  }, []);

  return (
    <>
      <Header />
      <TVFocusGuideView autoFocus={true}>
        <Text style={styles.categoryTitle}>コスタリカの島々</Text>
        <FlatList
          style={styles.flatList}
          horizontal
          data={islandVideos}
          renderItem={({item}) => (
            <View style={styles.itemContainer}>
              <VideoCard
                title={item.title}
                description={
                  item.description.split(' ').slice(0, 20).join(' ') + '...'
                }
                imgURL={item.imgURL}
                pressFunction={() =>
                  navigation.navigate('VideoDetailScreen', {video: item})
                }
              />
            </View>
          )}
        />
      </TVFocusGuideView>
      <TVFocusGuideView autoFocus={true}>
        <Text style={styles.categoryTitle}>コスタリカの水中</Text>
        <FlatList
          style={styles.flatList}
          horizontal
          data={underwaterVideos}
          renderItem={({item}) => (
            <View style={styles.itemContainer}>
              <VideoCard
                title={item.title}
                description={
                  item.description.split(' ').slice(0, 20).join(' ') + '...'
                }
                imgURL={item.imgURL}
                pressFunction={() =>
                  navigation.navigate('VideoDetailScreen', {video: item})
                }
              />
            </View>
          )}
        />
      </TVFocusGuideView>
    </>
  );
};

const styles = StyleSheet.create({
  flatList: {
    padding: 10,
  },
  itemContainer: {
    margin: 10,
  },
  categoryTitle: {
    fontSize: 24,
    fontWeight: 'bold',
    color: 'white',
    marginLeft: 30,
  },
});

export default LandingScreen;
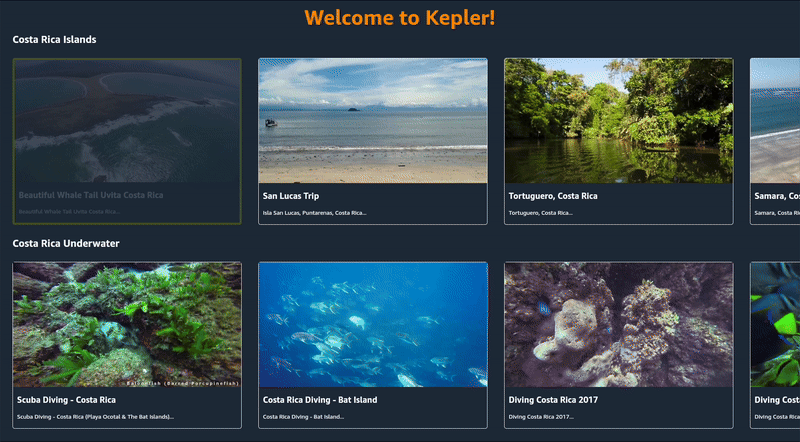
動画をクリックすると、作成したVideoDetailScreenが表示されますが、図のように、ビデオの詳細は現在ハードコーディングされているので、次はこの画面を更新して実際のビデオデータをレンダリングします。
Last updated: 2026年2月9日