
Set Up Vega Studio
Vega Studio, an extension in Visual Studio Code (VS Code) and Kiro. Installing the Vega Software Development Kit (SDK) automatically includes this tool:
- Integrated debugging tools
- Real-time performance monitoring
- Built-in app optimization features
- Direct device management for Fire TV Stick
- Comprehensive testing capabilities
When you install the Vega SDK, it automatically configures Vega Studio in VS Code. If you use Kiro, you need to install Vega Studio manually. With Vega Studio, you can access all Vega development tools and commands directly from the command palette in VS Code or Kiro.
Verify your setup
-
Open VS Code or Kiro and look for the Vega extension icon
 in the activity bar. You can also navigate to Code > Settings > Extensions (in Kiro, Kiro > Settings > Extensions).
 -
Enter "Vega Studio" in the Extensions: Marketplace search field.
If you see the Vega extension icon, continue to Build Your App or explore the Vega Studio and advanced configuration options in Vega Studio.
If you don't see the Vega extension icon, continue to Install Vega Studio manually.
Install Vega Studio manually
Choose one of these installation options: Microsoft Marketplace, the Vega SDK, or the Open VSX Registry (for Kiro).
Option 1: Install from Microsoft Marketplace
- Select Install.
- Select Open Visual Studio Code.
- Select Continue if prompted.
- Look for the Vega extension icon in the activity bar.
Option 2: Install from Vega SDK
-
Open a terminal and enter:
vega setup-studio --install -
Select Reload if prompted.
-
Look for the Vega extension icon in the activity bar.
Option 3: Install in Kiro from Open VSX Registry
- Go to the Vega Studio extension page on the Open VSX Registry.
- Select Download.
- Select the architecture corresponding to your system.
- Open Kiro
 .
. - Choose Settings icon > Command Palette… (Cmd+Shift+P on Mac or Ctrl+Shift+P on Linux).
- Type Extensions: Install from VSIX… and select the command.
- Browse for the
.vsixfile that was downloaded in Step 3. - Look for the Vega extension icon in the activity bar.
Explore the Vega Studio panel
After installing Vega Studio, you can access all development tools through the Vega Studio panel.
- Open VS Code or Kiro.
- Look for the Vega extension icon in the activity bar.
-
Select the Vega extension icon to open the Vega Studio panel, which contains the following sections:
- Projects - Create, manage, and organize your development projects
- Build Modes - Configure debug and release build settings
- Devices - Manage and monitor connected devices
- SDK Manager - Install, view, and switch between SDK versions
- App Performance Tools - Monitor and optimize app performance
- Help and Feedback - Access documentation, tutorials, and submit support requests
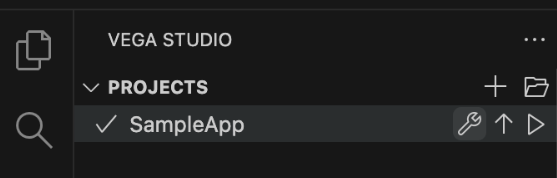
Manage your Vega projects
The Projects section lists your current projects with options to build, install, or run.
Select your build mode
The Build Modes section lets you choose between Debug and Release builds for your Vega app. Your selection applies to all subsequent builds until changed.

Debug mode
Debug mode is designed for development and testing. Debug mode includes debugging artifacts and enables the Metro Packager (React Native's JavaScript bundler), allowing real-time code updates through Fast Refresh.
Vega Studio automatically enables Fast Refresh when you use Debug mode. To use Fast Refresh:
- Build your app in Vega Studio.
- Run your app on Vega Virtual Device or Fire TV Stick.
- Make changes to your code. You should see changes instantly on your device.
Release mode
Release mode creates optimized, production-ready code intended for final deployment and publishing. Release mode disables development features like Fast Refresh, removes debugging information, and reduces file size for improved runtime performance.
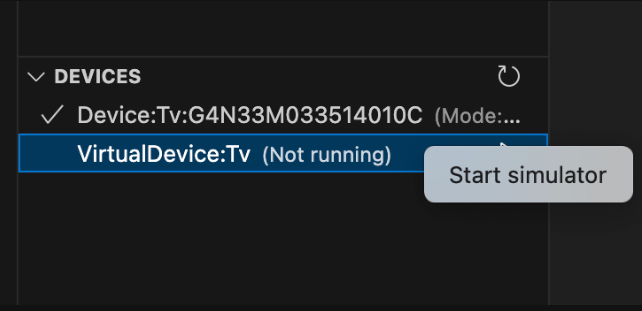
View your devices
The Devices section shows all devices (virtual or physical) connected to your machine. The device list updates automatically when you connect or disconnect devices.
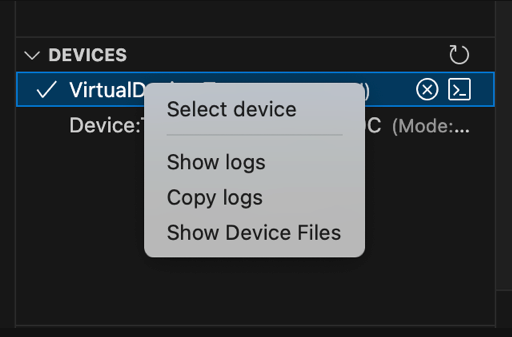
You can start a device from this interface.
Select a device to run your project.

You can also open terminal sessions for direct device interaction.
Install the Vega SDK manager to switch versions
The SDK Manager section lets you install a new SDK version, view installed SDK versions, or switch between installed versions.

To install a new SDK version:
- Select the SDK Manager section in the Vega Studio sidebar.
- Select Install New SDK or the + icon next to an available version.
- Wait for the installation to complete.
To switch SDK versions:
- Select the SDK Manager section in the Vega Studio sidebar.
- Select the version you want to activate.
- Reload VS Code or Kiro when prompted.
You can also manage SDKs through the command palette. For a full list of SDK Manager commands, see Vega Studio Commands.
Access performance monitoring tools
This section provides access to performance monitoring tools to optimize your app. Some tools are only available when apps run on physical devices.
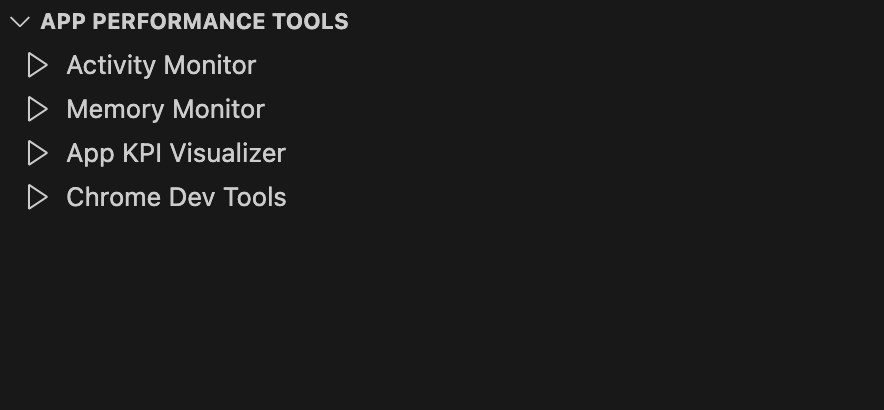
- Activity Monitor - Monitors app memory and CPU usage in real time
- Memory Monitor - Monitors app memory usage in real time
- App KPI Visualizer - Measures key performance indicators and verifies if your app meets the performance standard
- Chrome Dev Tools - Inspect, debug, and profile your apps. Use as an alternative to the built-in VS Code debugger
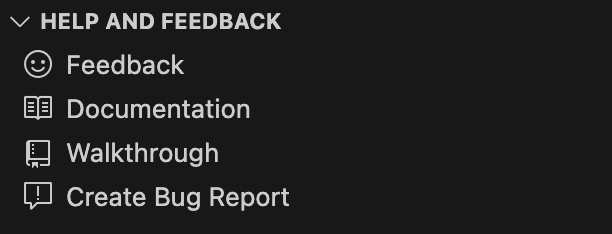
Submit feedback or issues, find resources and guides
This section provides links to:
- Feedback - Lets you submit feedback or issues to the Vega team
- Documentation - Links to resources for getting started with Vega development
- Walkthrough - Guides for project setup, build modes, device management, and performance tools
- Create bug report - Gathers diagnostic information about your system, devices, and logs
When you choose the Create bug report link, it activates the Bug Report tool which gathers diagnostic information about your system, devices, and logs. The tool saves the information as a file on your computer that you can attach when you submit a support ticket.
The report includes:
System information
- Operating system details (platform, version, architecture)
- Hardware information (memory, CPU)
- Environment details (Node.js version, SDK version)
Device information
- List of connected Vega devices
- Device details (type, OS, architecture)
- Device status information
Log files
- Vega Studio extension logs
- React Native application logs
- Vega SDK logs
- Device logs (for connected devices)
- Latest aggregated crash report (ACR) from the device
Protect your privacy
Before submitting a bug report, review the entire file as it may contain personal information such as usernames, home directory paths, file paths, or other sensitive data. Evaluate the report contents and remove any private information before submission.
When to create a bug report
Create and submit a bug report when:
- Vega Studio shows errors or unexpected behavior
- Vega Studio crashes or freezes
- Features don't work as expected
- The virtual device or device crashes
How to create a bug report
- Open the Help and Feedback view in Vega Studio.
-
Choose Create Bug Report.
The system:
- Generates a bug report file (this may take a minute)
- Saves the file to your home directory
- Shows you the file location
- Opens the Appstore Developer Support page
- When you see the Appstore Developer Support page, fill out the information.
- Attach the generated bug report file (10MB size limit) to your support ticket.
If the system fails to generate report:
- Restart VS Code or Kiro.
- Repeat steps 1-4.
Need help?
Use these resources to resolve issues or find answers:
- Create a support case to get direct help from Amazon support
- Use the DevAssistant to find information you need
- Search the community forum for solutions from other developers
Configure advanced options
Vega Studio provides advanced settings to customize your development environment. Use these options to tailor the extension behavior to your workflow.
Automatic device detection
Vega Studio automatically updates the device list to show connection status in real time.

To turn on or off the automatic device detection:
- Go to Extensions > Vega Studio.
- Navigate to Vega > Features: Automatic Device Detection.
- Check the box to turn on this feature, or uncheck to turn off.
Build target architecture optimization
Vega Studio optimizes builds by creating artifacts only for your target device architecture, reducing build times and package sizes.
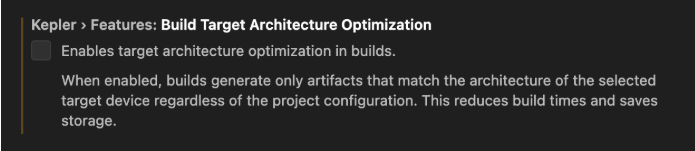
For example, when targeting Fire TV Stick:
- Included: armv7 artifacts
- Excluded: x86_64 and aarch64 artifacts
To turn on or off the build target architecture optimization:
- Go to Extensions > Vega Studio > Settings.
- Navigate to Vega > Features: Build Target Architecture Optimization.
- Check the box to turn on this feature, or uncheck to turn off.
Launch options
Vega Studio lets you configure parameters for the launch app command in VS Code or Kiro.
To configure launch options:
-
Open settings:
- Mac: Code > Settings > Settings (VS Code) or Kiro > Settings > Settings (Kiro)
- Linux: File > Preferences > Settings
-
Choose your configuration options:
- User - Applies to all projects under the current user
- Workspace - Applies to all projects under the workspace
- Project - Applies to a specific project
For example, in the following image, the setting option to configure is Workspace.

- Go to Extensions > Vega Studio.
-
In the Vega Launch Options section, enter your launch options.
Important: VS Code settings are nested. Folder settings override Workspace settings, which override User settings. See VS Code Settings.

Monorepo support
Vega Studio supports monorepo layouts through npm and Yarn workspaces (v0.20+). For setup instructions, configuration options, and troubleshooting, see Set Up Monorepo Support.
Next steps
Related topics
- Set Up Monorepo Support
- Vega Studio Commands
- Vega Performance CLI
- Community: Inspect JS traces from Vega Apps
Last updated: Mar 17, 2026