

Prerequisites
Before you provision the modules, set up your client and server machines. For more details, see Set Up Client - Server Machines for Production.Steps to provision and lock modules
Complete the following steps to provision, lock, and generate barcodes during module production.Step 1: Provision test modules
You can test provisioning on test modules to learn the time it takes to provision and how to generate control logs without locking the modules. To provision the device on a client machine-
Connect your client machine to the module by using
PuTTY.Connect module over serial port
To connect your Windows host machine to the module- Connect a USB cable from your host machine to the debug port on the module.
- To identify the port on your host machine to which the module connects, from the Start menu, search for and open Device Manager.
- In Device Manager, expand Ports (COM & LPT), and then find the USB serial connection. For example, the connection might be Silicon Labs CP210x USB to UART Bridge.
- In a convenient place, such as Notepad, paste the port number.
- Install PuTTY on your Windows machine.
- From the Windows start menu, open PuTTY, and then under Category, select Session.
- Under Connection type, select Serial, and then for Serial line, enter the port number you saved in Step 4. For Speed, enter 115200.
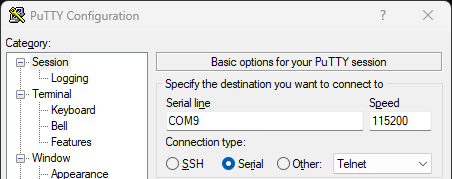
- To save the configuration, in Saved Sessions, enter Module, and then choose Save.
Next time, to select the saved configuration, next to Module, choose Load. (Or, double-click Module.) - To connect to the module with a baud rate of 115200, select Open.
A PuTTY terminal window opens. To see the command prompt, press the Enter key. - To verify your host machine connects to the module, enter
?in the terminal window.
The command displays the list of available commands on the module.
-
Create an environment variable called
ACKSDKTOOLS_TEST_MODEwith a value of1. - To apply the new variable, restart your machine.
-
In a PuTTY terminal window on the client machine, enter the following command.
- Set <port> to the serial port, such as
COM9on Windows.
- Set <port> to the serial port, such as
- If provisioning succeeds, the command displays the following response on the terminal.
- If provisioning fails, review the client and server logs to determine the error. You see the log filenames in the command response.
Step 2: Provision production modules
Provisioning a module for manufacturing generates a device serial number (DSN), gets a signed certificate from the server, and writes both to the module. On success, provisioning generates Matter audit logs. To provision the device on a client machine-
Connect your client machine to the module by using
PuTTY.Connect module over serial port
To connect your Windows host machine to the module- Connect a USB cable from your host machine to the debug port on the module.
- To identify the port on your host machine to which the module connects, from the Start menu, search for and open Device Manager.
- In Device Manager, expand Ports (COM & LPT), and then find the USB serial connection. For example, the connection might be Silicon Labs CP210x USB to UART Bridge.
- In a convenient place, such as Notepad, paste the port number.
- Install PuTTY on your Windows machine.
- From the Windows start menu, open PuTTY, and then under Category, select Session.
- Under Connection type, select Serial, and then for Serial line, enter the port number you saved in Step 4. For Speed, enter 115200.
- To save the configuration, in Saved Sessions, enter Module, and then choose Save.
Next time, to select the saved configuration, next to Module, choose Load. (Or, double-click Module.) - To connect to the module with a baud rate of 115200, select Open.
A PuTTY terminal window opens. To see the command prompt, press the Enter key. - To verify your host machine connects to the module, enter
?in the terminal window.
The command displays the list of available commands on the module.
-
In a Windows terminal window on the client machine, enter the following command.
- Set <port> to the serial port, such as
COM9on Windows.
- Set <port> to the serial port, such as
- If provisioning succeeds, the command displays the following response on the terminal.
- If provisioning fails, review the client and server logs to determine the error. You see the log filenames in the command response.
- On success, the command generates an audit log file in the
audit_logs_uploadfolder under the data folder on the server. Keep this file to upload to Amazon in a later step.
Step 3: Lock the module
In this step, you lock the module to prevent any unauthorized modifications or tampering. To lock the module, in a Windows terminal window on the client machine, enter the following command at the command prompt. Make sure that you connect your client machine to the module.Step 4: Generate barcodes
After you provision the module, you generate a unique set of barcodes: the FFS barcode and Matter QR code. The FFS barcode on the package identifies a specific device. Amazon scans the FFS package barcode during order fulfillment and pre-registers the device with the Amazon customer account. Pre-registration enables FFS to authenticate device ownership and enable simple setup. This step generates the following files:DVC_<DSN>.png– The Matter QR code or device barcode. You print or stick this code on the device to allow customers to scan and register the device. The barcode serves as a unique identifier for the device during manufacturing.DVC_<DSN>_qr_code_content.txt– The text content of the QR code.PKG_<DSN>.png– The FFS barcode. You print this barcode on the product package to enable Matter Simple Setup (MSS).
For more details, see Provisionee Barcode Specification / 1D Barcode requirements.PKG_<DSN>_barcode_content.txt– The text content of the package barcode.
-
Connect your client machine to the module by using
PuTTY.Connect module over serial port
To connect your Windows host machine to the module- Connect a USB cable from your host machine to the debug port on the module.
- To identify the port on your host machine to which the module connects, from the Start menu, search for and open Device Manager.
- In Device Manager, expand Ports (COM & LPT), and then find the USB serial connection. For example, the connection might be Silicon Labs CP210x USB to UART Bridge.
- In a convenient place, such as Notepad, paste the port number.
- Install PuTTY on your Windows machine.
- From the Windows start menu, open PuTTY, and then under Category, select Session.
- Under Connection type, select Serial, and then for Serial line, enter the port number you saved in Step 4. For Speed, enter 115200.
- To save the configuration, in Saved Sessions, enter Module, and then choose Save.
Next time, to select the saved configuration, next to Module, choose Load. (Or, double-click Module.) - To connect to the module with a baud rate of 115200, select Open.
A PuTTY terminal window opens. To see the command prompt, press the Enter key. - To verify your host machine connects to the module, enter
?in the terminal window.
The command displays the list of available commands on the module.
- On the client machine, in a Windows terminal window, enter the following command.
- If the command succeeds, the following response displays on the terminal.
- Store the QR code and barcode in your database with the device information.
