

chip-tool. Commissioning uses the Product Attestation Intermediate (PAI) certificate and private key to establish the authenticity of a new device. The device uses its certification declaration (CD) to prove its compliance with the Matter protocol.
Prerequisites
Before you start, make sure that you have the following items:- Alexa app on a mobile device.
- In Settings on your mobile device, allow the Alexa app to access the camera.
- Matter-compatible Amazon Echo device. For a list of devices, see Compatible Echo and eero devices.
- Connect the Echo device to the same Amazon developer account as the Alexa app.
- Connect the Echo device to a 2.4 GHz Wi-Fi network.
- Connect the development kit to a USB port on your host machine.
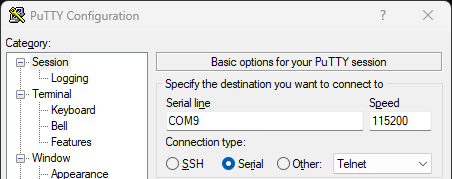
screen command in a terminal window. For Windows, use PuTTY.
Connect your host to the development kit
Connect your host to the development kit
Complete the following instructions to connect your host machine to the serial console on the development kit. Select the tab for Ubuntu, Windows, or Mac based on your host machine type.
- Ubuntu VM
- Windows host machine
- Mac host machine
To connect your Ubuntu VM to the development kit
- Navigate to VM settings, and then enable USB support.
- Depending on your virtualization software, add a USB filter to select the USB device.
- Connect a USB cable from your host machine to the debug port on the development kit.
- Select the USB device to connect it to the VM.
- In an Ubuntu terminal window, at the command prompt, enter the following command to add the user to the dialout group for access to the serial port.
- To identify the serial port, enter the following command.
- In a convenient place, such as Notepad on Windows or TextEdit on Mac, paste the port number.
- To connect to the development kit with a baud rate of 115200, enter the following command in an Ubuntu VM terminal window. Use the port number that you saved in the previous step.
This command opens a new terminal window on the development kit.
- To verify your Ubuntu VM connects to the development kit, enter
?in the terminal window.
The command displays the list of available commands on the development kit.
Create a new device discriminator (Optional)
To test multiple devices, generate a new discriminator for each device so that the Matter commissioner can distinguish between each device advertising to join the network. To generate a new discriminator- In a terminal window on your development kit, enter the following command to generate a new discriminator.
Set<discrimator-value>to a value between 0000 and 4095, inclusive.
- To apply the discriminator, enter the following command to reboot the development kit.
Commission the device with Alexa
Using the Alexa app, you commission the device to the Matter network using Wi-Fi over Bluetooth Low Energy (BLE). Make sure that you sign in to the Alexa app with your Amazon developer account. To add your ACK-based device to the Alexa app- On your mobile device, open the Alexa app.
- On the Alexa app, navigate to the Devices page, and then tap the plus sign (+).
- Tap Add Device, and then from list of devices, select Other.
- For Which logo is on your device?, tap Matter, and then for Does your device have a Matter logo, tap Yes.
- For Is your device powered on?, tap Yes.
- Connect your host machine to the development kit.
For details, see Connect your host machine to the development kit. - To get the QR code for the setup, enter the following command in a terminal window.
The command displays a QR code link similar to Sample QR.
- Click the link to the QR code.
- In the Alexa app, tap Scan QR Code.
- For Allow permission, tap Allow for access to the camera, and then scan the QR code with your camera.
- If you see This device isn’t Matter compatible, that’s OK. For Do you want to set up this device anyway?, tap Yes.
- For Connect device to Wi-Fi, select your Wi-Fi network, and then tap Next.
- For Device setup and ready to use, tap Done.
Alexa indicates that the setup succeeded. - Test the device controls in the Alexa app and by voice.
Commission the device with the CHIP tool (Optional)
You can also commission the device into the Matter network by using thechip-tool as the Matter controller. The commissioning process begins with communication over BLE between the chip-tool and the device. The process ends with confirmation sent from device to chip-tool over Wi-Fi. For more details, see Working with the CHIP Tool.
In the following steps, use these command options with chip-tool.
CHIP tool options
CHIP tool options
| Option | Description |
|---|---|
<node-id> | User-defined ID to assign to the device that you’re commissioning. Set to a decimal number or a 0x-prefixed hexidecimal number. |
<wifi-ssid> | Name of the Wi-Fi network to which to connect the device. Set to a string or 0xXXXXXXXX hexidecimal string, encoded as two-digit hexidecimal numbers. |
<wifi-password> | Credentials for the Wi-Fi network. Set to the Wi-Fi password for your Wi-Fi network, formatted as a string or 0xXXXXXXXX hexidecimal string, encoded as two-digit hexidecimal numbers. |
<setup-pin-code> | Device-specific 27-bit unsigned integer used to discover and authenticate the device. The setup PIN code is randomly generated and then flashed to the device during manufacturing. You can find this value in the logging terminal window when the device boots up or by running mack show on the device. For prototyping, use the test value of 20202021. |
<device-discriminator> | Device-specific12-bit unsigned integer used to distinguish between multiple devices advertising on the Matter network. The discriminator is randomly generated and then flashed to the device during manufacturing. You can find this value in the logging terminal when the device boots up or by running mack show on the device. For prototyping, use the test value of 3840. |
- In a new Ubuntu terminal window, at the command prompt, enter the following command.
- Navigate to the Matter tools directory to find the
chip-tool. You defined the directory name when you installed Matter tools. - To commission the device onto the Matter network, enter the following command at the command prompt.
- After several seconds of log output on both the device and host running the chip-tool, you should see the following output from the chip-tool.
- Test the device controls with the
chip-tool.
Test with the CHIP tool (Optional)
You can also test device control with thechip-tool. For more details, see Working with the CHIP Tool.
For each invocation, set the <node-id> to 12345, the same value that you used when you commissioned the device with the chip-tool.
The following table shows the chip-tool commands to test lighting features.
| Command | Description |
|---|---|
chip-tool onoff on <node-id> 1 | Turn on the light. |
./chip-tool onoff off <node-id> 1 | Turn off the light. |
./chip-tool onoff toggle <node-id> 1 | Toggle the light on and off. |
./chip-tool levelcontrol move-to-level 98 0 0 0 <node-id> 1 | Change the brightness of the light. |
./chip-tool colorcontrol move-to-hue 225 0 0 0 0 <node-id> 1 | Change the hue. |
./chip-tool colorcontrol move-to-saturation 55 0 0 0 <node-id> 1 | Change the saturation. |
./chip-tool colorcontrol move-to-hue-and-saturation 225 55 0 0 0 <node-id> 1 | Change the hue and saturation. |
./chip-tool [onoff|levelcontrol|colorcontrol] | Help for lighting clusters. |
Troubleshooting
If you encounter an error during commissioning, try the following tips:- To monitor device logs during commissioning, enter the following command in your VM terminal window:
idf.py monitor. - If the Wi-Fi communication fails, make sure that the Wi-Fi router and all clients have IPv6 enabled and confirm that they can ping each other. Also, make sure the firewall setting in the router isn’t blocking communication.
- If the chip-tool doesn’t receive confirmation from the device, the chip-tool reports an error, but the device thinks that commissioning succeeded. To start the commissioning process again, you must do a factory reset on the device, or erase the flash and then re-flash the image to the device. For more details, see Erase flash memory.
