Register a Product with AVS
This tutorial teaches you how to register an Alexa Voice Service (AVS) Built-in device with the Amazon developer portal. You complete the following activities in this tutorial:
- Create an Amazon developer account.
- Register an AVS built-in device.
- Set up your security profile.
When finished, you download the required security credentials to connect your device to AVS.
Step 1: Create an Amazon developer account
Create a free developer account at developer.amazon.com. If you already have an account, you can skip this step.
Step 2: Create a product
After you've created an Amazon developer account, you create a product and security profile. This authenticates your software client so it can connect to AVS.
To create a product
-
Log-in to the AVS dashboard.
If this is your first time registering a product, you might have to fill in some account registration details.
- Under products, click MANAGE YOUR PRODUCTS.
- Click ADD NEW PRODUCT.
Step 3: Fill in product information
You now must fill in your product information. This information identifies your device with AVS.
To fill in your product information
- Choose a Product Name. For example, AVS Tutorials Project.
- Choose a Product ID. For example, PrototypePi. Don't use any spaces in your product name.
- In the Please Select Your Product Type dropdown, select Device with Alexa built-in.
- For Will your device use a companion app?, choose No.
- In the Product Category dropdown, select Other (please specify).
- For Brief product description box, write a meaningful description. For example, Prototype.
- Under How will users interact with your product?, select Hands-free.
- Skip the Upload an image step. This isn't required for prototyping.
- Under Do you intend to distribute this product commercially?, select No.
- Under Will your device be used for Alexa for Business?, select No.
- Under Is this device associated with one or more AWS IoT Core Accounts?, select No.
- Under Is this a children's product or is it otherwise directed to children younger than 13 years old?, Select No.
- Click NEXT.
Step 4: Set up your AVS security profile
Create a Login with Amazon (LWA) security profile to associate your security credentials with your product.
To set up your security profile
- Click CREATE NEW PROFILE.
- Under Security Profile Name, enter a relevant name. For example, AVS Tutorials Project.
- Under Security Profile Description, enter a relevant description. For example, AVS Tutorials.
- Click NEXT. Your Security Profile ID generates.
-
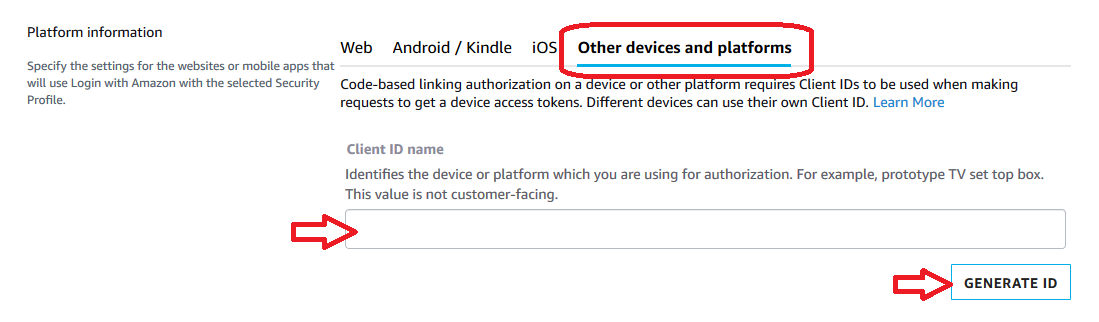
Under Platform information, choose the relevant device type for the device you're building your prototype on.
For example, if you're building on a Raspberry Pi, select the Other devices and platforms tab.
- Under Client ID name, enter a relevant name. For example, Prototype.
- Click Generate ID.
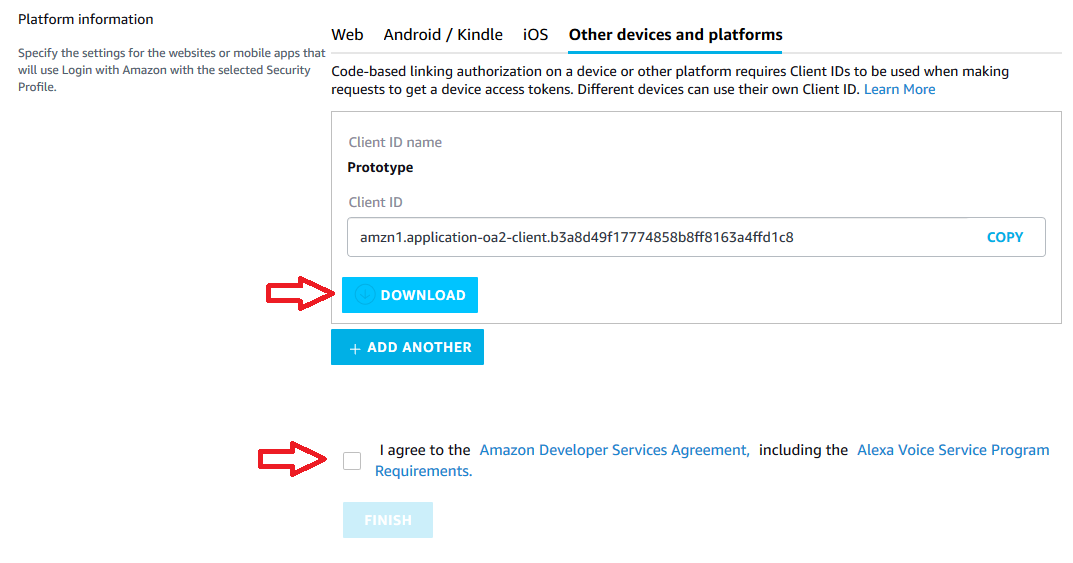
- Click Download. This downloads your config.json file that contains your AVS credentials.
- Read the Amazon terms and conditions. If you agree, click the I agree to the AVS agreement and the AVS Program Requirements box.
- Click FINISH. Congratulations! You now have access to AVS.
-
A pop-up appears. Click OK.
You can now view your device on your AVS dashboard.
The following screenshots highlight some of the important steps described in the previous section.
Step 5 (Optional): Enable your security profile for commercial distribution
If you're building a commercial product, you must provide your customer a link to your privacy policy.
- Open a web browser, and visit https://developer.amazon.com/lwa/sp/overview.html.
- Near the top of the page, select the commercial device security profile you created earlier from the drop-down menu and click the CONFIRM button.

- Enter your privacy policy URL beginning with http:// or https://.
- (Optional) Upload an image. It displays on the Login with Amazon consent page.
- Click SAVE.

Related topics
- What is the Alexa Voice Service?
- Learn to add Alexa to a Speaker, Sound bar, or AVR
- Set Up the AVS Device SDK on Raspberry Pi with a Script
Last updated: Nov 27, 2023