

Prerequisites
Quick Subscribe is a feature contained within the Appstore In-App Purchasing (IAP) API. Before you set up Quick Subscribe, you must do the following:- Have active in-app items.
Considerations
Before your start, review the following considerations and recommendations:- Optimize your app’s size to provide faster download and install times. It’s generally recommended to minimize the size of an app to 50 MB or less. Reducing the app size increases accessibility by allowing more users to install it and decreases the time required for installation and initial use. Additionally, smaller apps are less likely to be uninstalled due to storage constraints.
- The offers you present through Quick Subscribe work best for paid subscriptions. Quick Subscribe supports apps that offer a free trial. However, if your app uses a freemium model for acquisition, Quick Subscribe might not be the most optimal fit for your app. In a freemium model, the app itself is free and users can access a basic set of content and services without a paid subscription, but you charge a premium for additional content or advanced functionality.
- A purchase made through Quick Subscribe happens outside of your app. In the standard IAP flow without Quick Subscribe, a customer signs in to your app and then makes a purchase from within your app. However, with Quick Subscribe, the customer makes the purchase outside of the app first, after which the app opens and signs them in. Therefore, implementing Quick Subscribe has some differences from the standard IAP implementation. For help with integrating Quick Subscribe, use the steps on this page.
Step 1: Configure Quick Subscribe in the Developer Console
To configure Quick Subscribe for your app- Go to the Developer Console dashboard, and sign in to your account.
- From the navigation bar, choose My Apps.
- Find your app in the list and expand the row.
- In the In-App Items column, click the link to open the In-App Items screen.
- Select Create Quick Subscription.
-
An overlay pop-up appears as shown in the following image.
In the Choose default subscription drop-down, the list is populated with your existing IAP subscriptions. Choose the subscription on which you want to enable Quick Subscribe.

Create new quick subscription dialog
- In the Select term drop-down, choose a term for the quick subscription.
- If you would like to offer additional subscriptions for Quick Subscribe, select Add another quick subscription.
-
Choose your target devices for Quick Subscribe by checking the boxes.
- For Fire TV devices, you can choose to specifically target either Fire OS devices, Vega OS devices, or both:
- To target only Fire OS devices, check only Fire TV (Fire OS).
- To target only Vega OS devices, check only Fire TV (Vega).
- To target both Fire OS and Vega OS devices, check both Fire TV (Fire OS) and Fire TV (Vega).
- For Fire TV devices, you can choose to specifically target either Fire OS devices, Vega OS devices, or both:
-
Choose whether to create the quick subscription for Live App Testing (LAT) only or for both LAT and your live app.
- To create a quick subscription for LAT only, select Create Quick Subscription for Test.
- To create the quick subscription for both LAT and the live app, select Create Quick Subscription for Test and Live.
Step 2: Configure security profile
For Quick Subscribe to properly work, you must set up a security profile for your app. The security profile is essential because it allows Amazon to securely share customer data with you and lets you automatically create an account and sign in a user. A security profile associates Amazon data, including security credentials, with one or more apps. For example, if you have two apps, “My Game - Free” and “My Game - HD”, they can share data by using the same security profile. Name your security profile in a way that helps identify your app or app family. For more details, see Security Profile. To configure a security profile for your app- Go to the Developer Console dashboard, and sign in to your account.
- From the navigation bar, choose My Apps, and then select your app.
- Select App Services and scroll to the Security Profile section.
- Click Select existing security profile or create new to expand the options.
- Use the drop-down to select the security profile that you want to map to this app, then click Enable Security Profile. Alternatively, you can create a new security profile by clicking Create Security Profile.
Step 3: Implement getPurchaseUpdates
ThegetPurchaseUpdates() method retrieves the customer’s receipts. When a customer makes a purchase through Quick Subscribe, the purchase happens outside of the app. Therefore, Quick Subscribe requires that your app calls getPurchaseUpdates() to verify the customer’s purchase status. With this call, you can make sure that the customer receives the content that they purchased when the app opens. If you fail to properly implement getPurchaseUpdates(), it can prevent a customer from accessing the content that they purchased.
Implementation requirements
Follow these requirements to properly implement thegetPurchaseUpdates() method.
Step 4: Integrate with RVS
The Receipt Verification Service (RVS) lets you validate purchases made by your app’s users. For details about RVS, see . When you make a request to the RVS server, the JSON response returned includes apurchaseMetadataMap field. If the purchase was initiated using Quick Subscribe, the purchaseMetadataMap appears as {"QuickSubscribe":"true"}, as seen in the following example.
purchaseMetadataMap appears as null. The following table provides a description for all fields in the response object.
| Field | Data Type | Description |
|---|---|---|
autoRenewing | Boolean | Indicates if customer’s subscription will auto renew. |
betaProduct | Boolean | Indicates whether the product purchased is a Live App Testing product. |
cancelDate | Long integer | The date the purchase was canceled, or the subscription expired. The field is null if the purchase was not canceled. Time is in milliseconds. |
cancelReason | Integer | Indicates why a product was canceled. Possible values are null, 0, 1, or 2, where each integer represents a cancellation reason:null - The purchase was not canceled.0 - The cancel reason is currently unavailable and will render at a later time.1 - Your customer canceled the order.2 - The purchase was canceled by Amazon’s system. For example, a customer purchases a subscription with an invalid payment and the purchase could not be completed in the grace period. This code is also returned if Amazon customer support canceled the order at the request of a customer. |
deferredDate | Long integer | For tiered subscriptions, when a subscription is modified and the proration mode is deferred, indicates the date when the subscription plan will change. Will be null after the plan change takes effect. |
deferredSku | String | For tiered subscriptions, when a subscription is modified and the proration mode is deferred, indicates the upcoming plan’s SKU. Will be null after the plan change takes effect. |
freeTrialEndDate | Long integer | Indicates that the subscription is in a free trial. Provides the free trial end date of the subscription in epoch (milliseconds). The field is null if the subscription is not in a free trial period. |
fulfillmentDate | Long integer | In a subscription purchase, the date of the acknowledgement of fulfillment. Stored as the number of milliseconds since the epoch. Null if subscription fulfillment isn’t confirmed. Always null for consumables and entitlements. |
fulfillmentResult | String | In a subscription purchase, the status of fulfillment. Valid values:
|
gracePeriodEndDate | Long integer | Indicates that the subscription is in grace period. Provides the grace period end date of the subscription in epoch (milliseconds). The field is null if the subscription is not in a grace period. |
parentProductId | String | Null. Reserved for future use. |
productId | String | The SKU that you defined for this item in your app. |
productType | String | Type of product purchased. Valid product types are CONSUMABLE, SUBSCRIPTION, and ENTITLED. |
promotions | List<Promotion> | Details of the promotional pricing or retention offer of a subscription purchase. Null if there is no promotion. |
purchaseDate | Long integer | The date of the purchase, stored as the number of milliseconds since the epoch. For subscription items, purchaseDate represents the initial purchase date, not the purchase date of subsequent renewals. |
purchaseMetadataMap | Map<String, String> | If the purchase was initiated via Quick Subscribe, the value is {"QuickSubscribe":"true"}. Otherwise null. |
quantity | Integer | Quantity purchased. Always null or 1. |
receiptId | String | Globally unique identifier for the purchase. |
renewalDate | Long integer | The date that a subscription purchase needs to be renewed. The date is stored as the number of milliseconds since the epoch. |
term | String | Duration that a subscription IAP will remain valid (the term starts on the date of purchase). The term consists of a number and a time period (Day, Week, Month, Year), such as 1 Week or 2 Months. |
termSku | String | Unique SKU that corresponds to the subscription term. |
testTransaction | Boolean | Indicates whether this purchase was made as a part of Amazon’s publishing and testing process. |
Step 5: Send fulfillment result to Amazon
When you send a fulfillment result, you ensure that Amazon can confirm whether users can access the content that they paid for. Always communicate the fulfillment result to Amazon. To do this, use thenotifyFulfillment() method included in the . If you don’t send a fulfillment result, Amazon automatically cancels the subscription to make sure that customers don’t continue to pay for subscriptions that aren’t fulfilled.
After a customer signs in, call notifyFulfillment() with status FULFILLED when the subscription is fulfilled. If the customer already has a subscription that wasn’t purchased through Amazon, call notifyFulfillment() with status UNAVAILABLE to indicate that the customer has signed in, but the purchase isn’t applicable.
If you’ve previously integrated with the Acknowledge Receipt API, you can continue to use it in place of the notifyFulfillment() method. You must use either the notifyFulfillment() method or the Acknowledge Receipt API in your app to communicate the fulfillment result to Amazon.
Implementation requirements
Follow these requirements to properly implement thenotifyFulfillment() method.
- To communicate the fulfillment status to Amazon, you must call
notifyFulfillment()every time a receipt is processed. - When calling
notifyFulfillment():- Send
FULFILLEDwhen the following conditions are met:- You successfully map a customer to a receipt and unlock subscription content for the customer.
- Send
UNAVAILABLEwhen either of these conditions occur:- You identify that the customer has an existing subscription that wasn’t purchased through Amazon.
- The customer is not eligible to sign up for an account for your service.
- Send
Auto-cancellation
Amazon uses auto-cancellation to make sure that customers don’t continue to pay for subscriptions that aren’t fulfilled. If you don’t update a purchase receipt to theFULFILLED status by using notifyFulfillment() or the Acknowledge Receipt API within 14 days of purchase, Appstore automatically cancels and refunds the subscription. However, if within 14 days of purchase, you update the purchase receipt to the UNAVAILABLE status, Appstore immediately cancels and refunds the subscription.
Acknowledge Receipt API
Open/Close Acknowledge Receipt API details
Open/Close Acknowledge Receipt API details
The Acknowledge Receipt API uses the The version number of the
acknowledgeReceipt operation which allows you to notify Amazon that a subscription purchase has been fulfilled, so customers won’t lose access.The acknowledgeReceipt operation is a REST API, much like the verifyReceiptId operation used in RVS, but you must use a PUT request, rather than a GET request.acknowledgeReceipt operation is 1.0. For more details on the query parameters, review the following table.Query parameters
The Acknowledge Receipt API response uses the following query parameters.| Query Parameter | Description | Required |
|---|---|---|
developer | The shared secret used to identify the developer issuing the request. Your shared secret can be found on the Shared Key page for your developer account with the Amazon Appstore. | Yes |
user | ID representing a distinct Amazon customer for your Appstore app: . | Yes |
receiptId | Unique ID for the purchase: . | Yes |
fulfillmentResult | The status of the order fulfillment. Valid Values:
| Yes |
Response codes
After making the HTTP request, the Acknowledge Receipt API responds with one of the following codes.| Response Code | Description |
|---|---|
| HTTP 200 | Success: The Receipt ID, User ID, and shared secret are all valid. The subscription is marked as fulfilled. |
| HTTP 400 | The transaction represented by this receiptId is invalid, or no transaction was found for this receiptId. |
| HTTP 410 | The transaction represented by this receiptId is no longer valid. Treat it as a canceled receipt. |
| HTTP 429 | The request was throttled. Reduce your calling rate and retry after some time. |
| HTTP 496 | Invalid shared secret |
| HTTP 497 | Invalid User ID |
| HTTP 500 | There was an Internal Server Error |
Acknowledge Receipt FAQ
The following are frequently asked questions (FAQ) about the Acknowledge Receipt API.Step 6: Integrate with RTN
With Quick Subscribe, customers subscribe to your app through Amazon, but outside of your app. This could lead to your app missing some information about a customer’s purchase state. ThegetPurchaseUpdates() method sends data only when an app is opened.
Real-Time Notifications (RTN) provides customer purchase information for all transactions, including the ones that occur outside your app. When your server receives a purchase notification from Amazon’s RTN server, use the Receipt Verification Service (RVS) to validate the receipt.
With RTN, Amazon sends you updates about a customer’s subscription events, such as when a customer purchases, renews, or cancels a subscription. This information is important for apps with Quick Subscribe because it makes sure your app always has the most up-to-date information about the user’s subscription.
For details about how to set up RTN, see Use Real-Time Notifications.
Step 7: Integrate one-click account information sharing
To integrate your app with the one-click account information sharing feature, follow the Integrate One-Click Account Information Sharing guide. The following diagram shows the code flow for Quick Subscribe with one-click account information sharing.Open/Close Text description of diagram
Open/Close Text description of diagram
- App opens.
- Call .
-
Get
UserProfileAccessConsentStatusfrom response object by calling . - If user consented, go to step 5, otherwise go to step 11.
- Call .
-
If call is successful and
userProfileAccessAuthCodeis present in the response, go to step 7, otherwise go to step 11. - Update your server with the authorization code.
- Call the Appstore IAP Get Access Token API to get the access token.
- If the call is successful, call the Appstore IAP Get User Profile API using the access token and go to step 10. If the call fails, go to step 11.
- Create account with email. End flow
- Show app’s default account sign-up or sign-in experience.
- Authorize with local account using username and password. End flow
- Implement
getUserData(). - Determine customer’s consent status.
- If customer doesn’t provide consent, use your standard account creation process.
- If customer provides consent, proceed to next step.
- Get an access token by using the Appstore IAP Get Access Token REST API.
- Get customer’s profile data by using the Appstore IAP Get User Profile REST API.
- Get customer’s email.
- Create an account for your service using the customer’s email.
Step 8: Test Quick Subscribe with LAT
With Amazon’s Live App Testing (LAT) service, you can distribute an app that you intend to publish to the Amazon Appstore to a pre-defined set of testers before going live. The testers can sample the full suite of Amazon services against Amazon’s production environment, to make sure your app is working as expected.Set up LAT for Quick Subscribe
To test Quick Subscribe with Live App Testing (LAT), first configure Quick Subscribe for LAT in the Developer Console using the steps in Configure Quick Subscribe in the Developer Console. You can configure Quick Subscribe for LAT only, or configure it for both your live and LAT apps, as shown in the following image.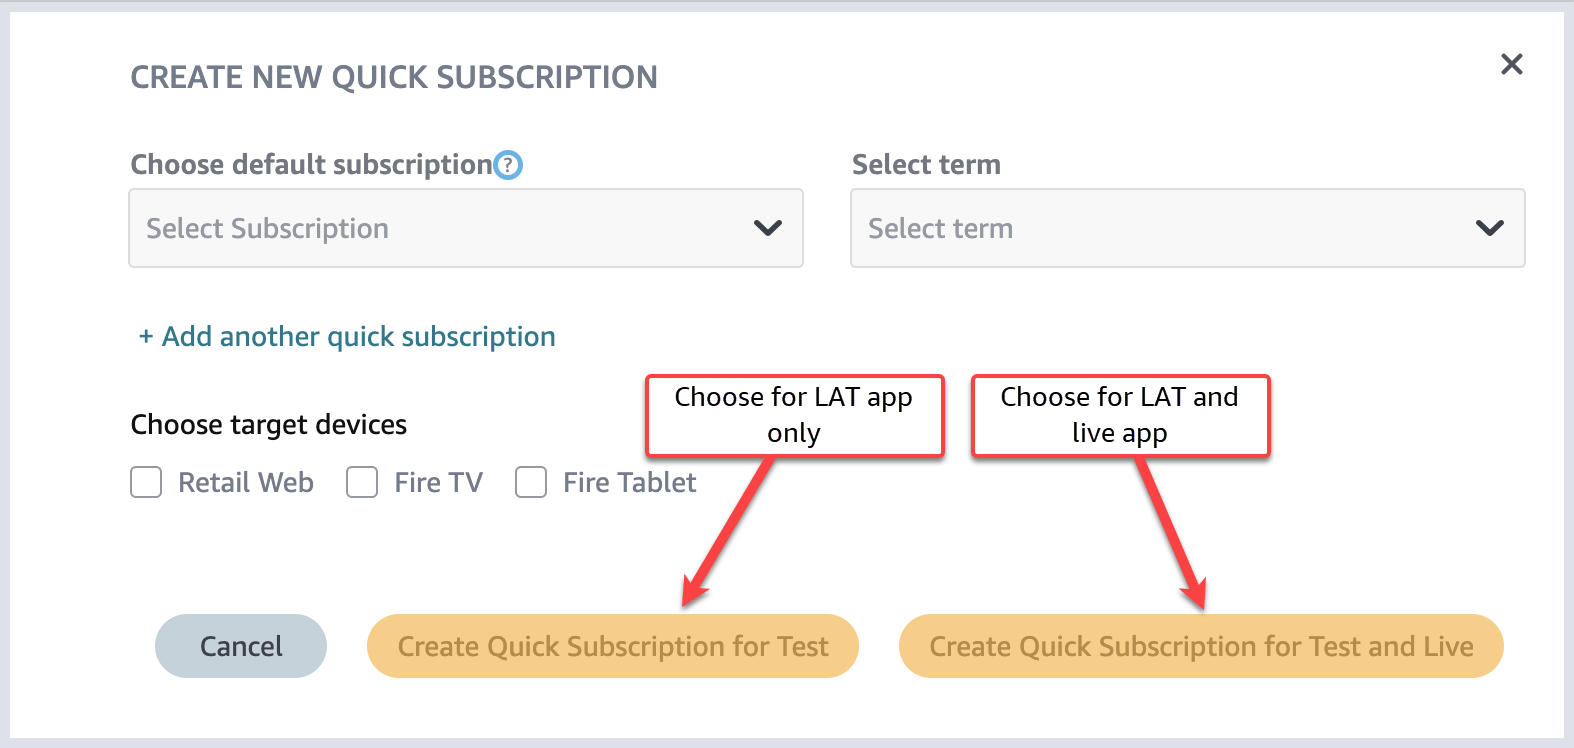 If you choose to configure Quick Subscribe for LAT only, you can later promote the configuration to your live app by selecting Actions > Promote to Live as shown in the following image.
 If you configured Quick Subscribe for your LAT app differently than your live app, a TEST label appears in the quick subscription details for the LAT app as shown in the following image.
 You can test the Quick Subscribe flow through the Amazon retail website or on a Fire device. When you start a live app test, you can send invitations to testers. Testers receive an email with a link to the Amazon website with the LAT version of the app.
Test Quick Subscribe on the website
From the LAT invitation email, select the Amazon website for your marketplace. On the app detail page, select the subscription option, which appears as a paid option for a subscription term, such as $20.00 monthly. Then, select a device to deliver to, and click Get App.Test Quick Subscribe on the device
To get started with testing Quick Subscribe on the device, you can use the LAT invitation email or the device notification. To test from the LAT invitation- Use the link in the invitation email to go to the app detail page on the Amazon website.
- Select the App Only option.
-
If you have multiple devices associated with your account:
- Click the device name in Deliver to <device name>.
- In the Deliver to dialog, select the device where you want to deliver app.
- Click Get App.
- On a Fire TV device associated with the Amazon account, click the icon for Your Apps & Channels (the icon appears on the navigation bar as three squares and a plus sign).
- Find the LAT version of your app, which has a TEST banner on the app icon. You might need to click App Library to see the app.
- Select the app icon to open the app detail page on the device.
- Select Subscription Options and download the app.
Related topics
- Integrate One-Click Account Information Sharing
- Quick Subscribe Test Cases
- Quick Subscribe Overview
- Quick Subscribe FAQ
