Alexa Blogs

Now that Alexa is multi-lingual, it’s a new day in Alexa skill making. Not only can you publish to customers around the globe, you can do so from a single code base.
In this article, we’ll review two concepts: 1) separating content from logic and 2) using the locale attribute to serve the right content to the right users.
Getting Organized
As an example, I’ve made a new skill: Classical Guitar Facts (using this template), which has content in both English and German. Although one might assume that I could get away with US English in the UK, differences in spelling and word choice will show up in the cards within the Alexa app, and this is not the best user experience. So, we’ll create content files in three separate folders, one per language, as shown below.

Create the Content Files
Moving the content out of the index.js files means that I’ve copied the FACTS array into a separate file and saved the file as de-facts.js, gb-facts.js, and us-facts.js respectively. Remember the last item in the FACTS array does not have a comma at the end. Also, remember the last line of this file “module.exports = FACTS”, otherwise the calling file (index.js) won’t be able to find it.
var FACTS = [
    "The strings of guitars are often called gut strings because…”,
    " …”,
    " …”
];
module.exports = FACTS;
Calling External Content
At the top of the index.js file, we need to declare the FACTS variable:
var FACTS = [ ];
so that we can call it later like this:
FACTS = require('./content/en-US/us-facts.js');
Of course, we can substitute en-US/us-facts.js with en-GB/gb-facts.js and de-DE/de-facts.js when needed. Now we’re well organized to swap separate content files based on language – but how do we know which language is calling our service?
Triaging Lambda Requests
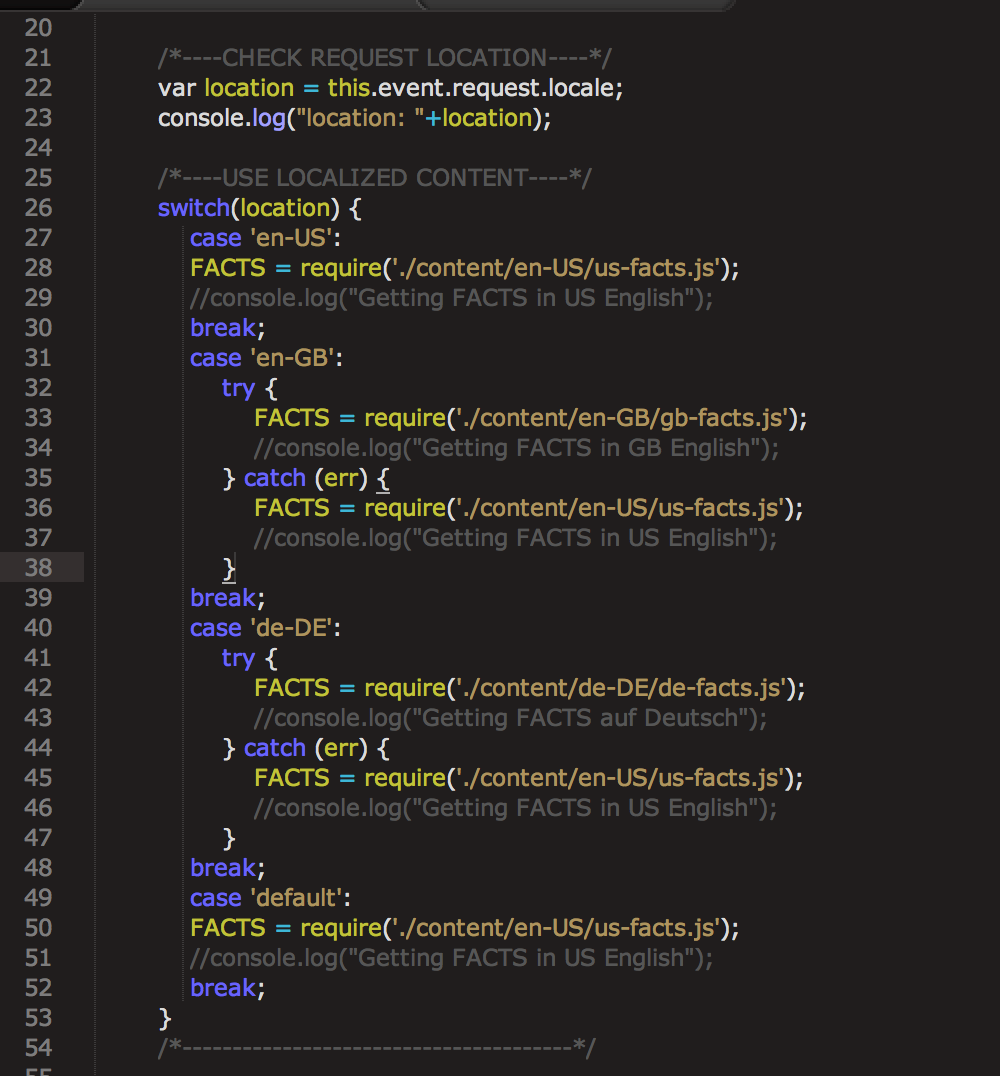
Notice the new “locale” attribute within the Lambda Request above left, this shows where the request was made. In this case, it shows either “en-US”, “en-GB”, or “de-DE” for German. By reading this attribute, we can determine which content file to require. As you can see below, (line 22) the key to getting the location is using:
this.event.request.locale
The rest is easy!
Wrapping Up
Using the Fact template as a simple starting point, we’ve separated the FACT array or content into three separate JS files – one per language. At the bottom of each file, we’ve included a single line in node.js so that index.js can call these files: module.exports = FACTS.
At the top of index.js, we’ve declared the FACTS array (var FACTS = [ ];) so that we can use it in our switch statement. Then we used the locale attribute to determine which language to use: location = this.event.request.locale. Finally, we used a switch statement to change the content based on the location variable (the try/catch statement within each case, is used to fall back to US English, if the target file can’t be found).
You can download this entire project as the starting point for your own multi-lingual skill. Indeed, you may want to save it for next time. You see, I’m listening to some lovely classical guitar music as I write this… and look forward to my next post where I’ll show you how to incorporate audio clips to complete this multi-lingual and musical experience. Stay tuned for more.
Check out these Alexa developer resources:
- Alexa Skills Kit (ASK)
- Alexa Voice Service (AVS)
- Build a Multi-Language Skill
- Alexa Dev Chat Podcast
- Alexa Developer Forums
- Alexa Skills Kit Training