Alexa Blogs

We are happy to announce a new Alexa skill builder, which provides a more intuitive interface for you to easily create engaging Alexa skills. You can also use this tool to build natural dialogs to provide more intelligent responses to user requests. New features like slot filling, confirmations, and natural prompts help ensure your skill gathers the right information about user intents and responds appropriately.
The tool is available today in beta in the Amazon Developer Portal. The Skill Builder supports the US English, UK English, and German languages. Some built-in capabilities are currently only available in US English under developer preview. We are working to bring those built-ins to the UK and Germany as soon as possible.
Today we also announced our new beta testing tool for Alexa skills, which makes it easy for developers to share their skill for feedback prior to publishing. Learn more about the beta testing tool in our announcement post.
Key Features of the Alexa Skill Builder
The Skill Builder provides a visual interface to easily create an interaction model for your skill. You can use this feature to add multi-turn dialogs to your custom skills. A multi-turn dialog is a conversation between the user and Alexa to gather the information needed to fulfill the user’s request. For example, for a trip-planning skill, you can add “which city are you flying from” or “how many people should I make the reservation for.” You can see how this works in the introduction to dialog directives video.
Additionally, the new skill builder enables you to:
1. Leverage the new Skill Builder’s multi-turn dialog capabilities for managing slots, prompts, and confirmations within custom intents
You can create a dialog model to reduce the amount of handling required in the skill endpoint (backend) to manage slot filling, prompts, and confirmations for a custom intent. Alexa uses the dialog model to understand which slots are required, and renders the prompts defined in the dialog model to ask the user for the slot data. Similarly, you can also enable confirmations for slots and intents.
When Alexa sends your skill an intent that requires multi-turn dialogs, it will include a dialog state that indicates whether it is started, in progress, or complete. To have Alexa manage the dialog for you, all you have to do is respond with a Dialog.Delegate directive, greatly reducing the amount of handling needed by you to create a great experience.
2. Search and browse hundreds of recently launched built-in intents and slots
Our built-in library enables you to leverage Alexa’s NLU to better understand and reply to requests without providing sample utterances. Now, these intents and slots are easier for you to find and use.
3. Integrate with your existing skills
Access the Skill Builder in the Interaction Model tab within the existing skill-creation flow within the developer portal. See a demo of this in action in the Skill Builder video on using intents, built-ins, and utterances. You can choose to opt out of the beta at any time or simply continue to use the old interface to define your interaction model.
In this blog post, we’ll take you through building a skill that uses the Dialog.Delegate directive. Watch a demo of this in the simplifying your code for multi-turn dialogs video.
Editing an Interaction Model for Your Skill
The Skill Builder is available for both existing and new skills in the Interaction Model tab within the existing skill-creation flow. Let’s take a look at an existing skill we have created, Dungeon Dice, a skill that generates random dice rolls, which we’ve shared in previous posts.
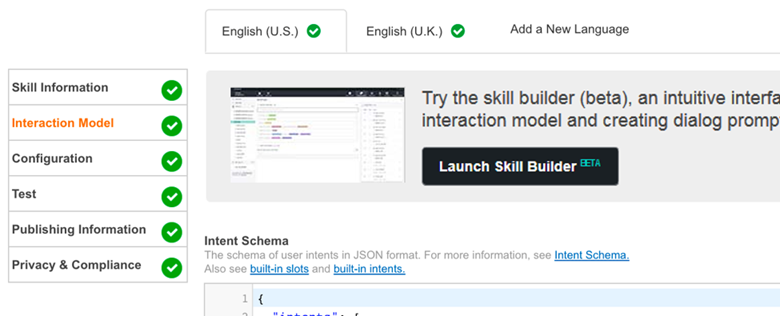
The existing intent schema is available for editing along with a new button for the Skill Builder (beta). This opt-in is available in US English, UK English, and German languages. In this example, we will edit the English (US) model.
Once the new editor loads, you are sent to the dashboard. The menu on the left lists all of your current intents and slot types as well as a code editor. You can edit intents and slots directly from the center area of the dashboard.

The top menu has options for all existing functionality of the skill-creation flow: saving and building your model, skill information, configuration, test, publishing, and privacy and compliance.

In the Skill Builder beta, the "Save Model," "Build Model," and "Interaction Model" buttons keep you in the Skill Builder while the other buttons take you to the old skill interface.
Notice how the Skill Builder visually maps out the intents, sample utterances, and slot types. Don’t worry, nothing is missing or gone. You can jump right to the code by clicking on the code editor button in the left menu.

Let’s take a look at our custom slot types and see how the editor has visually mapped those out for us.
![]()
Notice how you can easily delete an existing slot value by clicking the trashcan icon, and add a new value simply by typing it in and hitting the plus symbol. On the right-hand side, you can also see a list of intents within your interaction model that are using the custom slot type. This is an easy way to see the hooks you have created between your custom slot types and your intents.
Next, let’s check out the DiceRollSize intent that is referencing the custom slot. Clicking the intent name on the left-hand menu takes us to a new screen that pulls in the intent definition, its associated sample utterances, slots, and associated slot types.
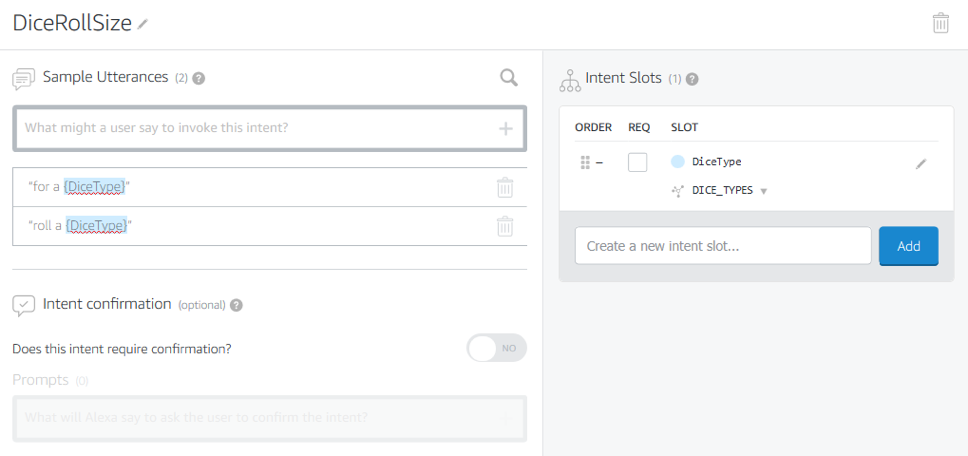
Changing the slot type is now as simple as clicking and selecting a new type.

Notice that any custom slot types we have defined are automatically pinned to the top! You can also search for all existing built-in slots or create a new custom slot type directly in the interface.
Now let’s add some sample utterances. Click on the center of the screen, and we see an area where you can type a new sample utterance for the intent. As soon as you add an open bracket, a pop-up appears and lets you pick from all the associated slot types that you have defined.

Notice that you can also create a new slot here if the existing slots don’t cover everything you want to ask. For example, we could create a new slot here for a date and then assign it the built-in AMAZON.DATE type.

What about adding a new intent? Simply click on the "Add Intent" button in the left-hand menu or the center of the screen to open a new intent creation dialog.
![]()
From here, you can search through 145 existing intents in the built-in library. As an example, let’s look at weather.

Now, adding weather to a Dungeons and Dragons dice roller might not be the exact thing we need, although from a story perspective, it wouldn’t hurt (“it was a dark and stormy night when the party entered the tavern…”).
Let’s get a little more creative and click on a custom intent. We’ll make a new option to slay a dragon with a special dice roll.
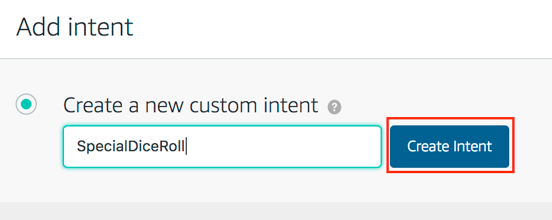
Next, we need to add a sample utterance for the intent. We are going to use “to kill the dragon” then click the plus sign to add the new utterance.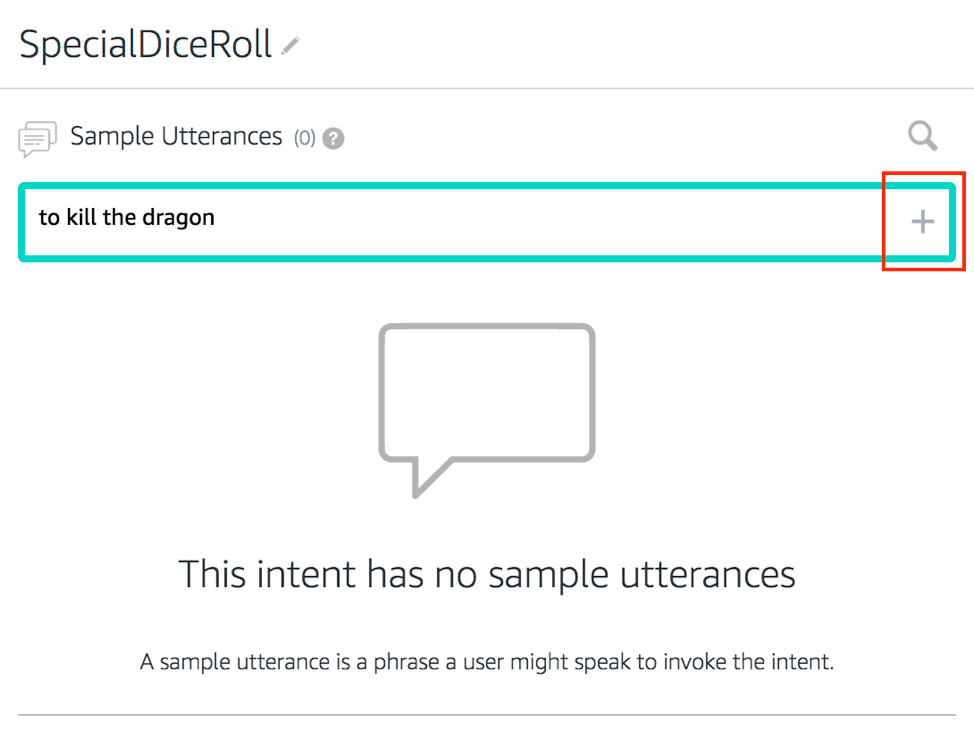 The skill builder provides us a new option for intents to automatically prompt a confirmation dialog. Since we’re going to cheat a bit here and roll a die that automatically slays the dragon, why don’t we go ahead and let users decide if they really want to do that.

Alexa will send your skill an intent with a dialog state that indicates whether it is started, in progress, or complete. All you have to do is respond with a Dialog.Delegate directive if the status in not complete, and Alexa will manage the dialogs for you using the prompts you provide.

Let’s click "Save Model" to make sure everything is updated then create some new dialog flow.

Creating Rich, Multi-Turn Dialogs
The new dialog model simplifies the process of having to gather slot value data for your intents from the user and automatically handles situations for you when required values are missing.
Since we need to know what type of die to roll, let’s make dice type a required slot value. We can do this by clicking on the DiceRollSize Intent like we did previously, but now we will take a look at the new Dialog Model area.

Clicking on either the center toggle button for slot-filling or the REQ checkbox under the Intent Slots box on the right will open up this new menu. We can then tell Alexa how we would like to ask for the dice type value if it is missing as well as the actual slot type we expect the end user to tell us. In this case, it will be the custom slot value we looked at previously named DICE_TYPES.

When you enter a curly brace in the text box, the Skill Builder displays a list of slot types that have been defined for the intent. In this case, let's click DiceType then save our changes. Behind the scenes, the Skill Builder creates the JSON in our intent schema.

Adding New Languages to Your Skill
We have seen how to quickly pull in our intents, slot types, and sample utterances and add new dialog options. How about adding new languages to our existing skill?
Simply click up on the top left and you will see a list of languages models your skill currently supports. In the case of the Dungeon Dice skill, both English (US) and English (UK) are supported.
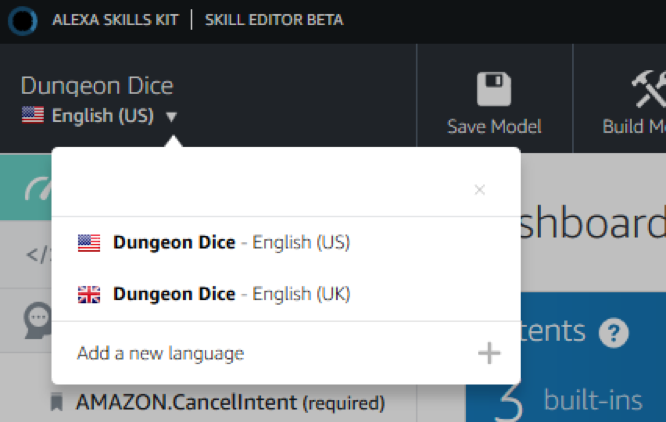
Clicking on the plus sign next to Add a new language will take us out of the Skill Builder and back into the skill-creation flow where we can selection a new language to add.
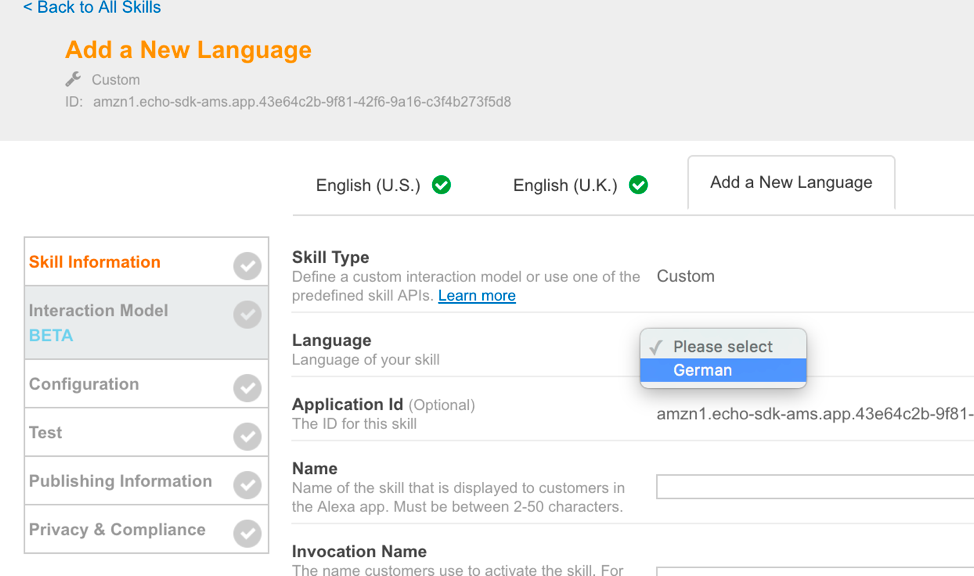
Once we have supplied the required information for our new language, we can begin editing its interaction model within the new Skill Builder exactly like we have for English (US).
Creating a New Skill Using an Existing Intent Schema
Another time-saving feature of the Skill Builder is the ability to import an existing intent schema we have created for one skill and use it to begin a new skill. If you have a local library of JSON files for intent schemas, you can reuse it across your own skills. Let’s go ahead and create a new dice roller skill that is based off of the existing functionality we have already built.
Let’s create a new English (US) skill called “more dice” in the existing skill-creation flow like normal. Then we’ll open the new Skill Builder in the Interaction Model tab.
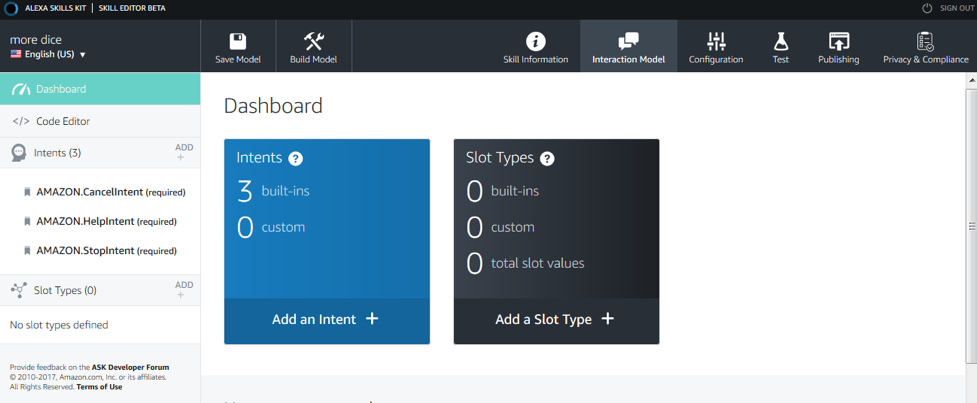
Nothing fancy here, just a blank skill template with some predefined intents that Alexa has created. Next, click the "Code Editor" button on the left-hand menu.

Notice the blue highlighted area in the center of the screen. You can drag and drop an existing JSON file, or click the area and then specify the location of the file.

I’m going to select dice.json and click "Open," then click on the "Apply Changes" button.

The Skill Builder parses the file and automatically pulls in the intents, slot values, sample utterances, and dialogs. We're all set and ready to go with a new dice skill that has all of the existing functionality of the previous skill.
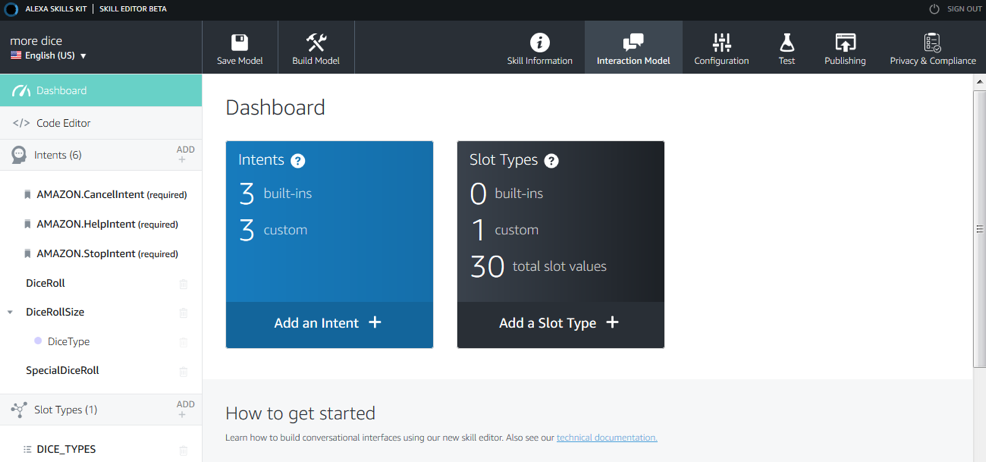
This becomes a great way for you to share skill interaction models across a team or within the #Alexadev community.
Build a Skill with the New Skill Builder (Beta)
Try the new Alexa Skill Builder’s rich and intuitive visual interface to easily create natural dialogs, gather information from users, and better manage this information to provide intelligent responses. We hope you enjoy using it as much as we’ve enjoyed creating it and look forward to hearing your feedback during this open public beta.
Check out the new Plan My Trip sample and tutorial to learn how to use the new Skill Builder. This new tutorial will show you how to create intents, utterances, and slots as well as how to delegate the process of gathering the required slots to Alexa.
For more information about getting started with the new Alexa Skill Builder, check out the following:
Videos on building conversational UI:
- Part 1: An introduction to dialog directives
- Part 2: Using intents, built-ins, and utterances
- Part 3: Simplifying your code for multi-turn dialogs
Additional resources:
- Use the Skill Builder (beta) to define intents, slots, and dialogs
- Alexa Skills Kit (ASK)
- Alexa Dev Chat Podcast
- Alexa Developer Forums
Build a Skill, Get a Shirt
The Alexa Skills Kit (ASK) enables developers to build capabilities, called skills, for Alexa. ASK is a collection of self-service APIs, documentation, templates, and code samples that make it fast and easy for anyone to add skills to Alexa.
Developers have built more than 10,000 skills with ASK. Explore the stories behind some of these innovations, then start building your own skill. Once you publish your skill, mark the occasion with a free, limited-edition Alexa dev shirt. Quantities are limited.
