Alexa Blogs
Today, we announced that Amazon Echo and Alexa is coming to the UK and Germany. With the announcement comes two new language models: English (UK) and German. You can start developing for these new languages today.
Now that Alexa is multi-lingual, this tutorial shows you how to deliver the right content to your customers in each of the supported regions- all from a single code base. This post assumes you have some familiarity with JavaScript/Node.js and the Alexa Skills Kit. To learn more about using the Alexa Skills Kit, please watch this video. For guidance on designing a voice experience with Alexa, please see this video.
In this tutorial, you’ll build a web service to handle notifications from Alexa and map this service to a skill in the Amazon Developer Portal, making it available on your device and to all Alexa users upon certification.
After completing this tutorial, you’ll know how to do the following:
- Create a multi-language skill - This tutorial will walk first-time Alexa skills developers through all the required steps involved in creating a basic skill. Your skill will support English (UK) and German language models. You can also add support for the US English language model.
- Understand the basics of VUI design - Creating this skill will help you understand the basics of creating a working Voice User Interface (VUI) while using a cut/paste approach to development. You will learn by doing, and end up with a functioning Alexa Skill.
- Use JavaScript/Node.js and the Alexa Skills Kit to create a skill - You will use the template as a guide but the customization is up to you. For more background information on using the Alexa Skills Kit please see this video.
Let's Get Started
Step 1. Setting up Your Alexa Skill in the Developer Portal
Skills are managed through the Amazon Developer Portal. You’ll link the Lambda function you created above to a skill defined in the Developer Portal.
1. Navigate to the Amazon Developer Portal. Sign in or create a free account (upper right). You might see a different image if you have registered already or our page may have changed. If you see a similar menu and the ability to create an account or sign in, you are in the right place.

2. Once signed in, navigate to Alexa and select "Getting Started" under Alexa Skills Kit.

3. Here is where you will define and manage your skill. Select "Add a New Skill"

4. As you can in the image below, we have language options at the top of the Skill Information tab. Here we’ll start with English (UK). Make sure the radio button “Custom Interaction Model” is selected for “Skill Type.” Add the name of the skill. You can use “Greet Me” for the UK Language model. Remember to write the name of your skill with initial caps – as it’s a title which also appears in the Alexa App. Next, enter the same name in all lower case letters for the invocation name. Since we are using the sample, type “greet me”. We are not using the Audio Player functionality so be sure to select “No” there. Select Next.

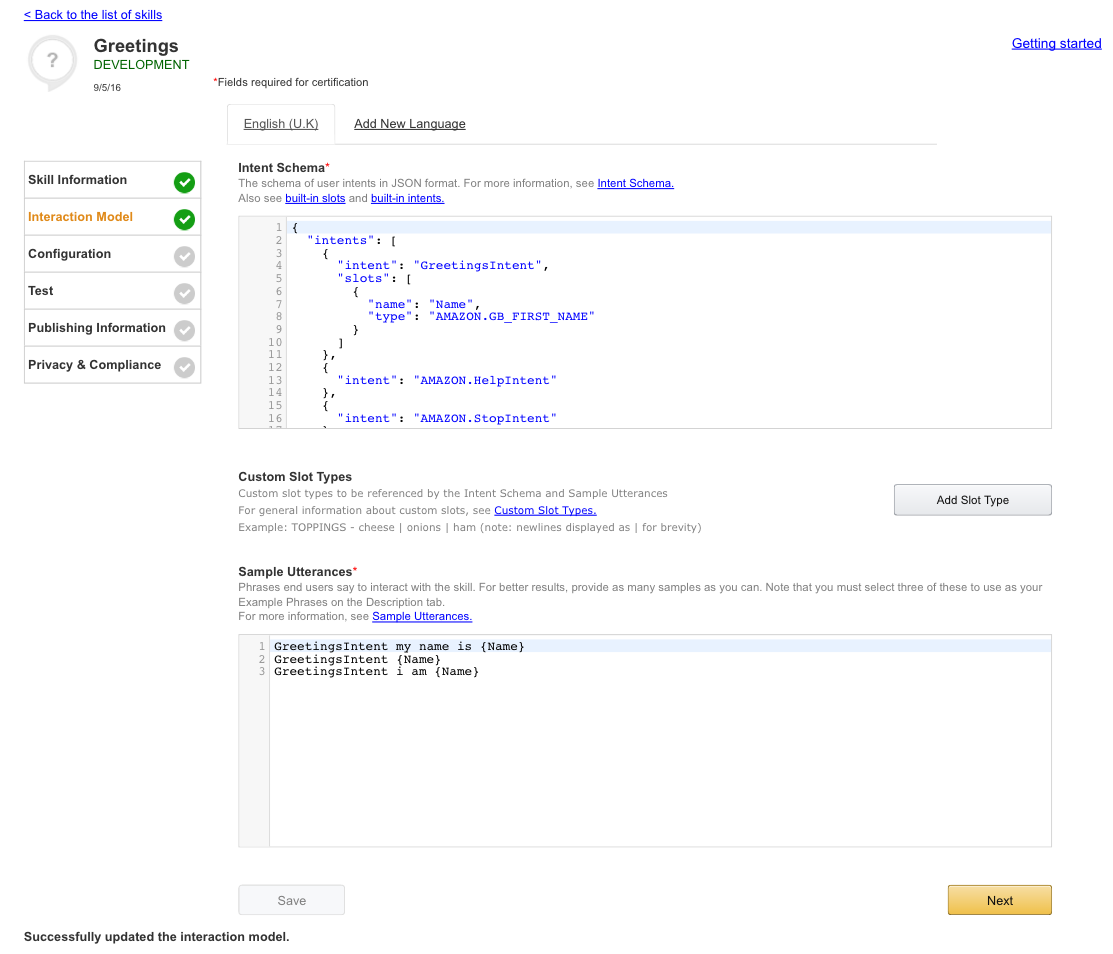
5. Now, notice you're in the interaction model section. And that we have an English (UK) tab at the top.

6. Here is where we define our skill’s voice interaction model. Let’s begin with the intent schema. In the context of Alexa, an intent represents an action that fulfills a user’s spoken request. Intents can optionally have arguments called slots. We’ll have one slot in this template for retrieving the user’s name. We have a number of built-in slot types to improve recognition. We’ve create a number of built-in slots for the two new language models, and in this tutorial we will be using the built-in First Name slot for both GB and DE. You can also extend built-in slots with your own values for even better recognition, for example when using rare first names. Learn more about supported built-in slot types.
Review the Intent Schema below. This is written in JSON and provides the information needed to map the intents we want to handle programmatically. You will see that there is one intent called ‘GreetingsIntent’ where we collect the slot value called Name. Followed by a number of built in intents to simplify the handling of common user tasks such as help, stop and cancel. For more on the use of built-in intents, read more here.
JSON {

  "intents": [

    {

      "intent": "GreetingsIntent",

      "slots": [

        {

          "name": "Name",

          "type": "AMAZON.GB_FIRST_NAME"

        }

      ]

    },

    {

      "intent": "AMAZON.HelpIntent"

    },

    {

      "intent": "AMAZON.StopIntent"
    },
    {
      "intent": "AMAZON.CancelIntent"
    }
  ]
}
The next step is to build the utterance list.
Given the flexibility and variation of spoken language in the real world, there will often be many different ways to express the same request. Providing these different phrases in your sample utterances will help improve voice recognition for the skills you add to Alexa. For the purpose of this tutorial, we will only add three sample utterances. In a production skill, it is important to include as wide a range of representative samples as you can. Alexa also attempts to generalize based on the samples you provide to interpret spoken phrases that differ in minor ways from the samples specified.
Now it’s time to add the Utterances. Copy/paste the sample utterances below. Once they are copied, the screen should look similar to the following image:
GreetingsIntent my name is {Name}

GreetingsIntent {Name}

GreetingsIntent i am {Name}
Select Save. You should see the interaction model being built (this might a take a minute or two). If you select next, your changes will be saved and you will go directly to the configuration screen. After selecting Save, it should now look like this:
Next we will configure the AWS Lambda function that will host the logic for our skill.
Step 2: Creating Your Skill Logic using AWS Lambda
Installing and Working with the Alexa Skills Kit SDK for Node.js (alexa-sdk)
To make the development of skills easier, we have created the ASK SDK for Node.js. We will be using this module to deploy this skill. The alexa-sdk is immediately available on Github and can be deployed as a node package from within your Node.js environment.
1. Firstly, create a folder on your machine to store the skill code.
2. To leverage the SDK for ASK you will need to install Node.js and update npm. To set this up on your machine, follow these steps.
3. Once you have node installed and npm updated, you are ready to install the ASK-SDK. In the command line, navigate to where your code is stored and type:
npm install --save alexa-sdk
Once this is installed you will need to include the node_modules directory with the source code for your skill. Let's do this with the example.
4. Navigate to the folder that you created in step 1. Create a directory called ‘src’ in there and move your node_modules directory to the new src directory. It may be in the base of your User or home directory (or wherever the alexa-sdk was installed).
5. Create a file called index.js and copy the below code in to the file
JAVASCRIPT

'use strict';

var Alexa = require('alexa-sdk');

var APP_ID = undefined; //OPTIONAL: replace with "amzn1.echo-sdk-ams.app.[your-unique-value-here]";

exports.handler = function(event, context, callback) {

    var alexa = Alexa.handler(event, context);

    alexa.APP_ID = APP_ID;

    var locale = event.request.locale

    console.log(event)

    if (locale == 'en-GB'){

        alexa.registerHandlers(UKhandlers);

    } else if (locale == 'de-DE') {

        alexa.registerHandlers(DEhandlers);

    } else {

        alexa.registerHandlers(UShandlers);

    }

    alexa.execute();

};

var UKhandlers = {

    'LaunchRequest': function () {

        var speechOutput = "Hi there, what is your name?"

        var reprompt = "What is your name?";

        this.emit(':ask', speechOutput, reprompt);

    },

    'GreetingsIntent': function () {

        // Get users name

        var userName = this.event.request.intent.slots.Name.value


        // Create speech output

        var speechOutput = "Greetings " + userName;


        this.emit(':tell', speechOutput)

    },

    'AMAZON.HelpIntent': function () {

        var speechOutput = "You can tell me your name, such as 'my name is Dean', then I'll greet you with your name";

        var reprompt = "Tell me your name?";

        this.emit(':ask', speechOutput, reprompt);

    },

    'AMAZON.CancelIntent': function () {

        this.emit(':tell', 'Goodbye!');

    },

    'AMAZON.StopIntent': function () {

        this.emit(':tell', 'Goodbye!');

    }

}
6. Save the index.js file and compress the files inside the src directory into a zip file. Remember, do not compress the src directory itself, just the files within the directory. Your compressed file should show up in the src directory. You will use this file in a later step.
Create an AWS Account

7. Open aws.amazon.com and then choose ‘Create a Free Account’
- Follow the online instructions. Do not worry about the IAM role, we will do that later.
- You will need a valid Credit Card to set up your account (note the AWS Free Tier will suffice however. You can find out more about the free tier here.)
- Part of the sign-up procedure involves receiving a phone call and entering a PIN using the phone keypad.
8. Sign in to the AWS to Console
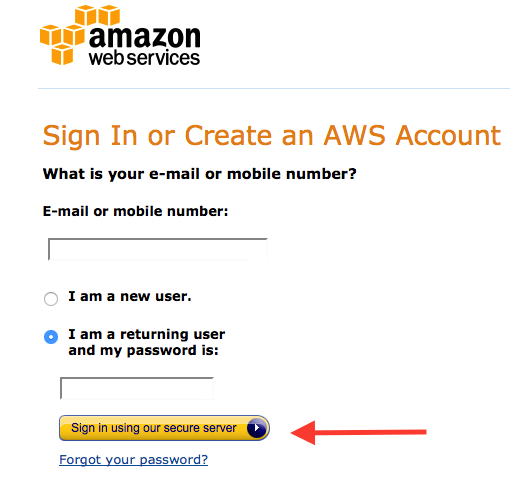
9. It can sometimes take a couple minutes for your new AWS account to go live. You will receive an e-mail when your account is active.
Create an AWS Lambda Function
AWS Lambda lets you run code without provisioning or managing servers. The first 1M calls per moth are free, so don’t worry – you won’t be charged to run and test this skill. If you were to exceed the free tier limit you pay only for the compute time you consume - there is no charge when your code is not running. With Lambda, you can run code for virtually any type of application or backend service - all with zero administration. Just upload your code and Lambda takes care of everything required to run and scale your code with high availability.
Note: If you are new to Lambda and would like more information, visit the Lambda Getting Started Guide.
10. IMPORTANT: Select EU West (Dublin, Ireland) region (upper right). Only eu-west-1 (Dublin) and us-east-1 (N.Virginia) AWS regions currently support the Alexa Skills Kit and lambda integration.

Select Lambda from Compute services (upper left)

Select “Create a Lambda Function” to begin the process of defining your Lambda function
At the bottom of the ‘Select Blueprint’ page, select “Skip”

Now, you need to configure the event that will trigger your Lambda function. As we are building skills with the Alexa Skills Kit, click on the gray dash-lined box and select Alexa Skills Kit from the dropdown menu.

Choose Next to continue.

You should now be in the "Configure Function" section. Enter the Name, Description, and Runtime for your skill as in the example.

Select the ‘Code Entry Type’ as ‘Upload Zip File’ and upload the zip file containing the example you created in Step 1. Note: This zip file should contain the contents of the src directory, including the node_modules subfolder.

Set your handler and role as follows:
- Keep Handler as ‘index.handler’
- Drop down the “Role” menu and select “Create a new custom role”. This will launch a new tab in the IAM Management Console.
- (Note: if you have already used Lambda you may already have a ‘lambda_basic_execution’ role created that you can use.)

You will be asked to set up your Identity and Access Management or “IAM” role if you have not already done so. The role will give our Lambda function permission to call other AWS services, such as Cloudwatch Logs for example. In the Role Summary section, select "Create a new IAM Role" from the IAM Role dropdown menu. The Role Name and policy document will automatically populate.
Select “Allow” in the lower right corner and you will be returned to your Lambda function.

Keep the Advanced settings as default. Select ‘Next’ and review. Then select ‘Create Function’:

Congratulations, you have created your AWS Lambda function. Copy the ARN and we’ll return to the Configuration tab on the Amazon Developer Portal.

Step 3: Add Your Lambda Function to Your Skill
Navigate back to developer.amazon.com and select your skill from the list. You can select the skill name or the edit button.

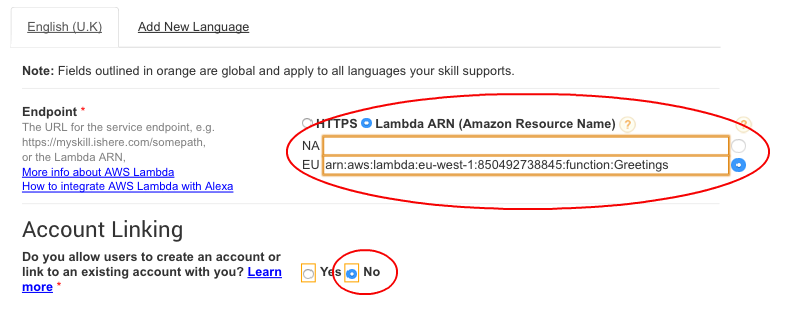
Click the Configuration tab. Select the Lambda ARN (Amazon Resource Name) radio button. Paste the ARN from your Lambda function into the input box. As we are creating this skill in English (UK) and German, we only need to add our function ARN to the EU field. Select the radio button to the right of this field to mark EU as the primary lambda function.
Note: If you’re skill will also support English (US) then you will be required to include a North America (NA) endpoint (us-east-1). It is recommended that they both have the same code and you handle the location within your code, more on that in a later step. You can have two endpoints at this stage also, though it is not required.
Then, select “No” for account linking since we will not be connecting to an external account for this tutorial. Then select Next.
You have now completed the English (UK) development of your skill. Now it’s time to test.
Step 4: Testing Your Skill
In the Test area, we are going to enter a launch word (launch, begin, open, start) in the service simulator section and see how Alexa will respond. In this example, we have called the skill ‘Greetings’ – remember? This is the invocation name for our skill.
- In the Service Simulator, type ‘Open Greet Me’ and select “Ask Greet Me”.

You should see the formatted JSON request from the Alexa Service and the response coming back. Verify that you get a correct Lambda response.

(Step 5: Add Support for German (DE).
Navigate back to the Skill information section in the Developer Portal. Then select ‘Add New Language’.

A new page should appear, similar to when you configured the UK language model.
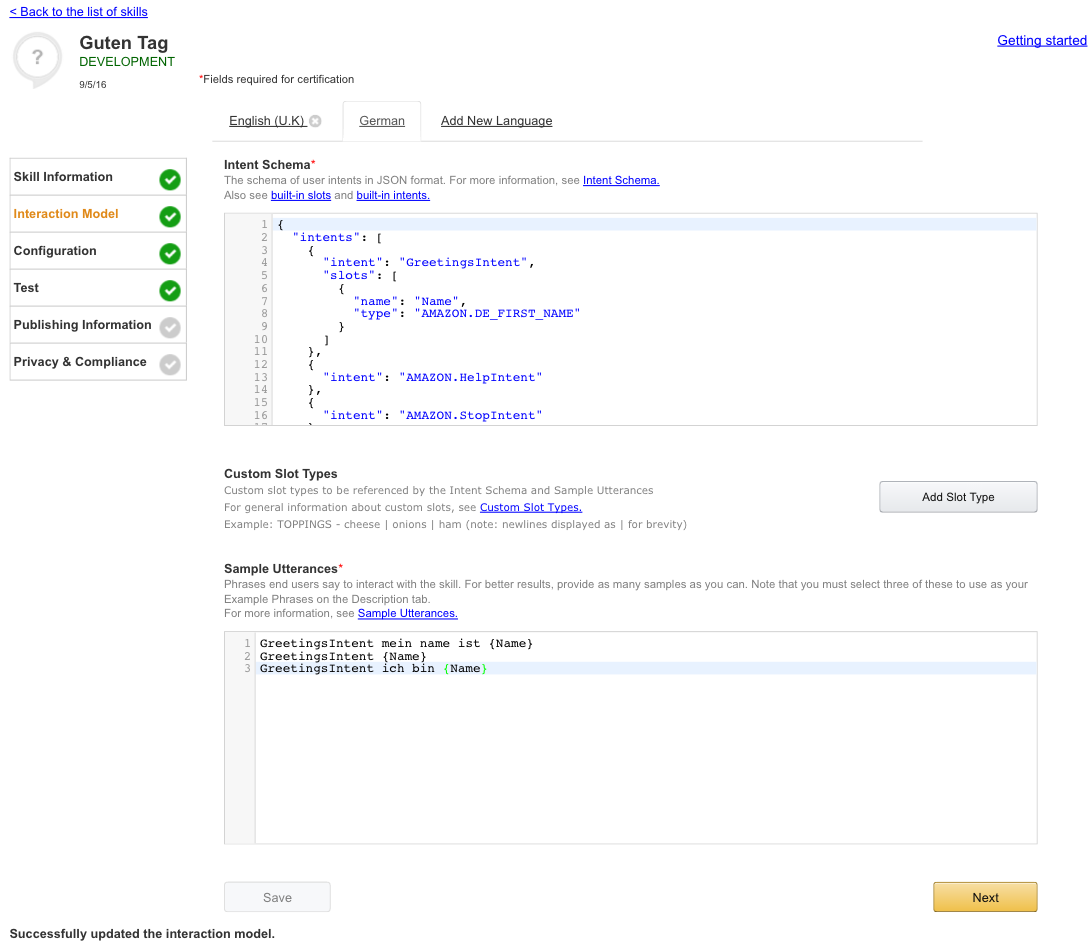
Select German as the language and select ‘Custom Interaction Model.’ Give your skill a name and invocation name, we will call ours ‘Guten Tag.’ Select ‘No’ to Audio Player then click ‘Save’ and then ‘Next.’

You should now have the interaction model page. We will need to create an intent schema for our German skill that understands German first names. We will use the built-in slot AMAZON.DE_FIRST_NAME for this. This is what the schema looks like:
JSON

{

  "intents": [

    {

      "intent": "GreetingsIntent",

      "slots": [

        {

          "name": "Name",

          "type": "AMAZON.DE_FIRST_NAME"

        }

      ]

    },

    {

      "intent": "AMAZON.HelpIntent"

    },

    {

      "intent": "AMAZON.StopIntent"

    },

    {

      "intent": "AMAZON.CancelIntent"

    }

  ]

}
Copy and paste this into the Intent Schema field.
We will also need some German sample utterances. Below is a translated version of the utterances we used for the UK model. Again, for a published skill we would recommend as many of these as possible.
GreetingsIntent ich heiße {Name}
GreetingsIntent mein name ist {Name}
GreetingsIntent {Name}
GreetingsIntent ich bin {Name}
Select Save. You should see the interaction model being built (this might a take a minute or 2). If you select next, your changes will be saved and you will go directly to the configuration screen. After selecting Save, it should now look like this:
Click ‘Next.’ We do not need to edit the configuration page as we already configured an EU AWS Lambda endpoint for the UK model. We will use the same Lambda function to handle both languages. Doing so, ensures the best possible customer experience because the servers are closer and deliver faster responses. Note: For the same reason, if adding support for English (US) you will need to add a North American (NA) Lambda endpoint in the us-east-1 (N. Virginia) AWS Region.
Click ‘Next’. You should now see the familiar testing screen. We’ll test shortly. But first we need to update our function code to support German. Let’s dive into that, open the index.js file you created earlier, in your favourite code editor.

- You will see that on line 9 we define a ‘locale’ variable. We abstract this from the JSON event that Alexa sends to your web service (In this case your AWS Lambda function). Alexa supports three locales, one per language model. en-GB, en-US and de-DE.
- You can see that we have an if/else statement that registers the handler based on the locale that it receives. This is how we handle multiple languages in a single code base.
- So far we have only defined the responses for the UK model in our code. Copy/paste below (somewhere near the bottom of your index.js file) to define handlers for DE. You can see how we triage the various requests based upon locale. When the user invokes the GreetingsIntent, we also abstract the Name slot value, so that we can greet them by their first name.
JAVASCRIPT
var DEhandlers = {

    'LaunchRequest': function () {

        var speechOutput = "Hallo, wie heißt du?"

        var reprompt = "Wie ist dein Name?";

        this.emit(':ask', speechOutput, reprompt);

    },

    'GreetingsIntent': function () {

        // Get users name

        var userName = this.event.request.intent.slots.Name.value

        // Create speech output

        var speechOutput = "Hallo " + userName;

        this.emit(':tell', speechOutput)

    },

    'AMAZON.HelpIntent': function () {

        var speechOutput = "Sag mir deinen Namen, zum Beispiel ‘mein Name ist Dean’, und ich begrüße dich mit deinem Namen";

        var reprompt = "Wie ist dein Name?";

        this.emit(':ask', speechOutput, reprompt);

    },

    'AMAZON.CancelIntent': function () {

        this.emit(':tell', 'Tschüß');

    },

    'AMAZON.StopIntent': function () {

        this.emit(':tell', 'Tschüß');

    }

}
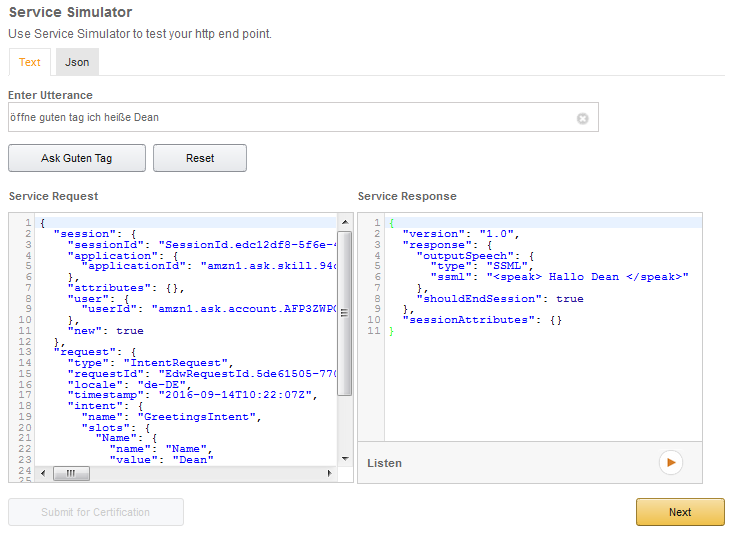
Now head back to the Developer Portal and click the testing section. Be sure to be in the German tab. Type ‘öffne guten tag ich heiße Dean’ into the service simulator Then click ‘Ask Guten Tag’

You should see the JSON service request and response in the field below. You can see that the slot value of the slot called ‘Name’ is ‘Dean’ and how the skill has used this to return a custom response to the user.
Step 6: Adding Extra Functionality
Congratulations, you’ve just created your first multi-lingual skill. Check out the list of things to try below to expand on this example. Don’t forget to let us know what you make via @alexadevs on twitter.
- Create some extra functionality for the skill and really make It your own. Be as creative as you wish. You can add more intents, or slots to make something really your own.
- Add Support for the English (US) Language model. You’ll have to create an identical AWS Lambda endpoint in the us-east-1 region.
- Try out one of our sample templates, such as Trivia Game or Decision Tree.
- Persist the user’s name data within a session. You can do this by storing session data in the session attributes. More details here.
- Persist the name data beyond the life of a session - You can use AWS DynamoDB to achieve this really easily with the alexa-sdk. Top-tip: Use the user_id from the request to recognize the user. Details here.
- Publish your skill – Details on submitting your skill for certification can be found here. We also have a handy Skill Submission checklist here. For the first 100 skills in each new language, we’ll be giving developers a free limited edition t-shirt. It’s not to be missed!
