Alexa Blogs

Today’s guest post comes from Michael Garcia, EMEA Solutions Architect at AWS. In this post, we'll discuss how you can voice-control any physical devices using Alexa.
The Internet of Things
Amazon Echo and Alexa Skills Kit (ASK) are enabling developers to create new experiences with voice-enabled applications. It is a really natural interface to interact with the physical world around us. The new Smart Home Skill API enables you to quickly create Alexa skills to control connected devices for the home, like lights and thermostats, from the cloud. What about controlling other types of devices from the cloud?
That is what the Internet Of Things (IoT) is all about. Today we are going to see how you can connect and control any device using the Amazon Web Services (AWS) platform and Alexa Skills Kit. We’ll start with some basics around AWS IoT, a managed service that will enable you to connect securely your objects to the AWS platform. We’ll create a representation of our physical device and then we’ll see how we can create a new skill to voice control our object from the cloud. If this is the first time you are creating an Alexa skill, I highly recommend you build a trivia skill or create a fact skill. Both blog posts provide step-by-step tutorials so you can build a skill in under an hour and learn the end-to-end process of creating a skill with AWS Lambda.
For those who already have a physical device and want to connect it to AWS IoT, you can consult the quickstart documentation for AWS IoT to easily get started by using the AWS SDKs and sending data to the Cloud.
To start, we’ll use a very simple industrial use case to make things feel more concrete. Imagine that you’re a developer who needs to develop a skill so that an operator in an industrial facility could control a water pump remotely with his voice. To achieve that we will focus on the Alexa Skills Kit and we will simulate having a physical device (the water pump) so everyone can perform the steps described below. We are assuming that the reader also has prior knowledge of the AWS Platform. To get up to speed, feel free to visit the AWS training section.
We will provide you with a glimpse of how to use Alexa and the AWS platform so you can create your own voice-enabled IoT application later.
AWS IoT: Creating a ‘Thing’ Which Will Represent a Physical Device
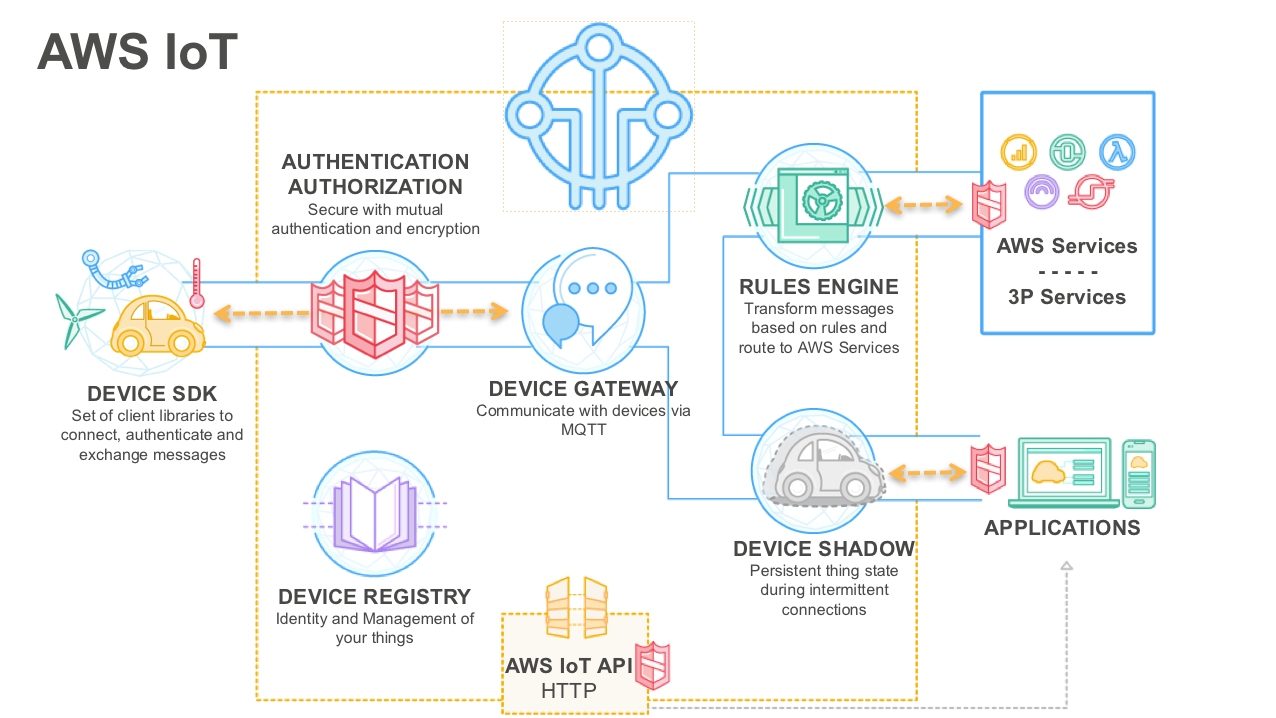
AWS IoT is a managed cloud platform that lets connected devices easily and securely interact with cloud applications and other devices. AWS IoT can support billions of devices and trillions of messages, and can process and route those messages to AWS endpoints and to other devices reliably and securely. With AWS IoT, your applications can keep track of and communicate with all your devices, all the time – even when they aren’t connected.
AWS IoT makes it easy to use other AWS services with built-in integration so you can build value-added IoT applications that gather, process, analyze and act on data generated by connected devices, without having to manage any infrastructure.
Let’s start by logging into the AWS Console on the IoT page. By default, this will select the ‘us-east-1’ AWS region, we recommend you stick with that region for this article.
Next, we are going to create a ‘thing’ which is the virtual equivalent of the physical device you want to control.
For this example, let’s imagine that we want to control a water pump in an industrial facility.
Once in the console perform the following steps:
- Click on ‘Create a resource’
- Click on ‘Create a thing’
- Type ‘waterPump’ as the name
- Click ‘Create’
- Click on ‘waterPump’

You can now see details on your newly created ‘thing’ and in the right panel, you can see that it has no state.

In the right panel you can see information on the ‘REST API endpoint’, make sure you copy this value as we will need it later on.
AWS IoT: Interact with Your ‘Thing’ Using ‘Device Shadows’
With AWS IoT you can create a persistent, virtual version, or ‘Shadow state’ of each device that includes the device’s latest state. This allows applications or other devices to read messages and interact with that device. Device Shadows persist the last reported state and desired future state of each device, even when the device is offline. Alternatively, you can retrieve the last reported state of a device or set a desired future state through the AWS IoT API. AWS IoT will compare the desired and last reported state, and command the device to make up the difference.
Device Shadows make it easier to build applications that interact with your devices by providing always available REST APIs.
The AWS IoT Device SDK makes it easy for your device to synchronize its state with its shadow, and to respond to desired future states set via the shadow. You do not need it for this tutorial as we will not focus on the code that would be located on the physical device. If you have a physical device you wish to connect you can follow these instructions.
Now, we have a ‘Thing’ called ‘waterPump’ and it has a shadow. We are going to use them to change the state of our water pump. The water pump can either be inactive (not pumping any water) or active (pumping water).
We will focus on how to change the Shadow state of a device using an Alexa skill. To make things easy we are going to simulate having connected a physical object with the AWS IoT Device SDK and the state of our device.
Go back to the AWS Console as we left it:
- Click on ‘update shadow’ in the right panel
- Copy and paste the code below
{

  "desired": {},

  "reported": {"pump":0}

}
You should get the following:

- Click on ‘update shadow’ to save the new shadow state
You should now see that the Shadow state contains the updated state, which shows in the reported section that the pump is inactive (value of 0).

This step simulates having a physical device connected to AWS IoT. If we had a physical device with an inactive pump, it would have published the same state thanks to the AWS IoT Device SDK and we would have the exact same information in our Shadow state. The ‘reported’ section is meant to be updated by the physical device only. We are showing you how to do it, in case you don’t have a physical device to connect.
To control a physical device, you need to update the ‘desired’ part of the Shadow state using the AWS IoT API. In our case we will use our Alexa skill to update the ‘desired’ section of the Shadow state using the AWS IoT API from AWS Lambda.
Alexa: Creating an Alexa Skill with AWS Lambda and Device Shadows
Once you are familiar with the Alexa Skills Kit and understand how to create an Alexa skill, you can use the following pieces of code to change the Shadow state of your Thing and thus control your connected device.
Place the following code at the top of your AWS Lambda function to load the libraries we are going to use, replace the endpoint with the ‘REST API Endpoint’ value you copied earlier. Mind the fact that you need to extract only the following part: XXXXX.iot.us-east-1.amazonaws.com.
//Environment Configuration

var config = {};

config.IOT_BROKER_ENDPOINT      = "XXXXXX.iot.us-east-1.amazonaws.com".toLowerCase();

config.IOT_BROKER_REGION        = "us-east-1";

config.IOT_THING_NAME           = "waterPump";

//Loading AWS SDK libraries

var AWS = require('aws-sdk');

AWS.config.region = config.IOT_BROKER_REGION;

//Initializing client for IoT

var iotData = new AWS.IotData({endpoint: config.IOT_BROKER_ENDPOINT});
Then you can place the following as a function to be executed when your intent triggers, more precisely when the ‘onIntent’ function is referenced inside the Alexa Skills Kit template.
/**

 * Activate the pump using AWS IoT Device Shadow

 */

function activatePump (intent, session, callback) {

    var repromptText = null;

    var sessionAttributes = {};

    var shouldEndSession = true;

    var speechOutput = "";


    //Set the pump to 1 for activation on the device

    var payloadObj={ "state":

                          { "desired":

                                   {"pump":1}

                          }

                 };


    //Prepare the parameters of the update call

    var paramsUpdate = {

        "thingName" : config.IOT_THING_NAME,

        "payload" : JSON.stringify(payloadObj)

    };


    //Update Device Shadow

    iotData.updateThingShadow(paramsUpdate, function(err, data) {

      if (err){

        //Handle the error here

      }

      else {

        speechOutput = "The pump has been activated!";

        console.log(data);

        callback(sessionAttributes,buildSpeechletResponse(intent.name, speechOutput, repromptText, shouldEndSession));

      }

    });

}
With all those components in place here is the integration we have achieved:

Test the Setup
To test the whole configuration we will place ourselves inside the device’ shoes. When a user is using your skill it will trigger an update to the AWS IoT Device Shadow. In this instance it will update the ‘desired’ section of the Device Shadows to control your device and will update the value of the pump attribute to 1 to activate the pump.
When that happens the AWS IoT service will send multiple notifications in the form of MQTT (MQTT is a publish/subscribe known protocol in the IoT space) messages on reserved MQTT topic so your device can listen to them. Physical devices can directly catch the delta existing between the ‘desired’ and ‘reported’ state and act accordingly. For instance, the device will catch the delta and see that the pump needs to be activated, and then activate it.
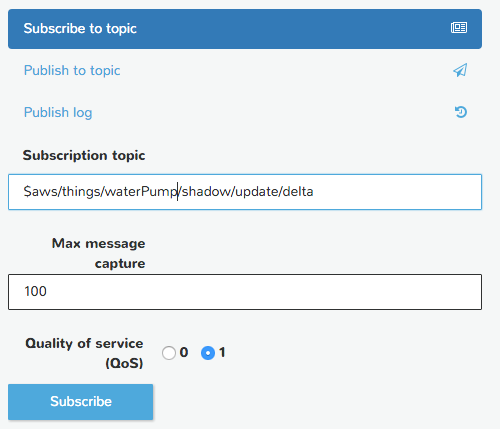
To achieve this without a physical device we will listen to the same MQTT topic the physical device would be listening on. Perform the following steps in the console:
- At the top of the screen, go to the ‘MQTT Client’ tab
- Click on ‘Generate client ID’
- Click on ‘Connect’

- Click on ‘Subscribe to topic’
- Type the value ‘$aws/things/thingName/shadow/update/delta’
- Click ‘Subscribe’
You can now use the Alexa Voice Simulator in the developer portal or an Alexa-enabled device, such as the Amazon Echo, Echo Dot, Amazon Tap or AlexaPi, to use your skill and activate the pump with your voice. You should instantly see the delta (difference between ‘desired’ and ‘reported’ state in Device Shadows) being pushed to the MQTT topic you are listening to. If you have a physical device, the notification would be delivered to it too.

Conclusion
You are now able to build voice-enabled IoT applications using ASK and AWS IoT. Device Shadows will give you the ability to retrieve the last known state of your device and to control it. To dive deeper, you can use Alexa and AWS Lambda with the rest of the AWS Platform to add high value services like making use of Amazon Machine Learning or running analytical queries with Amazon Redshift.
To learn more about AWS IoT, you can take a look at this session from AWS Re:Invent. Many other sessions or webinars are also available.
To learn more about Alexa, you can check out these Alexa developer resources:
- Alexa Skills Kit (ASK)
- Alexa Developer Forums
- Knowledge Base
- Intro to ASK On Demand Webinar
- Voice Design 101 – On Demand Webinar
- Developer Office Hours