Alexa Blogs

If you’ve already created your first Alexa Skill, you may be using local environments, the AWS CLI, and other DevOps processes. This blog post is for advanced developers who want to level up skill creation by adding some automation, version control, and repeatability to skill deployments.
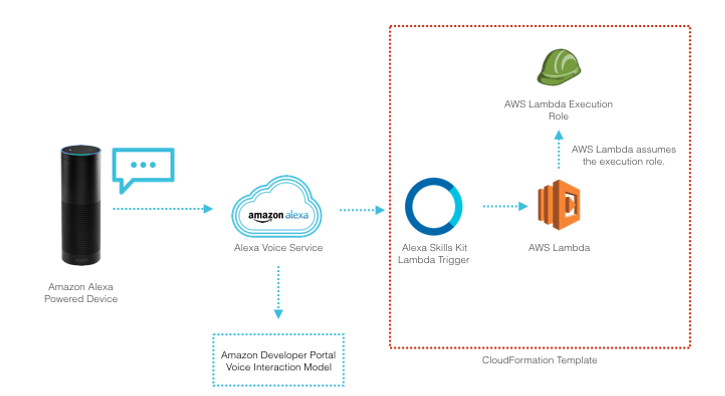
In this post we're going to programmatically create our skill backend using AWS CloudFormation. CloudFormation is an AWS service that enables you to describe your AWS resources as a JSON file, these JSON files can later be ‘executed’ to tear up and tear down your AWS environments. This gives us a number of benefits, including version control and repeatability. You can read more about AWS CloudFormation in general over in the AWS developer docs here. To put this into context, when looking at the Alexa Skills Kit Architecture below, the resources in the red box below are what we will be creating within our CloudFormation Template.
The Template
The CloudFormation template is a JSON object that describes our infrastructure. This will consist of three components.
Parameters - Where we define the input parameters we want to inject into our template, such as ‘function-name.
Resources - The AWS resources that make up our skill backend, Such as the lambda function.
Outputs – Any information that we would like to retrieve from the resources created in our CloudFormation stack. Such as the lambda function ARN.
The template that we will create in this tutorial can be used as a starting point to create the backend for any of your Alexa skills.
Pre-Requisites
You will need to package up your lambda function code and dependencies as a zip file. You can follow the guide on how to do this with node.js here. You will then need to upload this code to a new or existing bucket on AWS S3. Make sure the S3 bucket has permissions that permit AWS Lambda to access the zip file. The easiest way to achieve this is to apply a bucket policy, similar to the example below to the S3 bucket where your lambda package is stored. You will need to replace the items in the <> brackets with your own values.
{
       "Version": "2008-10-17",
       "Statement": [
              {
                     "Sid": "MyFunctionCode",
                     "Effect": "Allow",
                     "Principal": {
                           "Service": "lambda.amazonaws.com"
                     },
                     "Action": "s3:getObject",
                     "Resource": "arn:aws:s3:::<YOUR-BUCKET-NAME-HERE>/<PATH-TO-YOUR-ZIP-FILE-HERE>"
              }
       ]
}
If you do not have an existing skill to use during this tutorial, feel free to use the node.js decision tree skill sample. We've already packaged that up for you and uploaded it to S3 in a public bucket. You can use the below parameters when testing.
BucketName : alexa-skills-kit-samples-cfn
Package Path: skill-sample-nodejs-decision-tree/index.zip
Parameters
We will require 3 parameters in our template.
Function Name - A Friendly Name to give our AWS Lambda function.
Bucket Name - The S3 bucket where our skill code is stored.
Package Path - The Path within the S3 bucket to the packaged code zip file.
Let's see how this looks in the template.
JSON
{
  "AWSTemplateFormatVersion": "2010-09-09",
  "Parameters": {
    "FunctionName": {
      "Description": "Give your Skill Function a Friendly Name",
      "Type": "String",
      "Default": "alexa-skill-function"
    },
    "BucketName": {
      "Description": "The S3 bucket where our skill code is stored",
      "Type": "String"
    },
    "PackagePath": {
      "Description": "The Path within the S3 bucket to the zipped node.js package",
      "Type": "String"
    }
  },
Let’s walk through this. First up we state the template version that we are using. Next, you can see that we have created the three parameters, each of these have a useful description and are of the type 'string'. You can also set a default value here, which we have done. We will use these parameters later, to tell our CloudFromation template where to download our code from, and what to name out lambda function.
Resources
Resources are the meat of our template. We will need 3 of these to make our simple Alexa Skill backend:
- An AWS Lambda function execution IAM role
- The AWS Lambda function itself
- Lambda Permissions that allow Alexa to invoke our function
We'll step through each of these one by one. Let's get started with the Lambda Function execution role.
Lambda Function execution role
Your lambda function needs to be granted permissions to perform actions on other AWS services. Here's what it looks like.
"Resources": {
    "LambdaFunctionRole": {
      "Type": "AWS::IAM::Role",
      "Properties": {
        "AssumeRolePolicyDocument": {
          "Version": "2012-10-17",
          "Statement": [
            {
              "Effect": "Allow",
              "Principal": {
                "Service": [
                  "lambda.amazonaws.com"
                ]
              },
              "Action": [
                "sts:AssumeRole"
              ]
            }
          ]
        },
        "Path": "\/",
        "Policies": [
         {
            "PolicyName": "AlexaSkillCloudWatchLogsAccess",
            "PolicyDocument": {
              "Version": "2012-10-17",
              "Statement": [
                {
                  "Sid": "AllowLogging",
                  "Effect": "Allow",
                  "Action": [
                    "logs:CreateLogGroup",
                    "logs:CreateLogStream",
                    "logs:PutLogEvents"
                  ],
                  "Resource": [
                    "*"
                  ]
                }
              ]
            }
          }
        ]
      }
    },
This looks like a lot, but there are a only a handful of key components here. Firstly, we give the resource a friendly name of LambdaFunctionRole. We then tell Cloudformation that we want this resource to be of the type AWS::IAM::Role as we are creating an IAM role.
Next we have the AssumeRolePolicyDocument property. This tells IAM who is allowed to assume this IAM Role. We want the AWS Lambda service (our function) lambda.amazonaws.com to assume this role for our function.
We then have an array of Policies, we just have one policy here, which lets our lambda function write to Amazon CloudWatch logs. You may add more policies here if your function requires access to more resources, for example an Amazon DynamoDB table. The PolicyDocument property is exactly the same as what you would see if creating an AWS IAM role in the AWS console.
AWS Lambda Function
We now need to create our AWS Lambda Function. Here’s what that looks like.
"AlexaSkillFunction": {
      "Type": "AWS::Lambda::Function",
      "Properties": {
        "FunctionName": {
          "Ref": "FunctionName"
        },
        "Handler": "index.handler",
        "Role": {
          "Fn::GetAtt": [
            "LambdaFunctionRole",
            "Arn"
          ]
        },
        "Description": {
          "Fn::Join": [
            "",
            [
              "Alexa Skill code for the ",
              {
               "Ref": "FunctionName"
              },
              " skill."
            ]
          ]
        },
        "Code": {
          "S3Bucket": {
            "Ref": "BucketName"
          },
          "S3Key": {
            "Ref": "PackagePath"
          }
        },
        "Runtime": "nodejs4.3",
        "Timeout": "10"
      }
    },
If you walk through this object, you can see the various configuration items for our Lambda function that will run and host our Alexa Skill service. For example, the Runtime and Timeout properties that you may be familiar with from creating Lambda functions before. What's more interesting here is how we have started to reference both the earlier created Parameters and Resources. We use three methods here.
Fn::GetAtt – This function that CloudFormation supports enables us to get a specific attribute from other resources in our template. In our case, we use this to get the Amazon Resource Name (ARN) of the IAM role we created earlier in the template.
Ref - Similarly to the above, Ref enables you to grab references that have been defined earlier in your template. You can do this for resources, but here we are using this for the Parameters that we set at the beginning, we’re getting the BucketName and the PackagePath.
Fn::Join - This function enables us to join a list of strings by a defined delimiter. We use this function here to add the friendly FunctionName that we defined in our parameters in to the description of our skill.
More information on supported CloudFormation functions can be found here.
Lambda Alexa Skills Kit Permissions
Next, we need to tell AWS Lambda to permit the Alexa Skills Kit to invoke our Lambda function. We do this by creating a AWS::Lambda::Permission resource.
"AlexaSkillFunctionPermissions": {
      "Type": "AWS::Lambda::Permission",
      "Properties": {
        "FunctionName": {
          "Ref": "AlexaSkillFunction"
        },
        "Action": "lambda:InvokeFunction",
        "Principal": "alexa-appkit.amazon.com"
      }
    }
  },
Here we are defining that, for the function with our FunctionName, we want to allow alexa-appkit.amazon.com
(The Alexa Skills Kit) permissions to perform the InvokeFunction action on our lambda function.
Note how we use Ref to refer to the earlier defined Lambda function resource.
That's all of the resources that we'll need. now let’s define some outputs that we need from our CloudFormation Template.
Outputs
CloudFormation outputs give us the ability to extract relevant information from our template and its resources. In our case, the one output that we need is the Lambda function ARN. This will be inserted into the Amazon Developer Portal when configuring our Alexa skill there.
Here's how we do that:
"Outputs": {
    "FunctionARN": {
      "Value": {
        "Fn::GetAtt": [
          "AlexaSkillFunction",
          "Arn"
        ]
      },
      "Description": "Lambda function ARN to be placed in the Amazon Developer Portal"
    }
  }
}
We give our outputs a name, in our case FunctionARN, and then we say what the value should be. See how we are using the Fn::GetAtt function to specifically retrieve the Arn attribute of our AWS Lambda function resource that we named AlexaSkillFunction earlier. We can optionally give our outputs a useful description, which we have done here.
Putting it all together
Now you have a complete CloudFormation template. Save this file locally on your machine.
If needed, you can find a copy of the entire template from this post over at our GitHub repo.
https://github.com/deanobalino/alexa-cloudformation-sample
Download the cloudformation.json file and save a local copy to your machine.
Running the CloudFormation Template
AWS Command Line Interface
The easiest way to create your CloudFormation stack is via the AWS Command Line Interface (CLI). If you don't already have the CLI installed you can get started here.
The following commands will create and launch the stack, replace the parameters with your own values. Values that require changing are enclosed in <> brackets.
aws cloudformation create-stack --stack-name <YOUR-STACK-NAME> --template-body
file://<PATH-TO-JSON-CLOUDFORMATION-TEMPLATE> --parameters
ParameterKey=FunctionName,ParameterValue=<YOUR-FUNCTION-NAME>
ParameterKey=BucketName,ParameterValue=<YOUR-S3-BUCKET>
ParameterKey=PackagePath,ParameterValue=<YOUR-PACKAGE-PATH> --capabilities CAPABILITY_IAM
This is an Asynchronous action. So to check the status, we will have to run another AWS CLI command. We'll use the StackName that you defined in the previous command to check the status.
aws cloudformation describe-stacks --stack-name <YOUR-STACK-NAME>
Once the creation is complete (this may take a few minutes), you should see an output similar to the below. We are looking for the StackStatus to have a value of CREATE_COMPLETE.
If you look at the outputValue property within the Outputs array. You will find the Lambda ARN for use in the Amazon Developer Portal.
{
  "Stacks": [
    {
      "StackId": "arn:aws:cloudformation:us-east-1:12345678901:stack\/blogposttest\/d917fdc0-5afe-11e6-95db-500c524294f2",
      "Parameters": [
        {
          "ParameterValue": "blogposttest",
          "ParameterKey": "FunctionName"
        },
        {
          "ParameterKey": "BucketName"
        },
        {
          "ParameterValue": "skill-sample-nodejs-decision-tree\/index.zip",
          "ParameterKey": "PackagePath"
        }
      ],
      "Tags": [
             ],
     "Outputs": [
        {
          "Description": "Lambda function ARN to be placed in the Amazon Developer Portal",
          "OutputKey": "FunctionARN",
          "OutputValue": "arn:aws:lambda:us-east-1:12345678901:function:blogposttest"
        }
      ],
      "CreationTime": "2016-08-05T11:22:09.190Z",
      "Capabilities": [
        "CAPABILITY_IAM"
      ],
      "StackName": "blogposttest",
      "NotificationARNs": [
        ],
      "StackStatus": "CREATE_COMPLETE",
      "DisableRollback": false
    }
  ]
}
AWS Console
Alternatively, you can create your stack in the AWS console. AWS already has a great guide on this here.
It may take a few minutes to create your stack, once created, click the Outputs tab within your stack to retrieve the Lambda Function ARN that you can use in the Amazon Developer Portal for your skill frontend.
Next Steps
Now that your backend is created, you can reference my colleague Rob's blog post on using the AWS CLI to programmatically update for function code as you iterate over time.
Once you have created the Voice Interaction Model in the Amazon Developer Portal you can test that your skill is functioning as expected by either using an Alexa enabled device, visiting echosim.io, or using the Service Simulator in the Amazon Developer portal. In case you need a reminder, the tutorial for creating the decision-tree sample template can be found here.
If you are making changes to existing, or adding new resources to the AWS resources defined in this template, such as changing function configuration or adding a DynamoDB table. I would strongly recommend that you amend the CloudFormation template to include these changes and perform an Update Stack operation within CloudFormation to ensure that all infrastructure changes are tracked within your Cloud Formation stack.
This article demonstrates how to programmatically create and define your Alexa Skills Kit backend as code by using AWS CloudFormation to make it simplified and repeatable.
More From Dean Bryen
Recently I sat down with Dave Isbitski, Chief Evangelist of Alexa, to record a new podcast. In it I talk about our international launch, multi-language skills, and the UK and German developer communities. Listen to the podcast episode >