Alexa Blogs

 A few months ago we introduced Flask-Ask, a new Python framework for rapid Alexa skill development created by Alexa Champion John Wheeler. Today, due to popular demand, John shares how you can deploy your Alexa skills built with Flask-Ask to AWS Lambda, a service that lets you run code without provisioning or managing servers, which you can use to build serverless applications. Check out John’s technical tutorial below, connect with him on Twitter, and hear more about Flask-Ask in the Alexa Dev Chat podcast episode 10.
In our first post, Flask-Ask and ngrok were used to rapidly create a memory game skill and test it locally. This post shows how to use Flask-Ask with the Zappa framework to quickly deploy skills to AWS Lambda. As of this writing, AWS Lambda supports Python 2.7. This tutorial assumes Python 2.7 is installed on your Windows, Mac, or Linux system.
Zappa, a serverless Python framework, uses a combination of AWS components to emulate the WSGI environment on Lambda that Python web frameworks require. Since Flask-Ask is a Flask extension and Flask requires a WSGI environment, Zappa is the perfect fit for deploying Flask-Ask skills to AWS Lambda. To demonstrate, we'll create an Alexa skill that uses the GitHub API to return how many stars, watchers, and forks a repository has.
Let's get started! If you prefer the video walkthrough of this post, check it out here or below.
Install project dependencies into a Python virtual environment
Step 1: First, create a directory named repo_stats for holding project files. Open up a terminal and cd into repo_stats.
$ mkdir repo_stats
$ cd repo_stats
Step 2: Install virtualenv
Zappa requires the use of a Python virtual environment, and using virtual environments is a good practice in general. Virtual environments separate dependencies between projects, so those dependencies need not be maintained in the system Python installation. This way, separate projects can depend on separate versions of the same dependencies. You can read more about virtual environments here.
To make sure you have virtual environments installed, type the following command in your terminal:
$ pip install virtualenv
Step 3: Create a virtual environment
After that command completes, create a virtual environment with:
$ virtualenv venv
A directory named venv now exists inside repo_stats. Next, activate the virtual environment with:
$ source venv/bin/activate (Unix)
$ venv\Scripts\activate (Windows)
Your command prompt should reflect your virtual environment being active by having the name of the virtual environment (venv) to the left of the prompt. So, like –
(venv) jwheeler:repo_stats$
The virtual environment can be deactivated at any time by typing deactivate or closing the terminal, but for now, keep it active.
Step 4: Install dependencies
Lastly for this step, install all the project dependencies into the virtual environment by typing:
$ pip install flask-ask zappa requests awscli
The preceding command installs Flask-Ask, Zappa, and two additional dependencies used in this tutorial. Requests is a Python module for making HTTP requests, and the AWS Command Line Interface (CLI) is for generating the AWS configuration Zappa uses to deploy to AWS Lambda. Before generating the AWS configuration with AWS CLI, let's create the skill and a user in the AWS console.
We are now ready to write the Lambda function for our skill using Flask-Ask.
Create the Lambda function using Flask-Ask
We’ll be using GitHub REST API (v3) to get statistics for the Flask-Ask repository. Please note that since this is a demonstration, the code is intentionally simple. The skill we'll build is great for personal use but not general enough for a public release so do not submit it for certification.
Step 5: Open up a code editor, and create a file named repo_stats.py inside the directory repo_stats. Type or copy-and-paste the code below:
import logging
from operator import itemgetter

import requests
from flask import Flask
from flask_ask import Ask, statement


REPOSITORY = 'johnwheeler/flask-ask'
ENDPOINT = 'https://api.github.com/repos/{}'.format(REPOSITORY)

app = Flask(__name__)
ask = Ask(app, '/')
logger = logging.getLogger()


@ask.launch
def launch():
    return stats()


@ask.intent("StatsIntent")
def stats():
    r = requests.get(ENDPOINT)
    repo_json = r.json()

    if r.status_code == 200:
        repo_name = ENDPOINT.split('/')[-1]
        keys = ['stargazers_count', 'subscribers_count', 'forks_count']
        stars, watchers, forks = itemgetter(*keys)(repo_json)
        speech = "{} has {} stars, {} watchers, and {} forks. " \
            .format(repo_name, stars, watchers, forks)
    else:
        message = repo_json['message']
        speech = "There was a problem calling the GitHub API: {}.".format(message)

    logger.info('speech = {}'.format(speech))
    return statement(speech)
In the stats method, the Requests library invokes the GitHub API. The response returned is a JSON structure with details about the repository including its statistics. Before collecting the statistics, we make sure the response status is 200 (i.e. successful). Then, a message with the statistics is returned as an Alexa response. If the API call isn't successful, an error message is returned instead.
Now that the code is complete, let's get ready to deploy to AWS Lambda using Zappa.
Deployment Step 1: Create an IAM user in the AWS console.
The first step in preparing for deployment is creating an AWS IAM user. Creating this user is mostly a point-and-click operation.
First, you'll need to have an AWS account. If you don't have one, head over to https://aws.amazon.com, click "Create an AWS Account", and follow the instructions to create your account.
Once your account is created:
1. Open the IAM Console.
2. In the navigation pane, choose Users.
3. Click the Add User button.
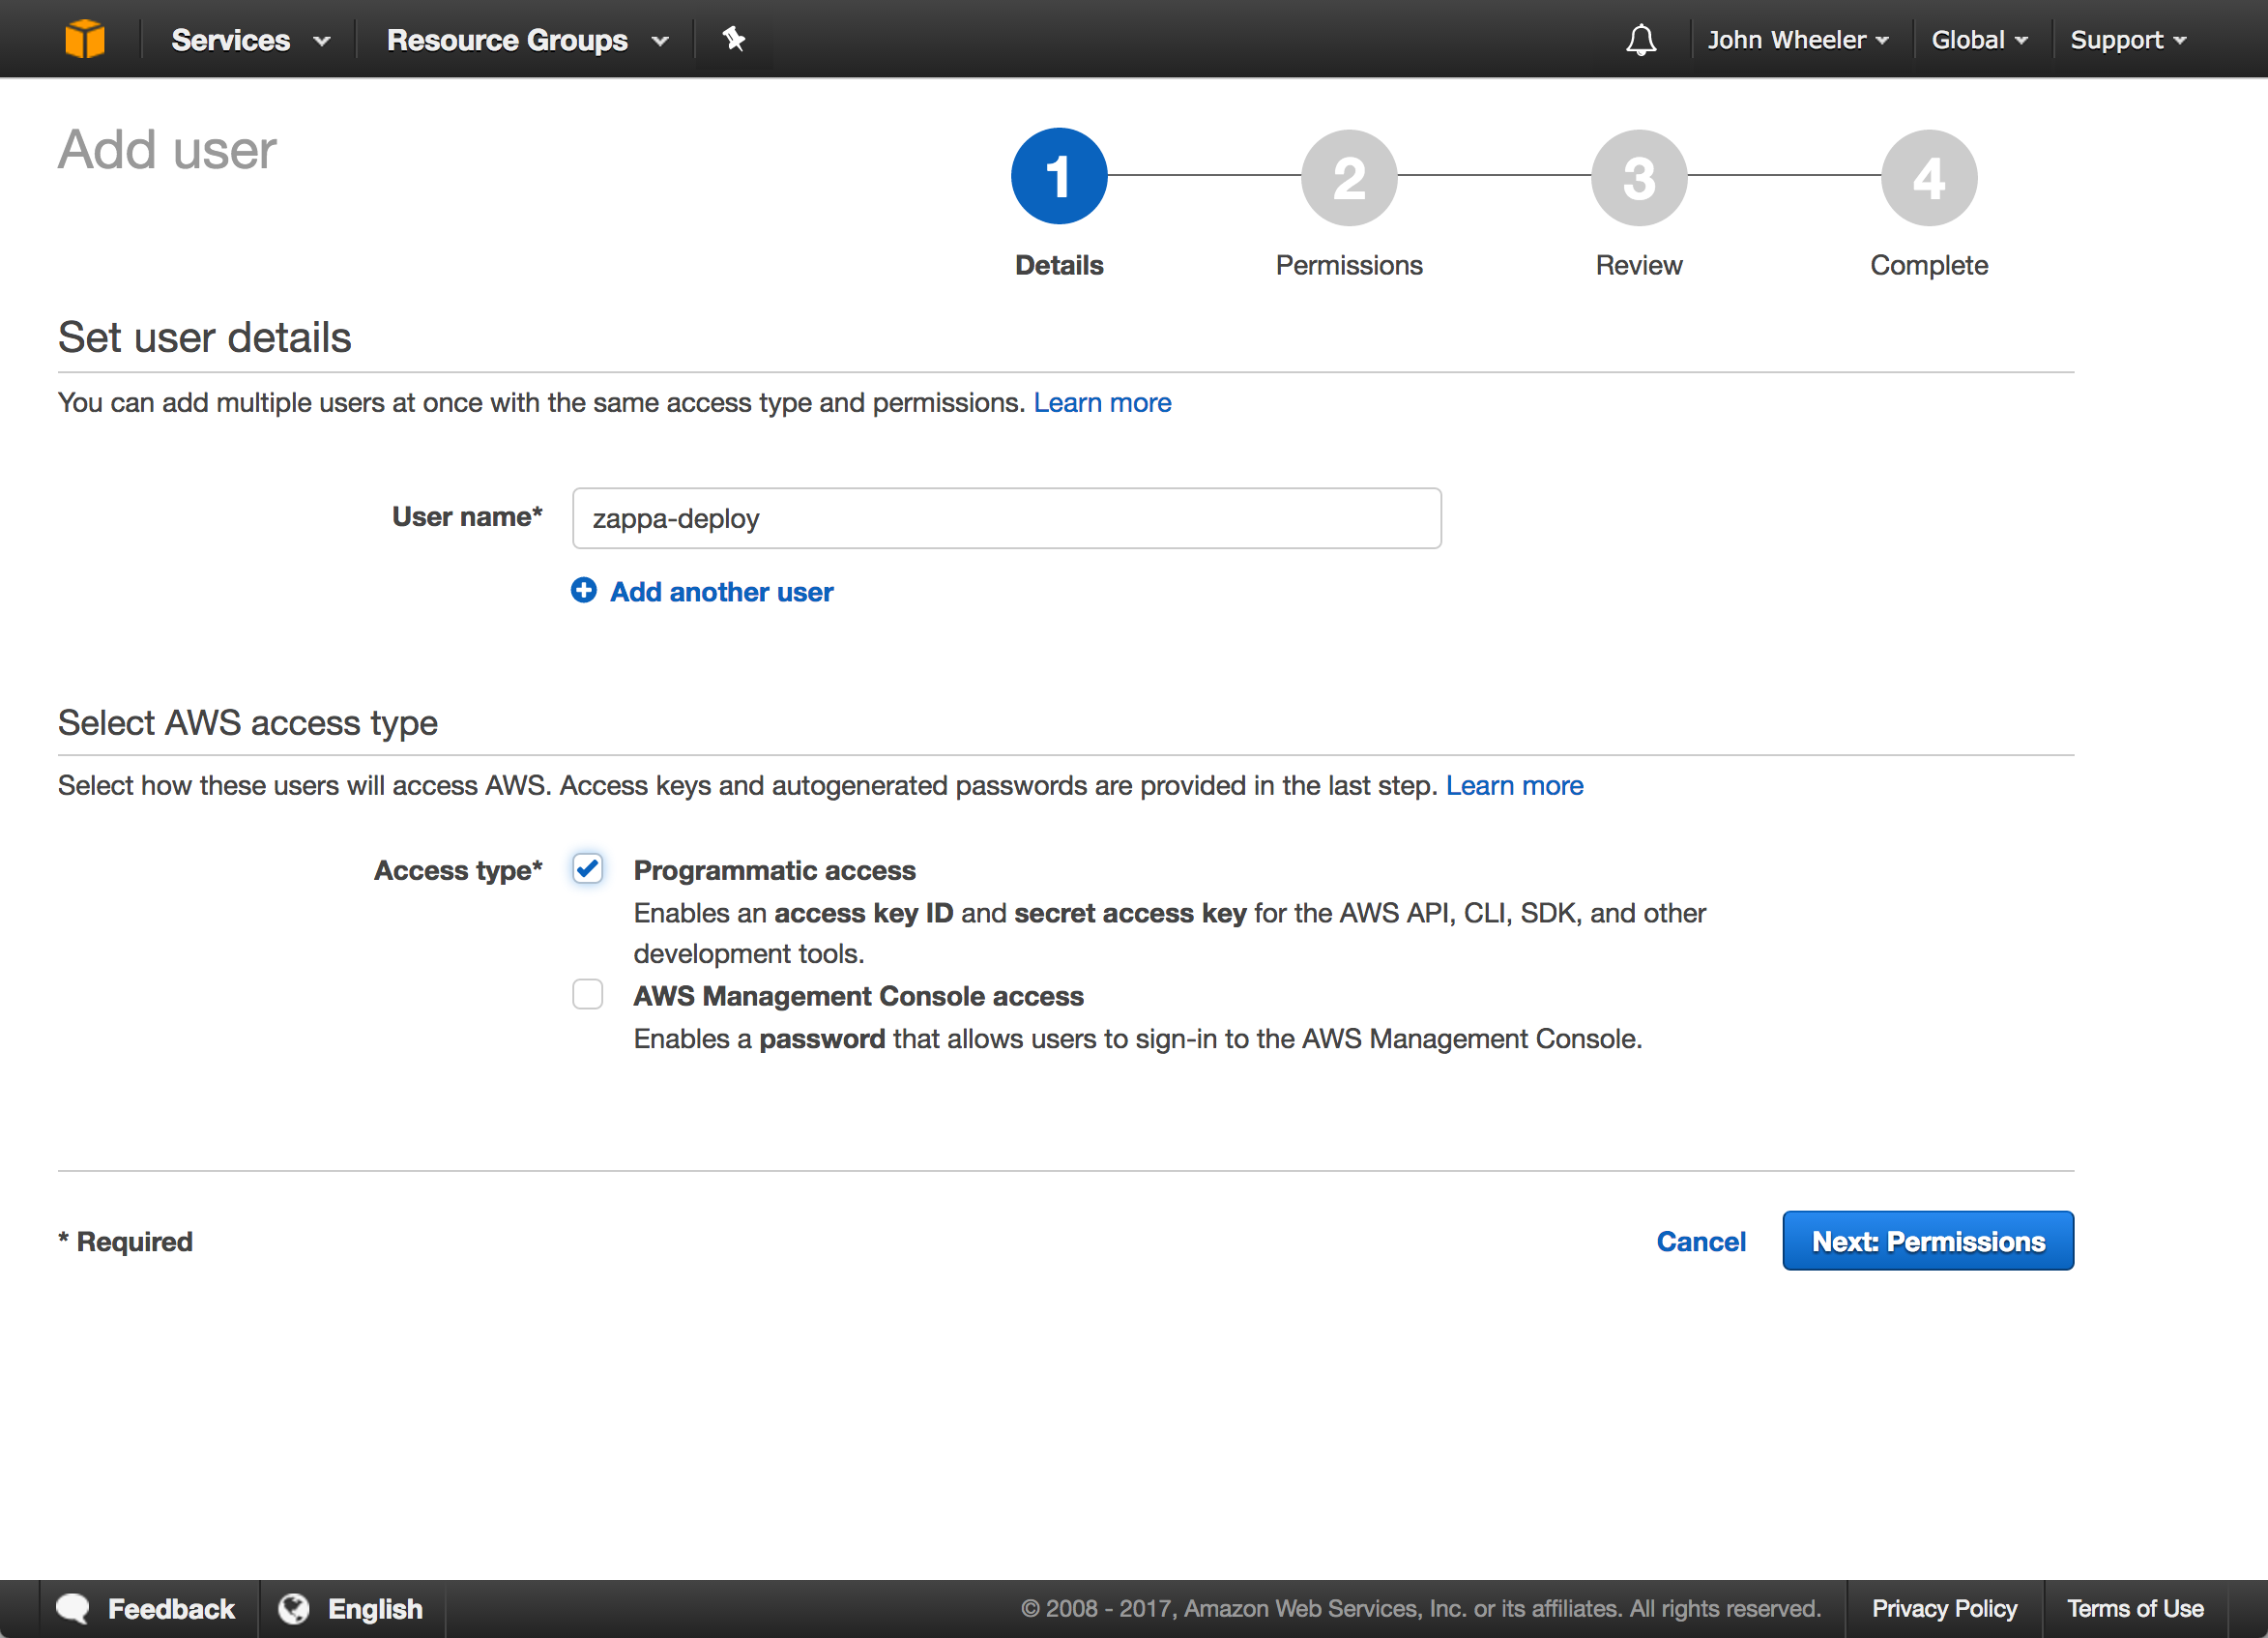
4. Name the user zappa-deploy, choose Programmatic access for the Access type, then click the "Next: Permissions" button.
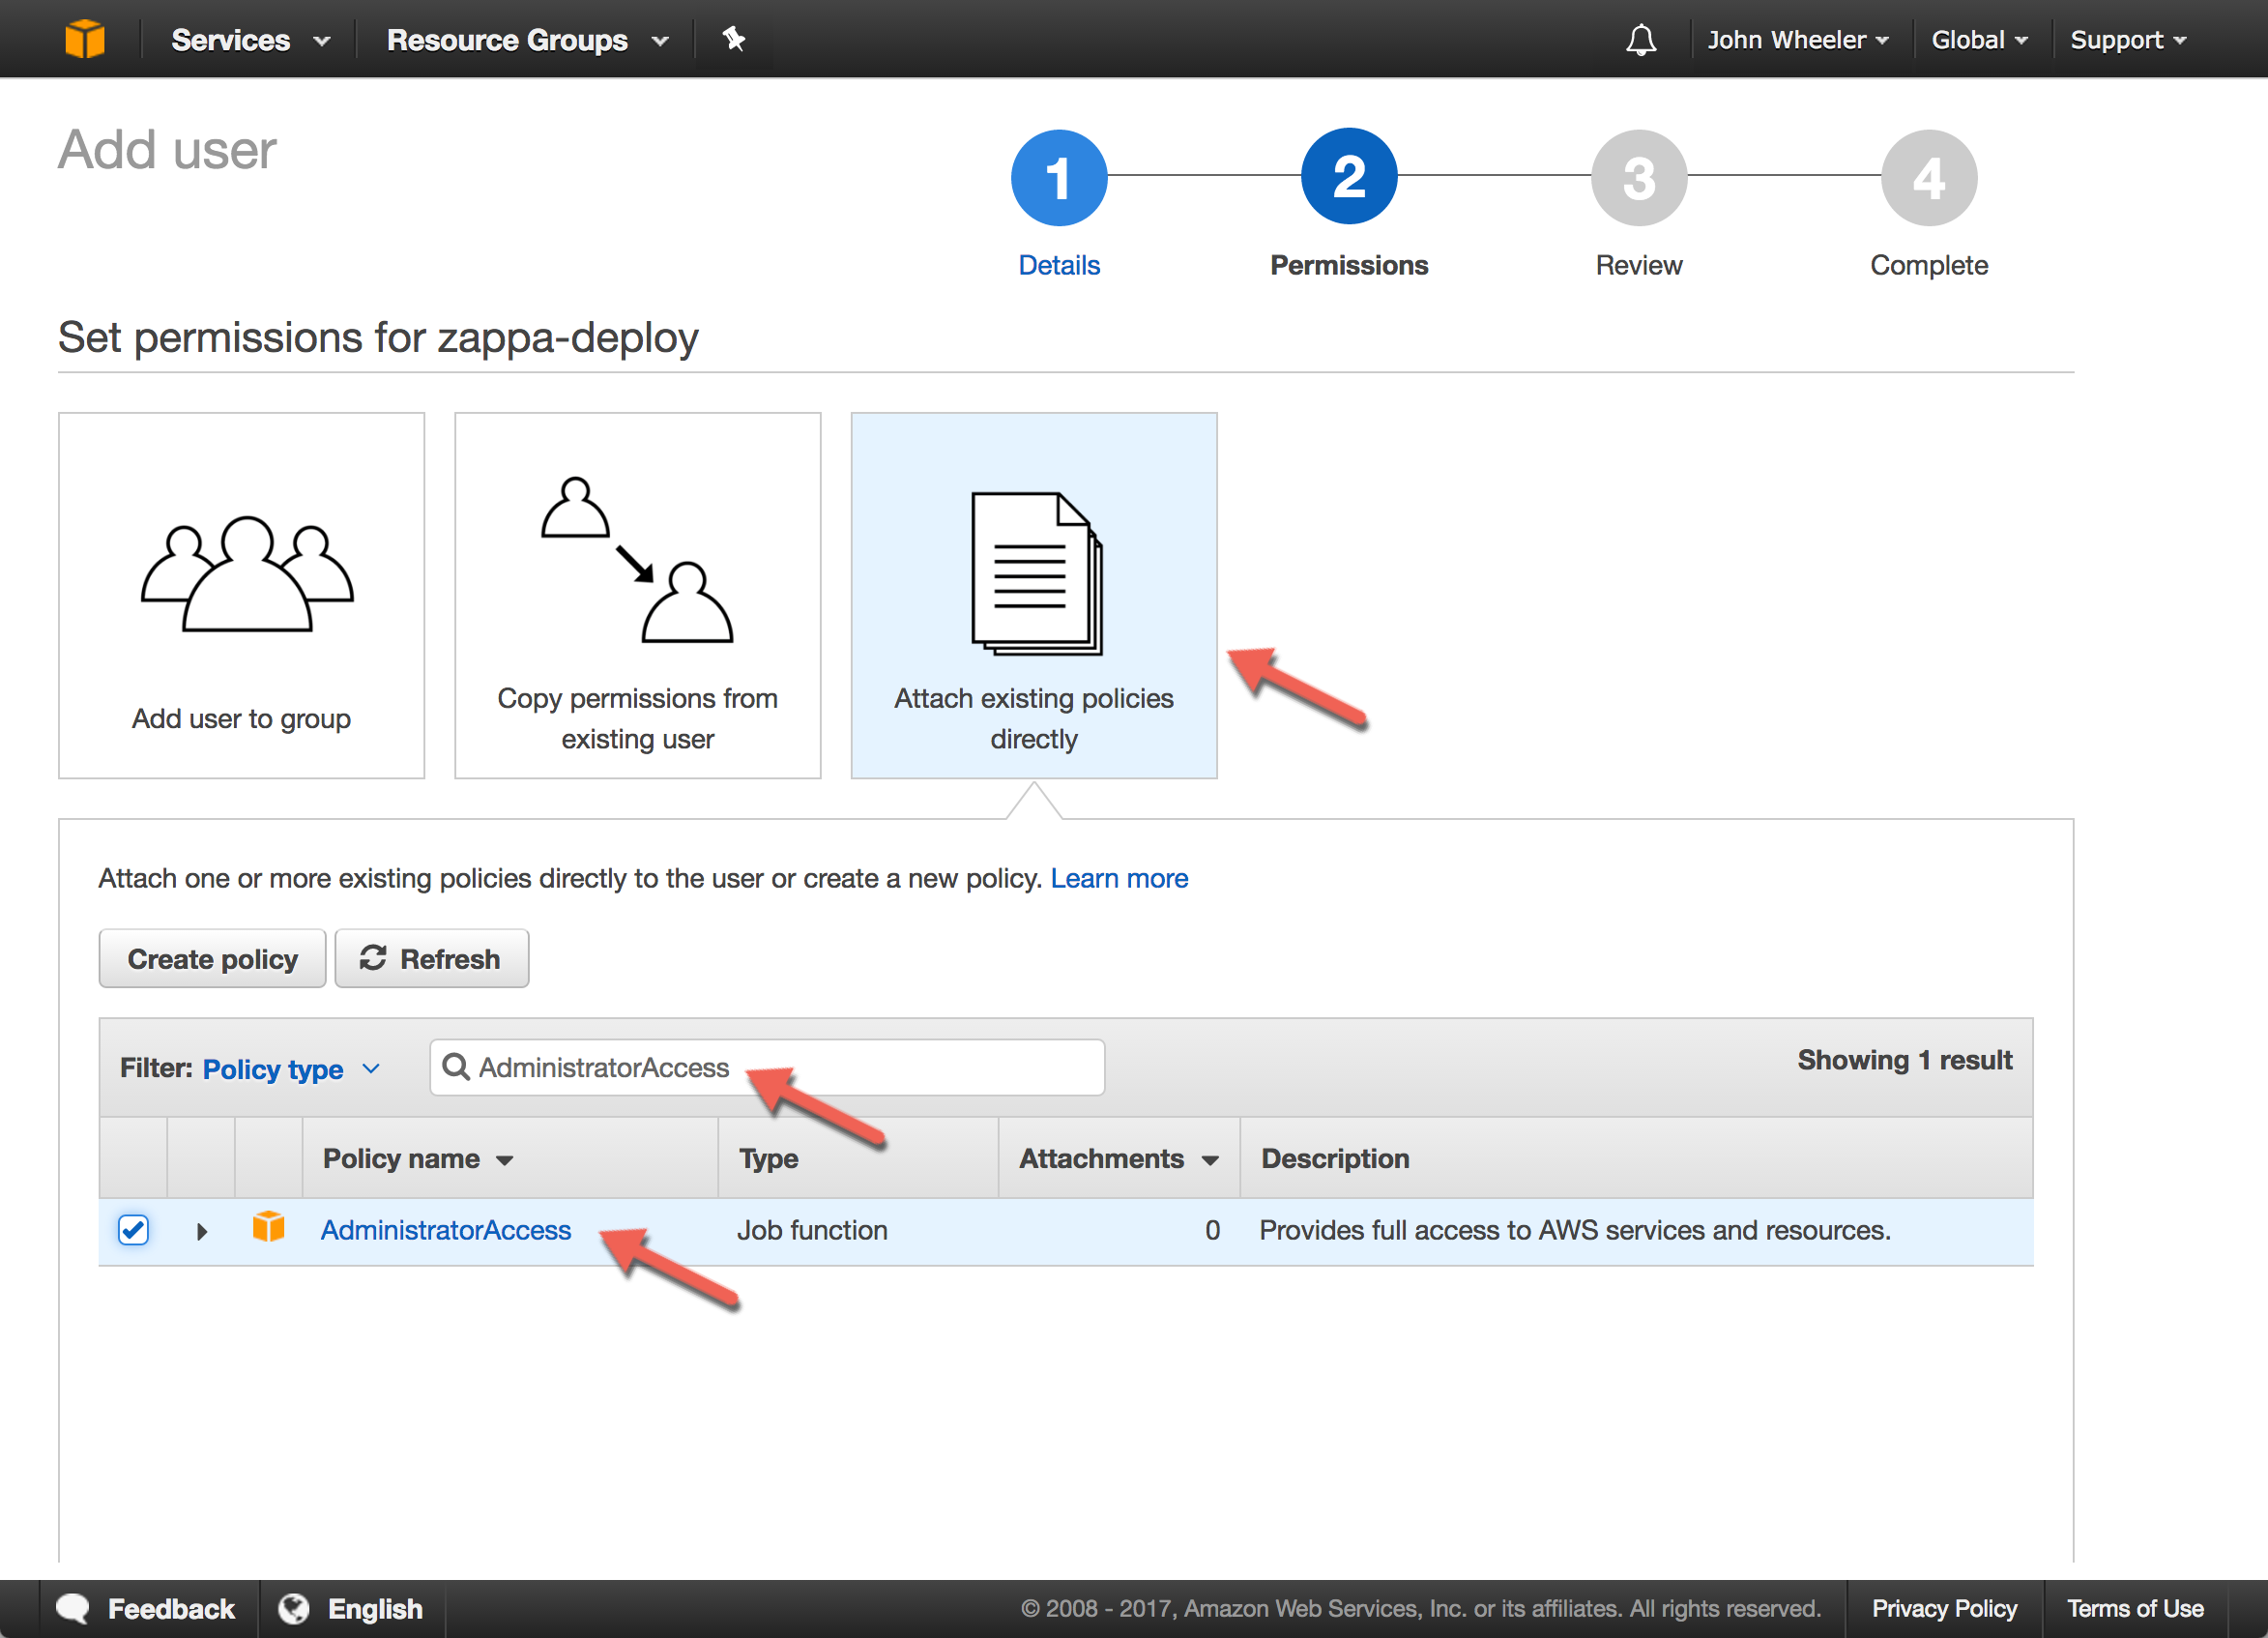
5. On the permissions page, click the Attach existing policies directly option.
6. A large list of policies is displayed. Locate the AdministratorAccess policy, select its checkbox, then click the "Next: Review" button.
7. Finally, review the information that displays, and click the Create User button.

8. Once the user is created, its Access key ID and Secret access key are displayed (click the Show link next to the Secret access key to unmask it).
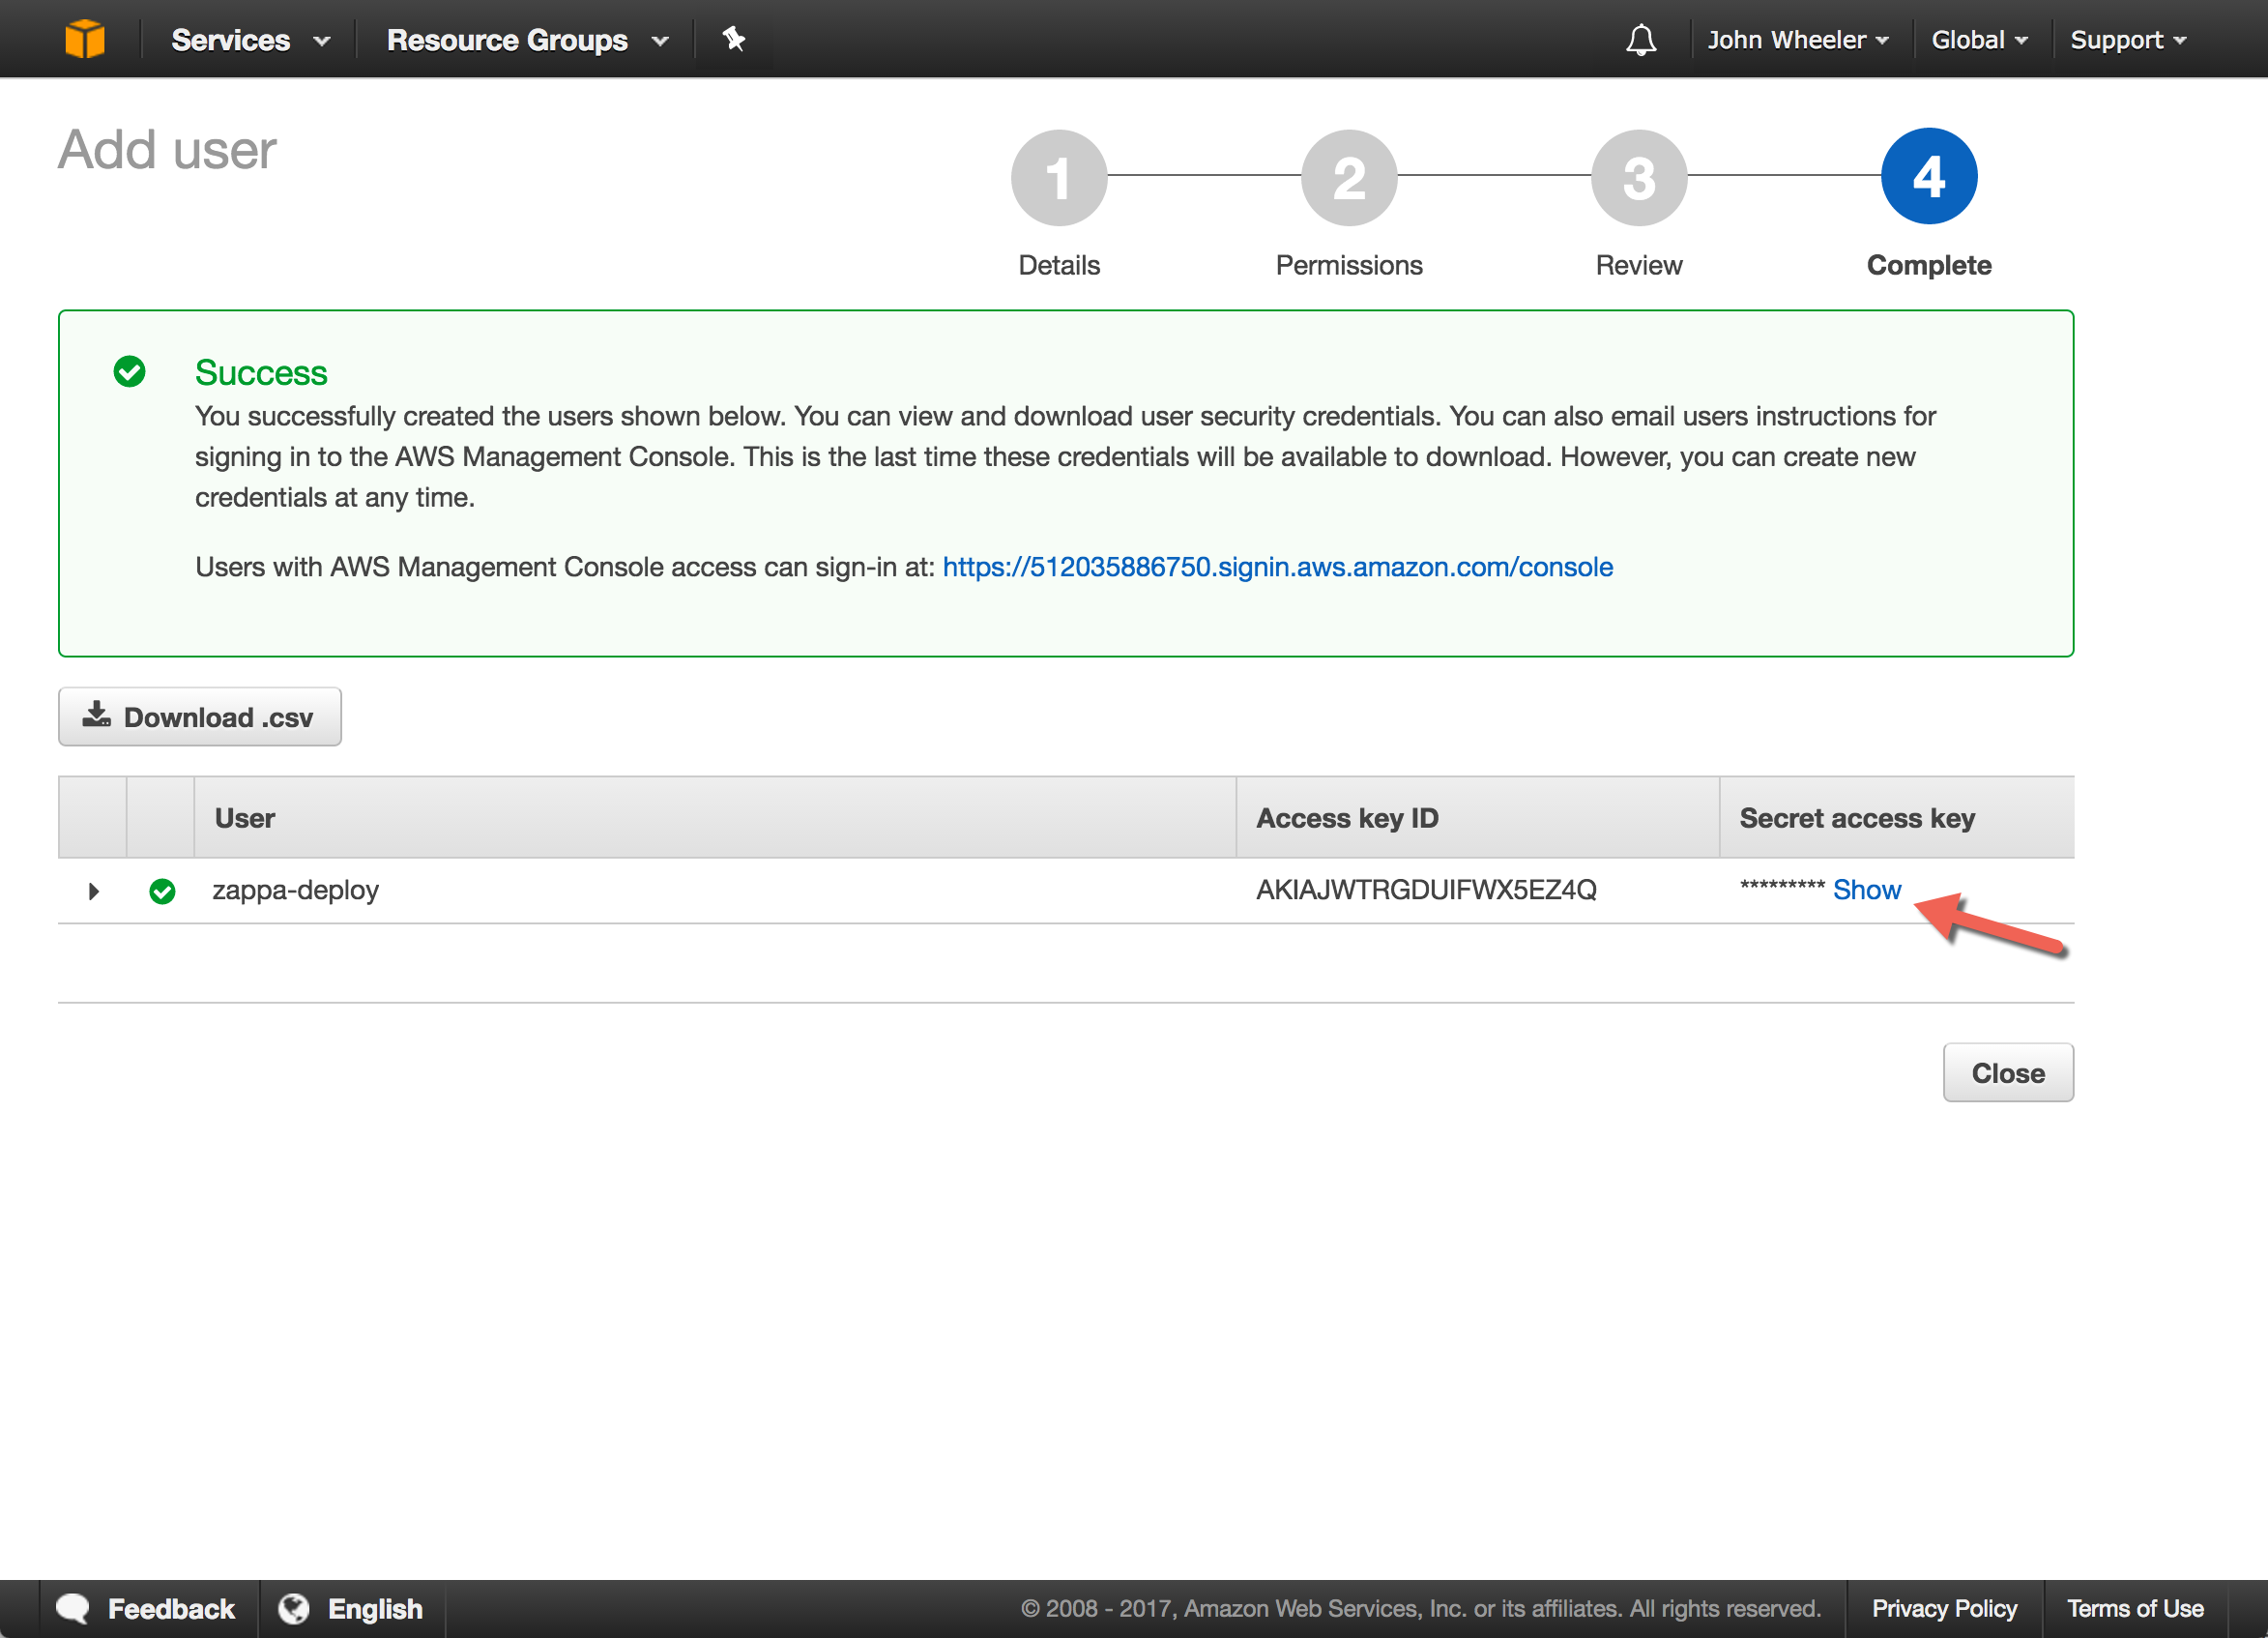
9. Copy and paste these credentials into a safe location for later reference. You will need these in Deployment Step 2. Also, treat these with the same care as you do with your AWS username and password because they have the same privileges.
The IAM user for Zappa has been created.
Deployment Step 2: Configure IAM credentials locally
Back in your terminal, make sure you’re inside the directory repo_stats, then type:
$ aws configure
Follow the prompts to input your Access key ID and Secret access key.
For Default region name, type: us-east-1.
For Default output format accept the default by hitting the Enter key.
The aws configure command installs credentials and configuration in an .aws directory inside your home directory. Zappa knows how to use this configuration to create the AWS resources it needs to deploy Flask-Ask skills to Lambda.
We’re now ready to deploy our skill with Zappa.
Deployment Step 3: Deploy the skill with Zappa
In the terminal, create a zappa configuration file by typing:
$ zappa init
The initialization process is interactive. Accept the defaults to all the questions, by hitting enter for each of the questions.
Once initialization is complete, deploy the skill by typing:
$ zappa deploy dev
The initial deployment process can take a few minutes while Zappa creates API gateways and bundles and uploads the code and dependencies. Releasing code updates doesn't recreate the API gateways and is a bit faster. Such updates are handled through a separate command:
$ zappa update dev
After deploying or updating, Zappa outputs the URL your skill is hosted at. The URL looks similar to this one:
https://mcgalgvft5.execute-api.us-east-1.amazonaws.com/dev
With the code deployed and URL available, we're ready to configure the skill in the Alexa developer console and test it.
Configure the skill in the Alexa developer console and test it
Like creating the IAM user above, configuring the Alexa skill is mostly a point-and-click operation done through a web console. Alexa has its own developer console separate from AWS.
Working with the Alexa console also requires its own separate developer account. First, go to https://developer.amazon.com and click Sign In. If you've never signed in, you'll be prompted to fill out a profile and registration details. Otherwise:
1. Go to the list of Alexa skills
2. Click the Add a New Skill button.
3. The skill configuration screen opens.
Skill configuration is broken into multiple sections. Fill out each section using the instructions below.
On the Skill Information section:
Set the Name of the skill to Repo Stats and use an Invocation Name of repo stats. Accept the defaults for the rest of the section, and click the Next button.

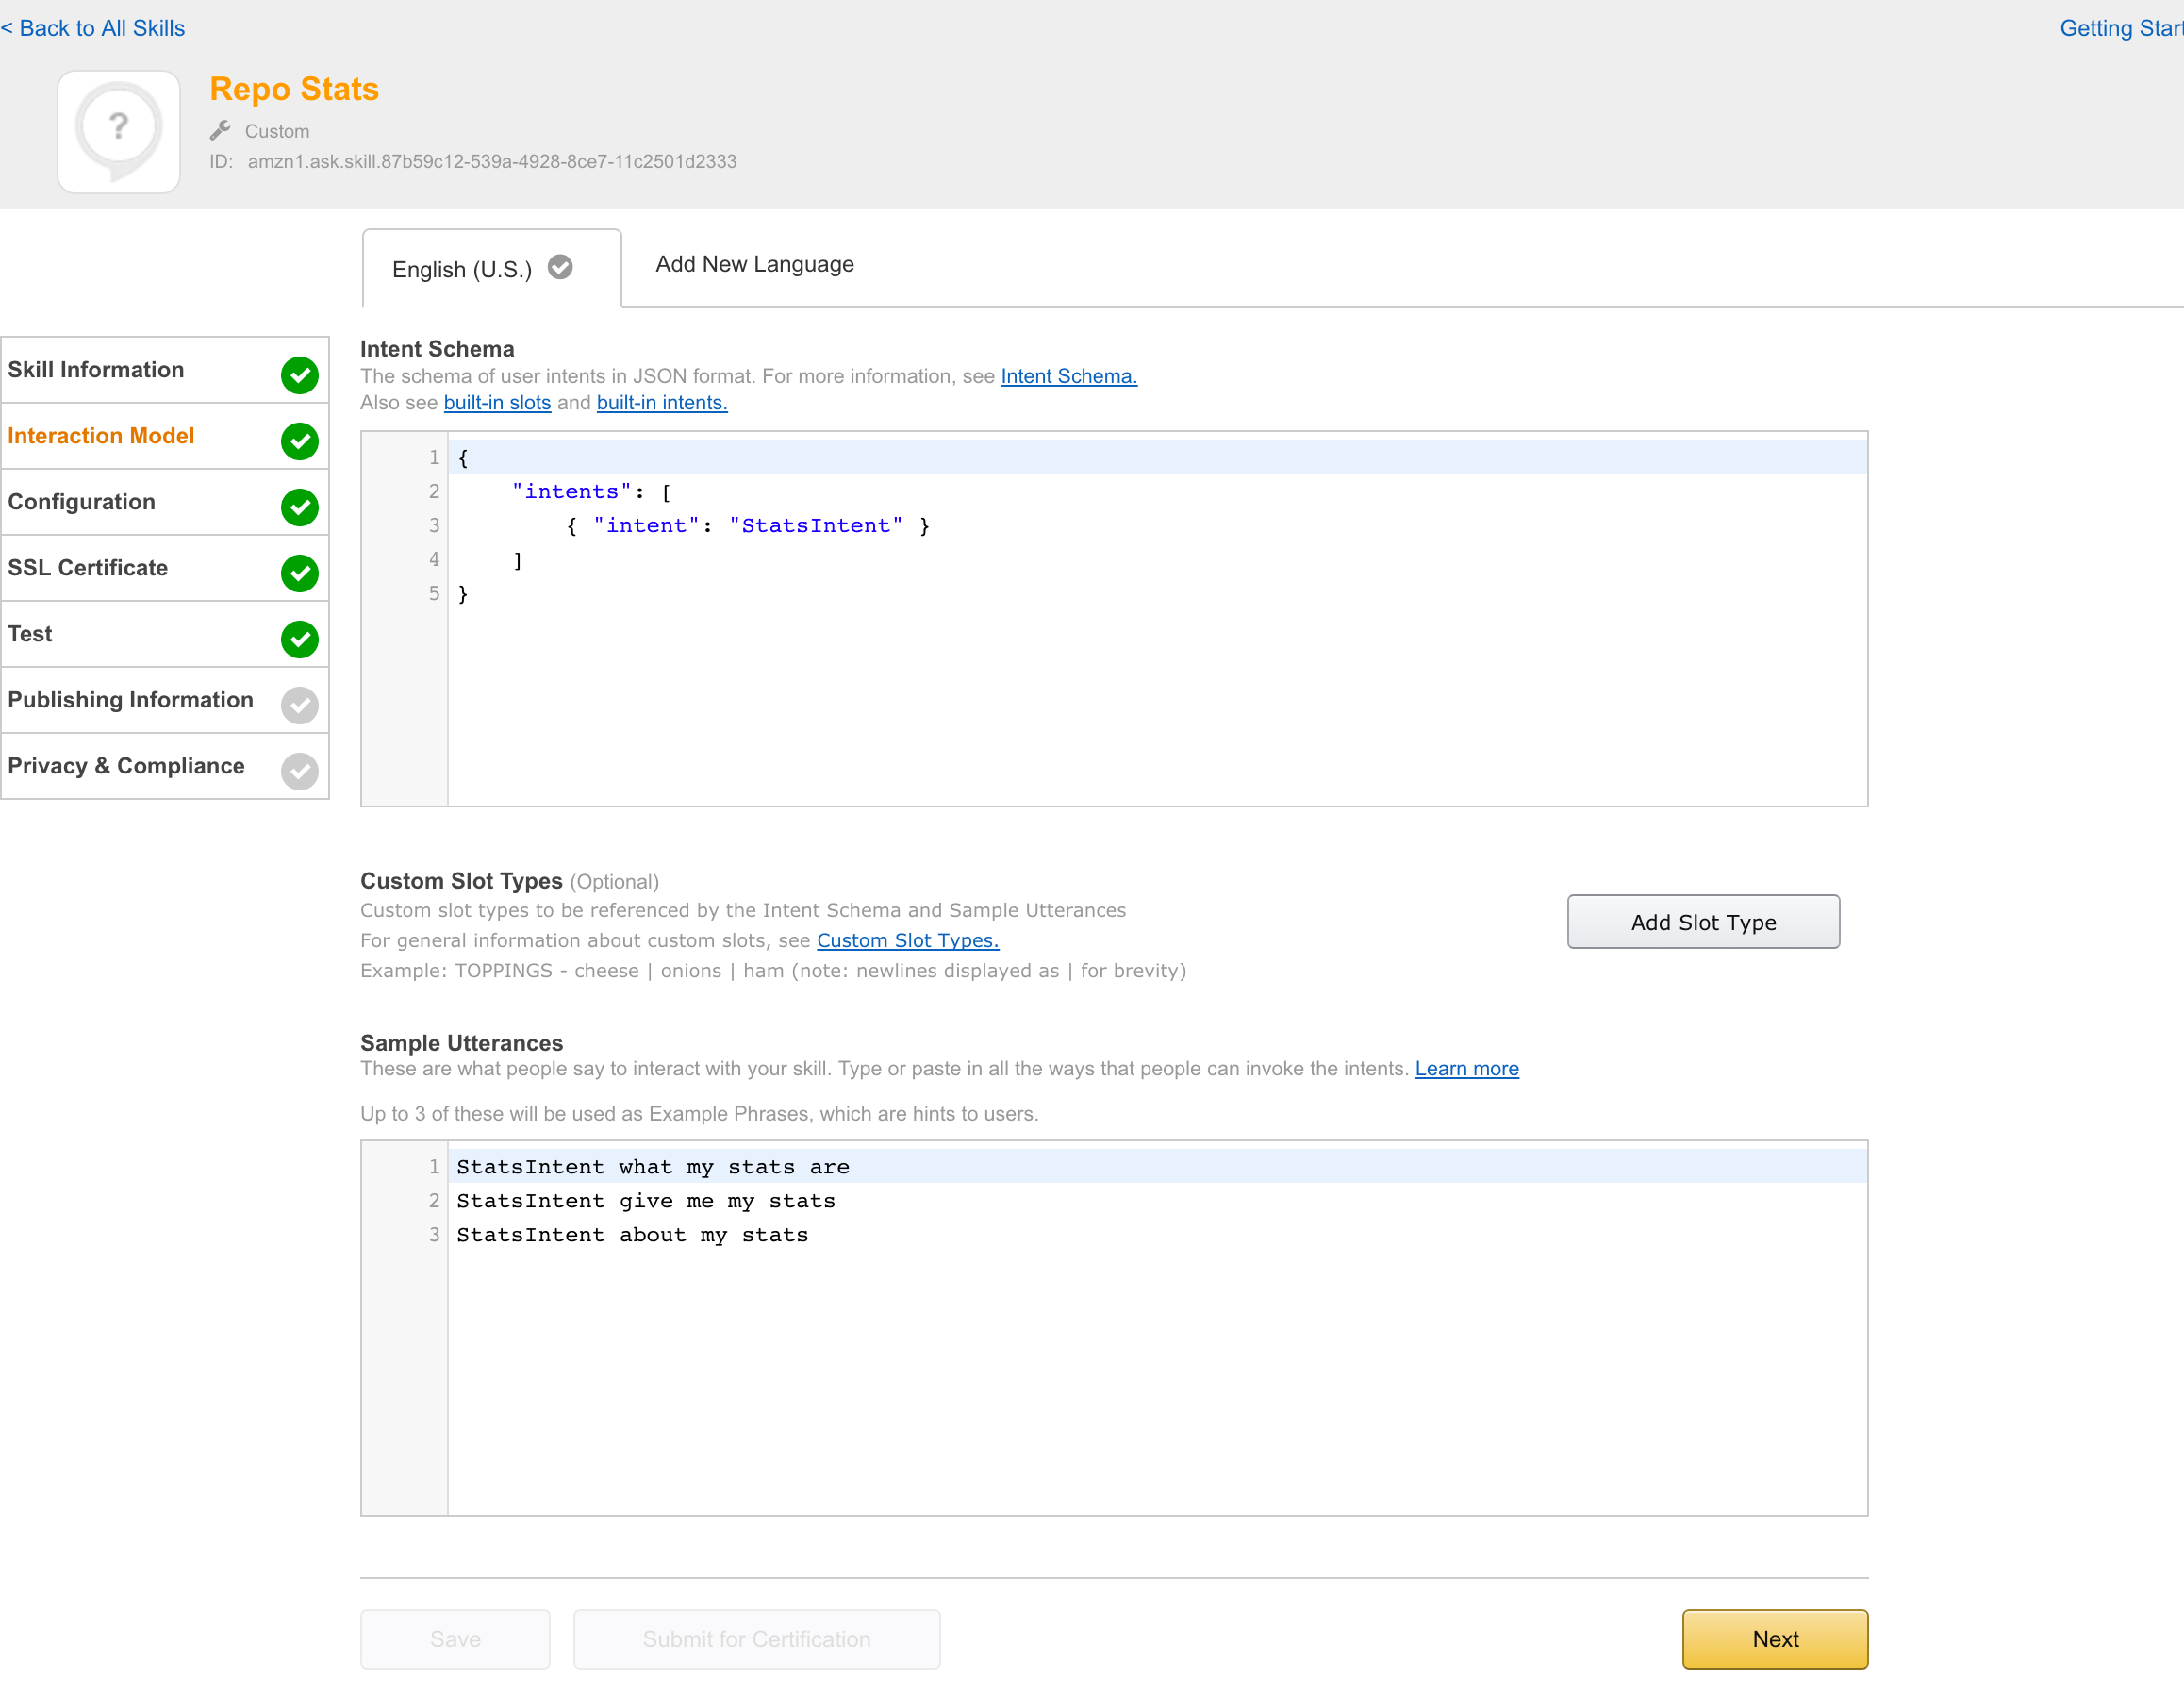
On the Interaction Model section:
Paste in the following Intent Schema:
{
    "intents": [
        { "intent": "StatsIntent" }
    ]
}
StatsIntent what my stats are
StatsIntent give me my stats
StatsIntent about my stats
Click the Next button.
On the Configuration section:
Select HTTPS as the Service Endpoint Type. You might have noticed the other option AWS Lambda ARN seems more appropriate, but since Zappa uses API gateways for WSGI emulation, we're going to select HTTPS here.
Select the appropriate geographical region that is closest to your customers checkbox and enter the URL Zappa output during the deploy step in the text field. Click the Next button.

On the SSL Certificate section:
Select the option that reads:
My development endpoint is a sub-domain of a domain that has a wildcard certificate from a certificate authority
Click the Next button.

The skill is ready to test. Using an Echo device or the Service Simulator available in the Test section, tell Alexa to "launch repo stats". Alexa should respond by telling you how many stars, watchers, and forks the repository has.
Your Alexa skill has now been deployed to AWS Lambda using Zappa.
Other useful Zappa commands
To tail Amazon CloudWatch logs, type:
$ zappa tail dev
You can limit the output returned and eliminate the HTTP noise in the logs by using the --since 1m and --non-httpcommand options:
$ zappa tail dev --since 1m --non-http
If you want to remove the AWS Lambda function, API gateway, and CloudWatch logs, type:
$ zappa undeploy dev
After undeploying, updates no longer work and the HTTPS endpoint in the Alexa console is invalid. You'll have to issue another zappa deploy dev to recreate the Lambda function and gateway. Also, undeploying does not delete the S3 bucket the code is stored in; you must delete it in the AWS console manually.
Final thoughts
Zappa isn't just for Flask-Ask. It can be used to deploy to AWS Lambda with Flask itself, Django, and other popular Python web frameworks that conform to WSGI. In addition, using Zappa makes code more portable; for example, the same Python code running on Lambda can run on Amazon EC2 without modification. For complete Zappa documentation, check out Zappa's extensive README file on GitHub.
That wraps up this tutorial. Congratulations for making it through! You've taught yourself how to deploy Flask-Ask and how to use Zappa, which are technical skills that are useful together and independently of one another. While Zappa is fantastic for deploying to production environments, I wouldn't recommend it for local development and testing. To master that development scenario, head over to the first post where we rapidly create an Alexa skill using Flask-Ask and ngrok.
Happy coding!
Learn more about the Alexa Skills Kit
Check out these Alexa developer resources:
- Alexa Skills Kit (ASK)
- Alexa Voice Service (AVS)
- Alexa Dev Chat Podcast
- Alexa Developer Forums
- Alexa Skills Kit Training
- Advanced ASK Training by Big Nerd Ranch
- Alexa Developers videos on YouTube