Authorize an AVS Device Through Code-Based Linking (CBL)
The instructions on this page describe how to implement code-based linking (CBL), an authorization method optimal for products with limited or no access to character input, such as a television or smart watch.
During product registration, send the user a short alphanumeric code and a URL. On a separate device with access to a browser, the user visits the URL, logs in with their Amazon credentials, and enters the short code to link the product with their Amazon account. After linked their account, the product notifies the user with a splash screen and provides access to AVS.
Process overview for implementing CBL
To implement CBL
- Obtain your client ID and client secret and record this value..
- Post a device Authorization Request
- Direct the user to log in
- Request device tokens
- Exchange the refresh token for a new access token
The following diagram illustrates the exchanges between your AVS-enabled product and LWA to obtain an access_token and refresh_token for use with AVS:

Step 1: Locate your client ID
To locate your client ID
- With your Amazon developer credentials log in to the developer console, select Alexa Voice Service, then either enable CBL for an existing product or create a new product:
- Click Manage to enable CBL for an existing product.
- Click Create Product to create a new product.
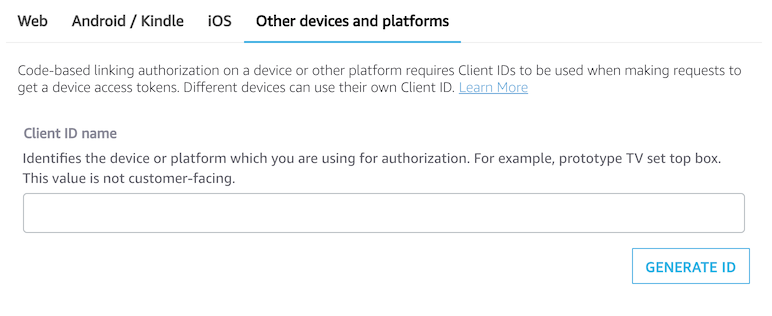
- Click the Security Profiles tab, then select Other devices and platforms.
- Enter a Client ID name, then click Generate ID.
- Save the Client ID somewhere for later use.
Step 2: Post a device Authorization Request
Your AVS-enabled device must make a POST request to obtain the appropriate user code and URL from LWA. If the device receives valid response, display the user_code and verification_uri to the user.
Use the following endpoint for your request: https://api.amazon.com/auth/O2/create/codepair
The request must include the following parameters:
response_type– The expected value isdevice_code, which specifies a CBL request.client_id– The Client ID you obtained in Locate your client ID.scope– The expected value isalexa:all. This specifies permissions for your product.scope_data– Additional JSON that includes product-specific information, such asproductIDanddeviceSerialNumber.productID– The Device Type ID for your product.productInstanceAttributes– an object containing thedeviceSerialNumber.deviceSerialNumber– A key that uniquely identifies this instance of your product. For example, this could be a serial number or MAC address.
The following example shows a scope object before URL-encoding. Use the following sample requests for reference:
    {
      "alexa:all": {
        "productID": "{{productId}}",
        "productInstanceAttributes": {
            "deviceSerialNumber": "{{deviceSerialNumber}}"
        }
      }
    }
Accept-Language header in your request to select the language the login and registration language for your user. Accepted values are: en-US, de-DE, es-ES, en-GB, fr-FR, it-IT, pt-BR, ja-JP, zh-CN. .Sample Request
The following example demonstrates a curl request to obtain an LWA user code and URL:
curl -d 'response_type=device_code&client_id={{client_id}}&scope=alexa%3Aall&scope_data=%7B%22alexa%3Aall%22%3A%7B%22productID%22%3A%22Speaker%22,%22productInstanceAttributes%22%3A%7B%22deviceSerialNumber%22%3A%2212345%22%7D%7D%7D' -H "Content-Type: application/x-www-form-urlencoded" -X POST https://api.amazon.com/auth/O2/create/codepair
Sample response
The response follows the format described by the section 3.4 of the OAuth specification. If the input is valid, the response has the following structure:
{
    "user_code": "{{STRING}}",
    "device_code": "{{STRING}}",
    "verification_uri": "{{STRING}}",
    "expires_in": {{INTEGER}},
    "interval": {{INTEGER}}
}
Response parameters
| Parameter | Description | Type |
|---|---|---|
|
user_code |
The code displayed to the user. The user enters this code during registration. |
string |
|
device_code |
Private code returned in the Device Authorization Response from LWA. |
string |
|
verification_uri |
URL that you present to the user. |
string |
|
expires_in |
Length of time in seconds that the codes are valid. |
integer |
|
interval |
Interval in seconds for time between Device Token Requests. |
integer |
Possible errors
HTTP 400: MissingValueHTTP 500: ServiceErrorHTTP 503: ServiceUnavailable
Step 3: Direct the user to log in
To direct the user to log in
- When your device receives a response to the Device Authorization Request, it must display the
user_codeandverification_urito the user.
For guidance and examples, see Setup and Authentication.
-
The user navigates to the
verification_uriand are instructed to login with their Amazon credentials and enter the provideduser_code. The Code Registration Page implements the User Instruction component of the OAuth specification.
This is a sample registration page. -
After entering the
user_code, Amazon directs the user to a page indicating a successful or failed authentication. If authentication fails, the page provides the reason for failure, such as code already authorized or unrecognized code.

Step 4: Request device tokens
After instructing the user to log in, the device begins polling for an access_token and refresh_token.
Use the following endpoint for your request: https://api.amazon.com/auth/O2/token
The request must include the following headers:
POST /auth/o2/token
Host: api.amazon.com
Content-Type: application/x-www-form-urlencoded
The request must include these parameters:
grant_type: The expected value isdevice_code. This informs the service of the grant type.device_code: The code returned in Device Authorization Request.user_code: The code displayed to the user. The user enters this code during registration.
Sample response
After the user completes the registration flow, the response matches the following structure:
{
  "access_token": "{{STRING}}",
  "refresh_token": "{{STRING}}",
  "token_type": "bearer",
  "expires_in": {{INTEGER}}
}
Response parameters
access_token: The access token.refresh_token: The refresh token.token_type: Bearer.expires_in: The number of seconds the access token is valid.
authorization_pending, slow_down, invalid_code_pair, invalid_client, unauthorized_client. On invalid_code_pair, restart the registration flow.Step 5: Exchange the refresh token for a new access token
When the access token expires or is about to expire, exchange the refresh token for a new access token. If the token exchange fails, the device should retry the exchange with an exponential back-off. Create a new connection with AVS after receiving and updating the tokens. Make a POST to https://api.amazon.com/auth/O2/token with the following parameters in the constructed URL:
grant_type:refresh_tokenrefresh_token: Refresh token.client_id: Client ID.
The response includes the following values:
access_token: Access token.refresh_token: Refresh token.token_type:bearerexpires_in: Number of seconds for which the access token is still valid.
Related topics
Last updated: Feb 26, 2024