Tutorial: Confirm API Arguments for Alexa Conversations
• GA:
en-US, en-AU, en-CA, en-IN, en-GB, de-DE, ja-JP, es-ES, es-US• Beta:
it-IT, fr-CA, fr-FR, pt-BR, es-MX, ar-SA, hi-INIn your Alexa Conversations skill, you can use the Confirm API response act to have Alexa ask the user to confirm the arguments of an API. If the user denies the arguments, Alexa requests the arguments again. For example, in a weather skill, Alexa might ask the user, "You want the weather for {city}, right?"
This tutorial walks you through how to add argument confirmation to the dialog from Tutorial: Annotate a Dialog for Alexa Conversations. The dialog from that tutorial is as follows.
User: What's the weather?
Alexa: For what city?
User: Seattle.
Alexa: In Seattle, it's 70 degrees.
In this tutorial, you expand the dialog to confirm the city argument as follows.
User: What's the weather?
Alexa: For what city?
User: Seattle.
Alexa: You want the weather for Seattle, right?
User: Right.
Alexa: In Seattle, it's 70 degrees.
- Steps to add argument confirmation to an Alexa Conversations skill
- Prerequisites
- Step 1: Add the dialog turns for argument confirmation
- Step 2: Configure the Alexa turn that asks for confirmation
- Step 3: Configure the user turn that provides confirmation
- Step 4: Build the skill model
- Related topics
Steps to add argument confirmation to an Alexa Conversations skill
Complete the following steps to add argument confirmation to a skill:
- Add the dialog turns for argument confirmation.
- Configure the Alexa turn that asks for confirmation.
- Configure the user turn that provides confirmation.
- Build the skill model.
Prerequisites
Before you do this tutorial, you must complete Tutorial: Annotate a Dialog for Alexa Conversations.
Step 1: Add the dialog turns for argument confirmation
The first step is to add an Alexa turn that asks the user to confirm the argument, and add a user response that confirms it.
To add the dialog turns for argument confirmation
- In the developer console, navigate to the dialog you created in Tutorial: Annotate a Dialog for Alexa Conversations.
- Under the dialog, click Alexa says, and then enter
You want the weather for {city}, right? - Click and drag the left side of the Alexa turn to reposition it under the
{city}user turn. - Click User says, and then enter
Right. - Click and drag the left side of the user turn to reposition it under the
You want the weather for {city}, right?Alexa turn. - In the header bar, click Save.

Dialog that includes confirmation
Step 2: Configure the Alexa turn that asks for confirmation
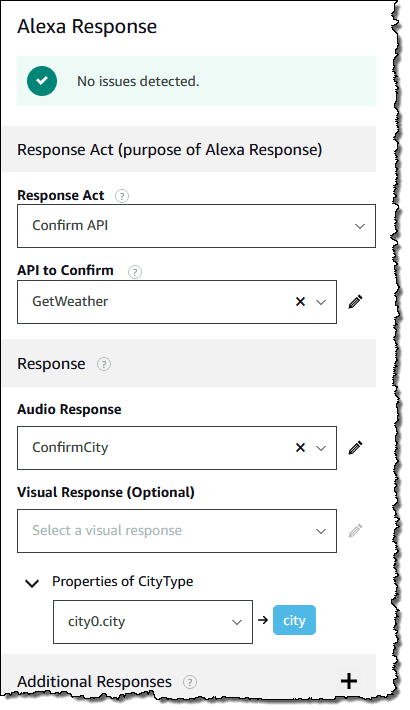
To confirm the argument, you configure the Alexa turn You want the weather for {city}, right? with the Confirm API response act.
You use this response act because you are confirming arguments for a specific API (GetWeather). If you want to confirm API arguments that belong to any API, you use Confirm Args.
To configure the Alexa turn that asks for information
- In the dialog, click anywhere within the Alexa turn
You want the weather for {city}, right?.
An Alexa Response panel appears on the right. - For the response act, select Confirm API.
- For API to Confirm, select GetWeather.
- In the header bar, click Save.
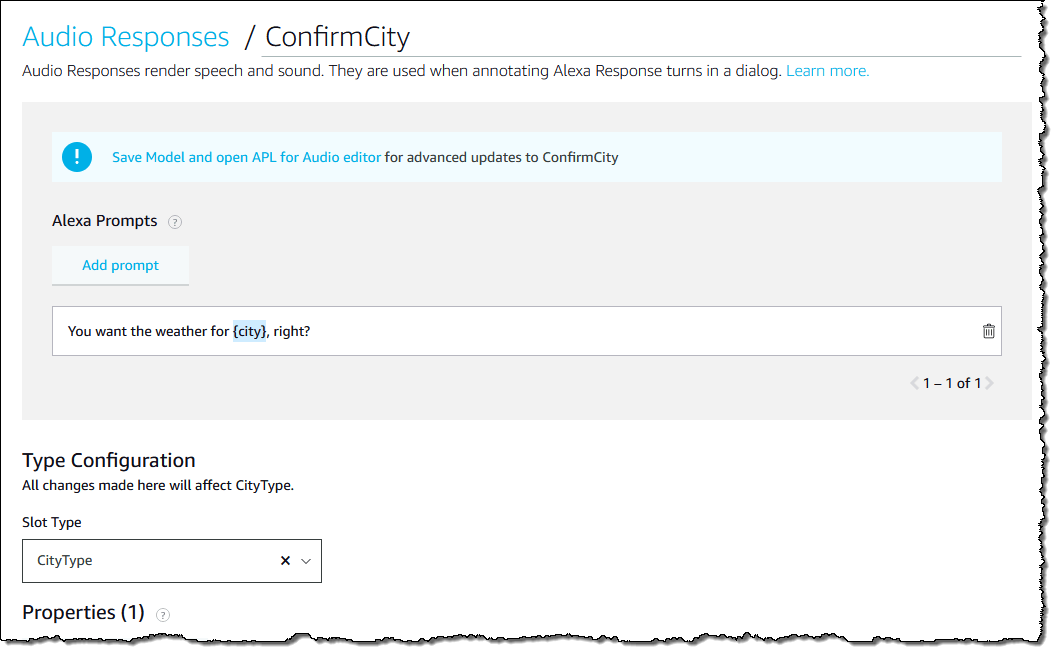
Alexa Conversations automatically creates a response called audioResponse0, which you edit next.
Configuring the Alexa turn that asks for information - In the left pane, under Audio Responses, click audioResponse0.
- In the main window, rename the audio response to
ConfirmCity. - Under Type Configuration, select the CityType slot type that you created.
- Scroll back up to the Alexa Prompts section, and double-click
{city}. - Verify that you see city in the Select an Existing Property section.
(You don't need to click it.) - In the header bar, click Save.
- Go back to your dialog, and click anywhere within the Alexa turn
You want the weather for {city}, right?. - In the Alexa Response panel, at the bottom of the Response section, expand Properties of CityType.
- Configure the variable mapping to the following:
city0.city → city - In the header bar, click Save.
Step 3: Configure the user turn that provides confirmation
For the user turn, you then define an utterance set of request act Affirm that groups together the variety of ways that the user might affirm the argument.
To configure the user turn that provides confirmation
- Click anywhere within the user turn
Right.
A User Input panel appears on the right. - In the User Input panel, under Request Act, select Affirm.
- Under Utterance Set, click the box and then select Create New Utterance Set.
The utterance set configuration box appears. - Name the utterance set
ConfirmCity.
Because you already selected a request act, the request act box automatically populates with Affirm. - Under Sample Utterances, click Add Utterance, enter
Yes, and then press enter. - Repeat the previous step and add sample utterance
Yup, but don't press enter this time.
Ignore the Type Configuration section. There are no variables in these utterances. - Click Save.
- In the header bar, click Save.

Utterance set for the user turn that provides confirmation
Step 4: Build the skill model
Your next step is to build the skill model.
To build the skill model
- In the header bar, click Build Model.
The light Alexa Conversations build begins. If the build fails, click back through all of the lines of your dialog, and ensure that you don't see any red errors. Also, see Issue: I get errors when I build the model.
If the light build succeeds, the full build begins.
Related topics
- Troubleshoot Your Alexa Conversations Skill
- Tutorial: Annotate a Dialog
- Get Started with Alexa Conversations
Last updated: Nov 27, 2023